Do you like the challenge of working on a mechanical clock? This one might have you ripping your hair out. These are not the best clocks to start on and can be a headache for the experienced clock-maker.
You will find Part I of this project here and Part II, here.

In August 2015 I wrote, “This a good project clock that is not for the inexperienced. As I gain more knowledge I will tackle this fascinating clock.” Well the time is now
With a little experience under my belt it time to tackle this vintage circa 1931 Sessions Westminster A chiming clock.
I had removed the movement from it’s case in 2015 to replace a bad click since the mainsprings can be easily removed without dis-assembly. The click holds the tension or power of the mainspring and is identified by a clicking sound when the key is turned on the winding arbour. Although I have not run the clock much since then the click is holding up well.
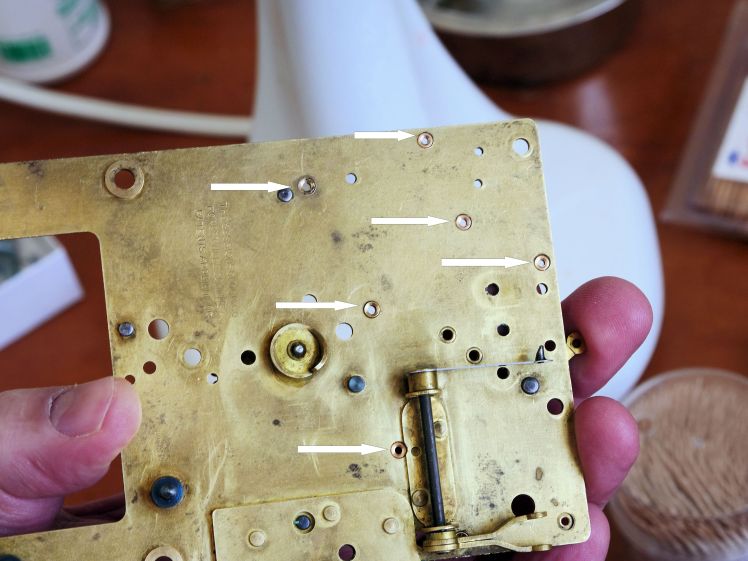
The movement required a total of 17 bushings. There was some movement of the pivots in the pallet arbour bushing holes, not enough to be overly concerning but they were addressed during servicing.
I was unable to pull the centre cam off because I do not have a puller which was unfortunate as the hole might have called for a bushing.


I was also unable to pull the arbour for the gathering pallet pins. It also might have needed a bushing though luckily I was able to bush one end. I mentioned in Part II that parts that are pressure fit on any movement are frustrating when said parts cannot be removed without special tools. Fortunately I was able to hand pull other chiming/striking parts off this movement.


There are two racks on this clock (see photo #4). One rack was missing it’s retaining spring. I made a new one out of brass wire. The clock was not striking properly and this small, seemingly inconsequential part might be the reason.
It shows very well for a vintage 86 year old clock
Between re-assembling the movement and testing of the time side I had an opportunity to address the finish on the case. I used a wood stain to hide scuffs and nicks, applied 5 coats of Minwax Satin Wipe-on Poly using 1500 grit emery cloth between coats to bring up the finish. Although not quite the deep luster of a clock coming out of the factory it shows very well for a vintage 86 year old clock. Purists might argue that I am using a modern finish on a classic clock but I don’t mind since the clock was found in a dusty old barn and cost me only $25.00.
Robert Croswell’s guide for the Sessions Westminster A clocks is excellent
The dial bezel was polished using Brasso.

Five Days Later
The clock has been running for a few days and I am satisfied that the time side is functioning well. I can now proceed with the strike and chime side, following Robert Croswell’s excellent manual.
One Week Later
The time is running well and I am getting a full cycle (8 days+) however I am still having issues with the strike side. It manages the quarter hours as it should, 4 strikes on the quarter, 8 on the half, 12 on the three quarter and 16 on the top of the hour. However it is obvious (to me) that I do not have the hour strike sequence set up properly. Robert Croswell’s guide for the Sessions Westminster A clocks is excellent but I am having difficulty understanding how the racks, and there are two, and the snails, again two, are set up.
Stay tuned, I know I will solve this little annoyance eventually.
Discover more from Antique and Vintage Mechanical Clocks
Subscribe to get the latest posts sent to your email.

What exactly is the issue? Incorrect count?
LikeLike
What is the problem exactly?
LikeLike
I can get the clock to run through the chime sequence but it repeatedly strikes one o’clock. I don’t think I have the snails set up correctly.
Ron
LikeLike
My partner and I stumbled over here from a different page and thought I might check things out. I like what I see so i am just following you. Look forward to looking into your web page for a second time.|
LikeLike
Thanks for checking out my blog.
LikeLike
At this time I am going away to do my breakfast, when having my breakfast coming over again to read additional news.
LikeLike
I guess what you are saying is that you need food because it takes so much of your energy to read more.
LikeLike
constantly i used to read smaller posts which as well clear their motive, and that is also happening with this paragraph which I am reading here.
LikeLike
I noticed that you are responding from Education Online. You may want to look at how to properly construct a sentence. However, thanks for dropping by.
LikeLike
Very great post. I just stumbled upon your blog and wished to mention that I have really enjoyed surfing around your weblog posts. After all I’ll be subscribing in your feed and I hope you write again soon!
LikeLike
Thanks
LikeLike
Heya i am for the first time here. I found this board and I find It truly useful & it helped me out much. I hope to give something back and help others like you aided me.
LikeLike
Thanks
LikeLike
Would you happen to know of any web sources for parts for this clock? I have one of these beauties and am missing the piece that the weight attaches to.
LikeLike
I am sure you mean the rod that attaches to the pendulum. It is called the suspension spring and pendulum rod. They are one piece and it looks like this. The supplier is Perrins in Toronto, Canada.
You would also have to shape a hook at the bottom end to hang the pendulum on.
Ron
LikeLike
Great info! Thanks that’s just what I need. Hopefully the clock won’t need much else to be up and running, it looks in great condition
LikeLike
You are welcome. The length would be just over 5 inches.
LikeLike