
This rather plain, box-like 8-day hour strike Rosewood veneered shelf clock is up for servicing. This is Part II of a two-part series. Go to Part I to read my notes and observations while disassembling the movement and the initial steps required to bring the clock to running condition.
The movement is in reasonably good condition but not without issues. It was running prior to cleaning (though not a full 8-day cycle) so I did not expect any further running issues after servicing and my principal goal was that it would run the full 8-day cycle.
I always take a number of photographs when I disassemble a movement. It is much easier than making diagrams and notes and best for future reference particularly when photos are archived.
During the course of drying the parts I noticed a bent wheel arbor, S2, the second clock with a bent wheel this week
As mentioned in Part 1 a worrisome issue is the build-up of green waxy gunk (old rancid, solidified oil or another lubricant) in several places that have contributed to accelerated wear in the years following 1983. Left in this condition re-oiling would create a liquefied grinding paste that would exacerbate wear. So, not a good thing to leave unserviced.

The lantern pinions, T1/T2 teeth, both ratchets and mainsprings also had green gunk and this leads me to suspect that parts of the movement were sprayed with a water dispersant cleaning solvent such as WD-40 more than once during the intervening years.


Cleaning and servicing
The movement was disassembled and the parts placed in my L&R ultrasonic. The main wheels and mainsprings were done separately, dried using a hairdryer, rinsed and oiled with Keystone mainspring oil. Restraining clamps were re-applied and the parts set aside.

The remaining parts; plates, wheels, levers etc. were placed in the ultrasonic using Polychem Deox 007 degreaser with the heat setting on for 20 minutes then rinsed and dried.
Each part was inspected carefully under magnification. The pivots are in excellent condition with no evidence of wear but there is bushing wear, as expected.
During the course of drying the parts, I found a bent wheel arbour, S2.

Addressing the bent wheel
The bent wheel is likely the result of the strike side mainspring that let go when it broke. Both mainsprings were subsequently replaced by a previous repair. Repair shops will typically replace the time side as a precaution. A bent wheel is a victim of collateral damage when a mainspring breaks, but it is wise to look for broken or bent teeth plus other signs of damage as well. The bent wheel was probably not noticed during re-assembly at that time.
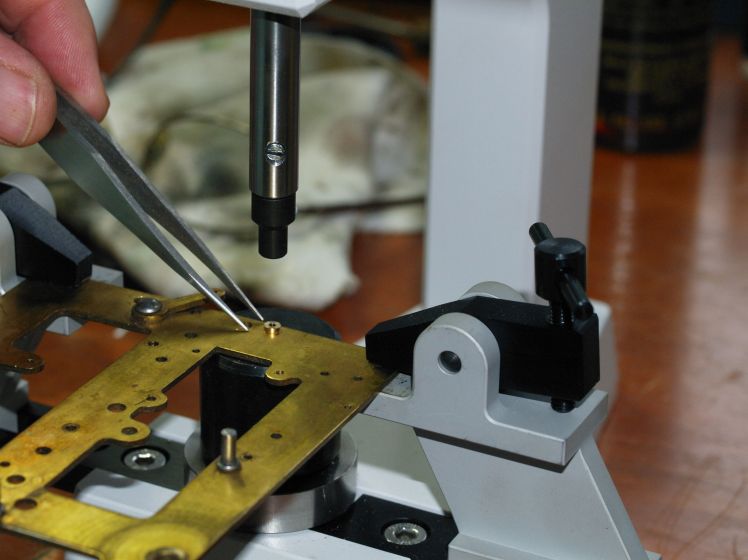
The wheel was placed in the 3-jaw chuck of my Taig mini-lathe. I gave it a few spins to determine how much to straighten and in which direction, selected a punch from my stake set and inserted the pivot arbour into the hole end of the punch and using a trial and error approach gently straightened the arbour. The steel is relatively soft and bends easily.

On to bushing
There are at least two punch marks around pivot holes that will be included in those to be bushed. As for total bushings, I am looking at 6 in total; S3F, S3R and S4R, S5R, T2F and T5R.
If a clock movement is not serviced (cleaned and oiled) routinely there will be wear in the plates of the movement where the pivots come through. Worn pivots are typically found in clocks that have been oiled over and over again and not cleaned. The new oil frees up the abrasive dirt and keeps grinding away at the steel and the brass bushing hole.
Pivots must be cleaned and polished periodically to ensure they can turn freely within the hole in the clock movement plate. A worn pivot hole is easy to observe as they usually are oval-shaped instead of round as you can clearly see in the next photo.

After the pivots were polished it is on to the next phase, installing bushings where necessary.
As mentioned. 6 pivot holes had to be bushed. These movements almost always take 3.5mm wide bushings but one pivot hole was so close to the edge of the plate that I had to use a 3mm bushing and broach the hole to accommodate the pivot. The remaining bushing installation was routine.

With 6 bushings installed, a thorough cleaning and a repaired second wheel on the strike side the movement is now running its full 8-day cycle and should run for many years to come.
Discover more from Antique and Vintage Mechanical Clocks
Subscribe to get the latest posts sent to your email.

You must be logged in to post a comment.