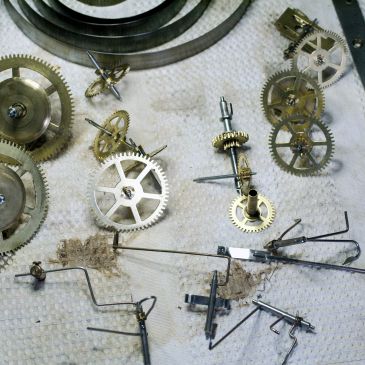
English bell strike servicing Part I – the assessment

In February 2020 my wife was perusing an online auction house looking for interesting bargains and noticed a 170-year-old Scottish tall case offered for bidding.

Over the past couple of years we had talked about acquiring an antique tall case clock but those we liked were either well beyond our reach or required extensive repairs so, here was a unique opportunity.

Though we had only auction photos to go by, the clock looked intriguing and was very much what we had in mind. We began our bidding low and managed to win the bid with a decent and acceptable (to us) price.

Tall case clocks have dropped dramatically in price over the past few years; nobody wants them and they do not fit the modern minimalist lifestyle of the young today. Besides, where would you put it?

Tucked into the corner of the auction house

The clock was not without issues nor did I expect it to be problem-free. The case required some structural work and the overall finish was dull and lifeless.

This article concerns my initial impressions and assessment of the movement prior to cleaning and dis-assembly.

Movement as found

What was I up against in terms of servicing the movement? What kind of issues would I find and did I have the skills to address those issues?

My preliminary assessment involved setting up the movement, connecting the weights, and performing some tests. After putting the clock in beat I managed to have it running for about a day.

while the time side ran well the strike side was another matter. Attaching the weight to the strike side produced a run-on strike until the power was depleted. Hmm, something serious or simply a minor adjustment?

Back of clock showing the crutch, bell, and hammer

While I have worked on dozens of English, German and American time and strike movements, this was my first attempt at an English bell strike. They are relatively easy to dis-assemble and re-assemble but are notorious for being temperamental. The greatest challenge is not the cleaning of the components or the reassembly, it is achieving long term reliability as a dozen parts threaten to hang up, split, or fall apart. Wear combined with scars from old repairs challenge any clockmaker.

First impressions

It is a very heavy movement with 3mm plates and large well-engineered components. These movements were designed to run reliably for years but 170 years and a history of cumulative repairs leaves one with a movement that can fail in many unexpected ways.

Looking at the escapement from above

Problem areas/issues

  • Enlarged pivot holes: I am reluctant to bush every pivot hole but upon inspection at least 3 bushings are required and possibly a fourth.
  • Repaired rack tail: The rack tail takes quite a beating. Once the rack is released during the strike sequence it drops with a bang on the snail. Years of banging ultimately results in a damaged and often repaired tail. The fix on this movement is ugly but the question is, is it robust enough to continue doing its job?
  • Homemade rack tail spring: Made from copper wire; there is too much tension causing the rack tail to strike the snail with too much force. A new rack spring has been ordered. In the meantime, I am using a thinner spring wire.
  • Worn gathering pallet: Assess and determine functionality.
  • Loose clicks: Loose clicks are a common issue with English bell strike clocks. The clicks on this movement are loose though the strike side is a little tighter than the time side. Both are functional. Should they be replaced or will they continue to function reliably as-is?
  • Loose crutch The crutch rod connecting to the escape wheel arbour has been adjusted too many times. It is loose and must be addressed.
  • Stiff Suspension spring: The suspension spring is the incorrect thickness and fashioned from a piece of a metal ruler! There is little amplitude. A new suspension spring assembly, pendulum rod, spike and hex nut have been ordered.
  • Bent rack: If it is soft steel it can be bent back to its original position. If it is hardened steel it could break if I tried to bend it.
  • Loose bell connection: Bell has been removed many times and the thread for the bell rod end where it connects to the cast iron bell, is stripped.
  • Missing seconds hand: Ordered
  • Calendar hand not connected: The movement has no calendar function. The face has a calendar hand and while the movement has no calendar wheel the movement is period correct. Was the movement replaced early in the clock’s life or was the clock originally built and assembled without a calendar function? That will remain one of the clock’s mysteries.
  • The cables are brass and they look old: I will make decision whether or not they should be replaced.
Side view showing the main wheel and the time train

And this ends part I. In the next part, dis-assembly and re-assembling the movement will be covered so, stay with me as we explore this movement further in Part II.

Tall case clock movement testing stand

A clock test stand is an absolute must for anyone that repairs antique and/or vintage clocks. Quite often minor adjustments are required after servicing that can only be made if the movement is on a test stand.

Years ago I bought a test stand from Merritts Clock Supplies. It is called Gene’s test stand and it is both versatile and adjustable. The stand can be used for many mantel and wall clocks. For those wall clocks that have longer pendulums, I designed what I call a movement stand extension that you can see in the photo below.

Continue reading “Tall case clock movement testing stand”

Don’t throw those old clock parts away

Don’t throw that old clock case or movement away. In this article, I will describe how I repurpose/reuse an old ogee clock case and how saving those old clock parts will come in handy someday.

Some time ago I responded to an ad on our local online for-sale site from an individual who had four clocks for sale, all for $20. I had no idea of the condition of the clocks but for the price I couldn’t lose but I knew it would be interesting. So, off my wife and set off for a 30-minute drive north of our home in Nova Scotia. The seller had them spread out on a table in an old barn. They had been stored in an attic for many years and were filthy.

None of them were in great shape but three came with mechanical movements which was worth the price alone.

They are:

  • E N Welch 30-hour Ogee movement and case,
  • Elisha Manross time and strike steeple clock, with 30-hour movement,
  • Ansonia Extra Drop time-only, 8-day wall clock with movement,
  • Waterbury mantel clock, replacement quartz movement.
That ogee case on the left was missing half of its veneer and would never be whole again

I managed to salvage two clocks from this bunch.

The Ansonia Extra Drop is hanging in my office and runs daily. The Elisha Manross steeple clock from 1843 has been cleaned up, serviced, and is now on display. The Manross clock has the distinction of being the only one in my collection with rare brass mainsprings.

A couple of missing pieces but looks good and runs well (reflection between 6 & 7)

Both clocks look great

Elisha Manross 30-hour steeple with brass mainsprings and new right finial & base

The Welch ogee and the Waterbury mantel clock were well beyond the due date they still had use as donor or parts clocks. I removed the brass bezel, strike rod block, dial face, rear door, and hinges from the Waterbury clock and tossed out the case which was not salvageable. Even the veneer could not be reused.

There was quite a bit to salvage from the Welch clock. I took out the movement, cleaned it, and put it aside to be used as a spare Ogee movement. I removed the pulleys, glass, hinges, iron nails, door catch and stripped the case entirely of its Rosewood veneer.

A new door made from the back panel of the ogee
Waterbury shot drop with new/old door

Talk to any clockmaker. Many save parts from clocks beyond repair for future use

Veneer from the ogee was used to make a new finial base for the Elisha Manross steeple clock
A section of old wood is glued to a missing section of the backboard for the Ansonia Extra Drop wall clock

Veneer from the ogee clock was used to cover the finial bases for an old Scottish tall case clock.

Talk to any clockmaker and you will find many that save parts from clocks beyond repair. Conserve, do not throw anything out, it may have a future use as a hard-to-find part for a repair.

Fleet Time company of Montreal – case refinishing and 2 surprises

While refreshing the case of this relatively nondescript mantel clock assembled by a short-lived Canadain clock company I ran into two interesting surprises.

Here is a garden-variety vintage Westminster chime mantel clock from the Fleet Time Company of Montreal (Canada). Many of these clocks were sold at department stores across Canada during the pre-war (WWII) era. However, this little known Canadian clock company had a brief life. Between 1936 and 1940 the company produced a range of two and three-train mantel clocks with movements sourced from Germany but were forced to end their operations.

The Second World War took a heavy toll on this company as the source of movements dried up and so did the company’s fortunes.

Wood cases were made in Canada for some models while other cabinets were imported from Germany.

This particular clock has a Gufa Westminster chime movement and I assume most of their 3-train clocks had a similar if not the very same movement. Gufa is the Guetenbacher Uhrenfabrik, located in Gütenbach, Germany. They manufactured 400-day clocks, cuckoo-clocks and later they became the “Jahresuhrenfabrik” (August Schatz & Sons in Triberg, Germany).

Rather than advertise the maker, many Fleet Time clocks simply had the word “Foreign” stamped on the movements.

This is a clock that could easily have been thrown in the garbage and I am fairly sure that is where it was headed. While I was in the city of Halifax (Nova Scotia, Canada) to pick up an Arthur Pequegnat Canuk kitchen clock the seller took me into his garage, pointed to a clock sitting on a shelf, and said. “for $10 more you can have this one”. “Why not”, I said!

Refinishing the case

I thought I would tackle the case first. While the front of the clock looks okay, the finish on the side sections were down to the bare wood plus scratches on top really detracted from the general appearance of the clock. It was a real mess. On top of that, the left side shoulder section was completely detached and had to be re-glued. Hot hide glue was used for this repair.

The finish was badly worn on both sides

Surprise #1

Rather than reproduce the dark lacquer finish I chose to sand the case down to the bare wood to see what lay beneath. To my surprise, I discovered a nicely grained, and beautifully textured grain. Enhancing the veneer with a light walnut stain is the way I chose to go because I did not want to go as dark as the original finish. Special Walnut, which has a light tone is perfect for the case and if I did not like it I could apply a darker walnut stain over it later.

Choosing the right stain; part of the case is still drying off from a wipe down with a damp cloth

The special walnut is very pleasing to the eye.

Special walnut stain

And the top of the clock.

Top of clock

After two coats of stain (above), here is the result.

After two coats of stain and two coats of shellac

The Special Walnut stain produced a very pleasing result. I applied one more coat of shellac, let it dry, and topped it off with Minwax Polishing Wax to produce a satin finish. Not the finish that came from the factory but it wlooks good.

Surprise #2

After cleaning the chapter ring, polishing the chrome bezel I was ready to return the movement to its case but what I should have done was test the movement beforehand.

When I received the clock I confirmed that the strike and chime functioned as they should and I assumed the time side was fine.

Broken mainspring which is not reparable

I inserted the winding key into the centre arbour and found no resistance. Hmm!

On these movements the barrels can be pulled out without disassembling the movement which certainly simplifies repairs. I pulled out the barrel, popped the back cap off, and discovered a broken mainspring. Using needle-nose pliers and heavy gloves, I pulled the mainspring out with for closer examination. No part of this mainspring is reusable and a new one must be ordered.

Occasionally when a mainspring breaks it takes a few other components with it like broken teeth, broken leaf pinions or bent arbours referred to as collateral damage. I inspected the gear teeth, pinions and arbours on the time train, gave the wheels a few spins and found everything moved smoothly, so, no damage this time. The broken mainspring is the only issue keeping this vintage mantel clock from striking and chiming again.

Mainsprings care easily sourced from a clock supplier. I waited until I built up a list of supplies for other projects then submitted the order online. German and American mainsprings are best and avoid those made anywhere else particularly India.

The movement was placed in a plastic bag along with nuts, hands, screws etc. and stored safely away until the mainspring arrived.

Two weeks later

Two weeks later, out come all the parts from storage.

Using my Olie Baker spring winder and mainspring retention collar I installed the mainspring into its barrel.

Fitting the barrel back into the movement involves moving the strike rods out of the way which is a bit of a pain, then, the barrel slides into a channel on the plate. The movement was returned to its case and the hands attached.

Fleet Time Westminster chime

The strike hammers were re-positioned for the best possible sound and my guess is that the clock is running and chiming for the first time in many years. As of this writing, it has completed a number of 8-day cycles. And to top it off, it looks great!

Let’s see, $10 for the clock $19.50 for the mainspring and less than a few dollars for stain, glue, etc. A satisfying project combined with a piece of Canadian clock history.

A 1847 Elisha Manross steeple clock with rare brass mainsprings

Among American clocks, the name Elisha Manross does not immediately come to mind unlike well-known clockmakers such as Seth Thomas, New Haven or Waterbury. However, Elisha Manross (1792-1856) was an important pioneer of the Connecticut clock.

Brass mainsprings are very rare. It is possible for a clockmaker to go through their entire career without seeing brass mainsprings. Why? Because brass was used for a very short period as a mainspring in clocks. From 1836 to 1850 brass mainsprings were used because steel was considered very expensive. It was not until 1847 that the tempered steel mainspring developed for everyday clocks was introduced and with it, the brass mainspring faded into clock history.

Tempered brass mainspring, American Clock and Watch Museum, Bristol Connecticut, June 2019

Quite often 30-hour time and strike Gothic Steeple clocks such as this one by Elisha Manross (Ca. 1847) have steel mainsprings because the original brass mainsprings broke and were replaced. That the mainsprings in this clock are original and still in excellent condition tells me that this clock did not have a particularly hard life.

Elisha Manross 30 hour movement
Elisha Manross 30 hour movement, as found

My plan is to preserve the brass mainsprings. Some might be tempted to replace them with steel ones. My interest is in preserving the brass mainsprings in this clock because they represents a very important part of the history of American clocks and should be back in the movement where they belong.

Continue reading “A 1847 Elisha Manross steeple clock with rare brass mainsprings”

Time to relax and slow down

It is time to take a little break. It has been a difficult first half of 2020 and we are all feeling the effects of isolation. For many the world-wide pandemic has been an adjustment not only with our daily routine but in our interactions with those dear to us. Hopefully things will change for the better.

The lake

Now, it is time to relax and slow down and for my wife and I that means a change of scenery.

I will be at our cottage in central Canada for most of the summer season spending as much quality time as I can with friends & family. At our summer get-away I plan to relax with a few good books, do a little fishing, swimming, hiking and exchange stories with friends and neighbours over a glass (or two) of wine.

Regular readers know that I typically maintain a steady output of 7 to 9 clock themed articles per month. I have prepared a number of articles in advance of the summer months which means that there will be NO interruption in blog posts.

Early morning fisher

Keep those letters coming. There may be a slight delay returning your email inquiry or responding to comments on blog posts but be assured that any question(s) about your clock or comments regarding any of my posts are important to me and will be answered as soon as I am able.

This blog profiles my own clock collection, the challenges of maintaining and repairing clocks, the joys of finding new and interesting vintage and antique clocks plus many articles of general interest. As we explore central Canada I will no doubt come across some interesting clocks as we forage through antique stores and flea markets. No doubt my summer adventures will produce new clock stories, new repair challenges and perhaps that next major restoration project. I might even include a trip to The Canadian Clock Museum in Deep River, Ontario.

If you are a newcomer to my blog, use the search box to browse past articles and/or click “follow” to have clock articles brought to your mailbox every three to four days. I hope you enjoy reading them as much as I enjoy researching each article.

Renewing an antique clock case in three easy steps

Renewing an antique wood clock case is easier than you think. In this blog, I will take you through three simple steps to revitalize the finish on this fine American 30-hour shelf clock. Let’s begin with 2 assumptions.

Two assumptions

  1. The word “simple” implies that you have done at least some work on clock cases/furniture pieces in the past.
  2. It is also assumed that the clock that is being renewed is intact and requires no structural repairs.
Daniel Pratt reverse ogee and splat clock

This Daniel Pratt Jr. reverse Ogee shelf clock was made in Reading, Massachusetts, around 1838. It has a splat-top between two pedestal type capitals. The mahogany veneered case with half reverse Ogee moldings is dirty but is in otherwise excellent condition. Moldings flank the veneered 2-panel door and a painted wooden Roman numeral dial with a mirrored lower tablet are its standout features. I doubt the mirrored tablet is original.

The case is dark and dirty with years of built-up oil and grime. It was dull and lifeless and has probably never seen a good cleaning. So, let’s get started. You will need a few things.

Supplies

  • 2-3 microfiber cloths
  • A small quantity of traditional shellac
  • Container for the shellac
  • Terry cloth or cotton for French polish pad
  • 400 grit sandpaper and 0000 steel wool
  • Clean-up rags

Step 1 – cleaning the case

A thorough cleaning is the most important step. There is no point in applying wax or any other finishing coat until the case is free of years of dirt and grime.

Grease-cutting dish soap is certainly one option but my go-to cleaner is Murphys Soap. Use it either full strength or diluted with water depending on how deep and stubborn the dirt is on the finish. Use a light coloured microfiber cloth to visualize how much grime comes off. “Elbow grease” is necessary at this stage meaning you may have to work hard to get it clean but be patient, the results will unfold.

In the case of this clock case much of what came off were years of built-up dirt and oils and certainly, some of the original shellac finish. Some areas were down to bare veneer but this is to be expected.

Once the surface is thoroughly cleaned, it is wiped down with a clean damp rag. Allow the case to dry overnight to determine what if anything was missed. The next day if areas still require cleaning repeat the process then, let it dry thoroughly.

Finally, rub the case down with 0000 steel wool followed with a damp cloth and prepare for the next step.

Step 2 – first application of shellac

A modern polyurethane finish is not a substitute for traditional shellac. Shellac is the finish that would have been used at the time the clock was made. Shellac has been around since the early 19th century. What is it? Shellac is a resin secreted by the female lac bug on trees in the forests of India and Thailand. It is processed and sold as dry flakes and dissolved in alcohol to make liquid shellac, and used as a wood finish.

If at all possible avoid canned shellac, it does not produce the same results and has a limited shelf life. If you have no access to shellac flakes check the expiry date on the liquid shellac can.

I use a 1 lb cut which is an 8 to 1 mixture, that is, 1oz of flake to 8 oz of denatured alcohol. It dries very quickly and many coasts can be applied in a relatively short period of time. Shellac comes in a number of shades but amber shellac, which I prefer, employs a warm glow to the finish. I use a French polish to apply the shellac. A ball fashioned out of terry clock is the most effective method of applying shellac. French polishing consists of building up layers of shellac. Moisten the pad in shellac, wipe off the excess and apply in long strokes.

A ball fashioned out of terry clock becomes a French polish

French polishing is a finishing technique that results in a high gloss surface, with a deep colour.

Step 3 – steel wool between coats

400 grit sandpaper can be used for rougher sections prior to the first application of shellac. Use a damp cloth to clean off the residue from sanding and let dry. Otherwise, 0000 steel wool is all that is required to rub out the imperfections on the case after the first application of shellac.  Repeat the process two times and allow for several hours drying time between coats.

The end result after a shellac topcoat

Final comments

Three coats is sufficient. More coats will produce a darker finish if that is what you are going for. If the finish is a too glossy and unnatural dull it down with 0000 steel wool until you have the effect you want.

Finally an application of a quality furniture paste wax will complete the effect. Minwax Paste Finishing Wax is the one I prefer.

Service intervals for antique and vintage mechanical clocks?

It is not uncommon for a mechanical clock to run 25, 30 years or more with nothing more done to it other than the occasional oiling.

How often should a mechanical clock be serviced? It is not as simple an answer as it seems.

In this post, I will discuss what it means to service a mechanical clock and explore some of the factors that influence how long a clock’s movement will last and how to prolong its life. Those factors will help you decide the best service interval for your antique or vintage clock.

Elisha Manross 30 hour movement
A very dirty 30-hour movement from the 1850s

If your clock does not work, cleaning it is the first step in determining the problem. Cleaning is just another word for servicing and the term “servicing” in the realm of professional clock repair implies a complete disassembly of the movement.

Though a common practice in the past, dunking a movement in a solvent and hoping for the best is not a substitute for servicing. Servicing a clock means that it is taken apart, inspected, assessed, cleaned, wear issues noted and damage due to abuse or failed parts is addressed.

What to look for

Normally clocks in my collection are inspected on a 3-4 year cycle. I will open them up and check the condition of the movement and if dry, re-oil. If I notice a particular clock stops occasionally and I find need to investigate, I will service it simply as a prudent measure. Clocks that stop occasionally are sending a clear message they require servicing.

If I notice that I am not getting full power during the clock’s designed running cycle I will investigate. For example, if a clock consistently stops at day 4 or 5 of its eight-day cycle this tells me that the movement might be very dirty or that there are worn parts causing the clock to stop prematurely.

I generally take the movement out of the case for inspection. As I inspect the movement I look for green or black residue around the pivots which indicate a more serious problem. It is at that point that dirt and other contaminants are mixing with the clock oil and producing an abrasive paste. This paste plays havoc with bushing holes and pivots.

The movement must be inspected closely and at a minimum, disassembled and cleaned. Once disassembled I will inspect parts for wear and determine if the wear should be addressed immediately or at some point in the future.

one-weight Vienna wall clock
Miniature one-weight Vienna wall clock stopped and after a cleaning runs much better

Let’s look at some factors that affect wear on a movement.

The clock’s environment

The local environment is the greatest factor affecting the life of a mechanical clock. In today’s homes, humidity and temperature can be controlled very effectively. However, there are always occasions in the year when the windows are open causing humidity to rise in a home. A clock may run faster or slower if there are changes in the home’s humidity as wood and metal expand and contract. Constant temperature and humidity in the home environment will definitely improve a clock’s performance.

Older homes with poor insulation have environments that are more difficult to control especially in kitchen areas where clocks are exposed to higher humidity and particulates from cooking. Clocks in homes with a wood heat stove tend to attract dust (though most modern wood stoves are well sealed) and the presence of pets will shorten the lifespan of clock pivots.

Dog and cat hair in suspension will get into the workings of a mechanical clock by wrapping around the pivots. Eventually, it is the reason the clock requires servicing.

I use an Excel spreadsheet and record any changes I make to a clock in my collection

The amount of dirt and dust (and animal hair) entering the movement is determined by how well the clock case is sealed. There is a very good reason why you should have an access door on the back of your mantel clock and if it is missing it should be replaced. Movements in high quality, well-sealed cases will run many years with minimum maintenance.

U M Muller box clock, and example of high-quality case construction

What are the signs that something is amiss

Spring driven time and strike clocks typically exhibit more wear on strike side pivots due to the hourly striking action. Yet clocks, especially American time and strike ones, will tolerate pivot wear and still run reasonably well if very worn.

It is very common to install many new bushings on an American clock. But sometimes I come across a movement where one side is much more worn than the other. I recently worked on a movement that required six bushings on the time side but none on the strike side. Evidently, a previous owner was bothered by the noise and the strike side was rarely wound.

With chiming clocks, the chime train is first to respond to additional friction caused by dried oils and dirt. The additional complexity of the chime side means that more parts are subject to wear. The chime will eventually slow down then stop altogether.

Fleet Time Westminster chime mantel clock circa the 1940s

If your weight-driven clock stops before its designed cycle, check for twisted cables around the winding drum and ensure that it is correctly in beat. Otherwise, a weight-driven clock does not tolerate pivot wear well and will need to be taken apart to investigate for that and other possible issues.

Sits without running

What happens when a mechanical clock sits without running? Time and environment are the biggest enemy – not operation. The only deterioration on an unused clockwork would be the oil as the oil will thicken and break down over time. Many clockmakers claim that synthetic oil is less prone to breaking down, something to consider for your prized mechanical clock if you do not plan to run it regularly.

Parts that are not moving for extended periods of time tend to fuse, and rust builds up faster particularly in high humidity environments. All mechanical things age better when running occasionally and so my advice is to let parts move from time to time. Run your valued mantel clock at least once per month to give it the exercise it needs.

This Schatz triple chime clock is “exercised” once per month

The environment in my home is controlled, the temperature is constant, the humidity is low and we do not have pets much like a museum environment. Having said that, I continue to schedule a health check on my clocks as a preventative measure.

I use an Excel spreadsheet to track and record any changes I make to a clock including information on service intervals and issues regarding the servicing of each clock in my collection. I want my clocks to last and some I would like to pass on to my children.

Restoring an 1850s Scottish tall clock case – Part II

Restoring the case of an 1850s period Scottish tall case clock with an English bell strike is the subject of this blog. This is Part II of a two-part series. Check out Part I here.

While the case was made in Scotland, the movement, dial and weights are all from Birmingham, England made at or before 1850. The clock was in fair condition when I bought it from an estate auction early in 2020, though I knew almost immediately that structural repairs and cosmetic fixes were necessary. My work was cut out for me.

It is rare to find a clock from this period that has not been subject to minor or even major repairs/changes over the years, some acceptable, others questionable

In Part I, I addressed age cracks, a cracked backboard and attaching a backboard to the waist section. In this, Part II, I will continue with installing new door pins, fashioning a missing right rear foot, cleaning the case and overall case refinishing.

New door pins

Both upper and lower door pins were missing. I considered what I would use as pins. Wood screws could work.

I cut the heads off two 3/4 inch steel wood screws and threaded each screw into the existing holes at the top and bottom of the frame. They are more than strong enough to hold the bonnet access door and appear authentic.

I learned that the poured cement on my basement floor is not level. It took me a 1/2 hour of crawling on the basement floor to find a perfectly level area

Continue reading “Restoring an 1850s Scottish tall clock case – Part II”

Restoring an 1850s Scottish tall clock case – Part I

This is my first experience with a tall case clock from the 1850s and my first venture into English bell strike movement servicing.

Let me explain. Although the case was made in Scotland, the movement, dial and weights are all from Birmingham, England made at or before 1850. The clock was in fair condition when I bought it from an estate auction early in 2020, though I knew almost immediately that structural repairs and cosmetic fixes were necessary.

In this Part I, I will address case age cracks, a cracked backboard and attaching the backboard to the waist.

In Part II, I will continue with new door pins, replacing a missing right rear foot, cleaning the case, overall finishing & attending to various trim pieces.

Although modern adhesives were used for the main structural repairs, some trim pieces were attached using traditional hot hide glue

The first question is how to address present structural issues. Should I utilize materials and techniques that would have been available at the time or select a modern method that would ensure that the part(s) will continue to provide strength, rigidity and service for many years to come? I used both approaches and my apologies to the purists.

As found, standing in a corner of the auction hall

Continue reading “Restoring an 1850s Scottish tall clock case – Part I”

The schoolhouse clock – how it got its name

Older readers growing up in the rural areas of Canada and American have fond memories of the one-room schoolhouse clock located in the front or rear of the classroom. Just how did the schoolhouse clock get its name?

As the teacher instructed the students to work quietly on their own students would look up furtively at the clock anticipating the next recess. Students learned about time, how it regimented the day, how it seemed to move slowly and yet so quickly. Can you imagine the privileged child selected to wind the clock once per week.

Killarney, Ireland pub. The drop fusee wall clock is to the right

With a swinging pendulum visible from a distance, the clock can easily be seen running. The open-door bottom access sash allowed for restarting and adjusting the rate. The vast majority were American clocks though Canada produced its fair share of schoolhouse clocks. Time-only movements were very popular because they had fewer moving parts, noiseless except for the ticking sound, were simpler to maintain and would run well for years even if very worn.

The schoolhouse clock came to be known as a particular style of clock found in school settings. If a particular style was ordered by a school authority manufacturers might have informally described them as clocks for schools or “school clocks”. In any event, the term, “schoolhouse clock” has become part of the lexicon of the clock collector.

Today, the distinctive schoolhouse clock is known as a drop octagon by clock collectors.

Most schoolhouse clocks are 8-day running, constructed of oak, have a brass dial bezel, bottom glazed access sash, 9 or 12-inch dial with the majority being time-only. A time-only clock provides less distraction in the classroom environment than those clocks making a striking sound.

None of the labels on my clocks have the word “schoolhouse” written on them. They are either described as a “drop octagon” or have a specific model name

In some clock circles it is said that schoolhouse clocks are a derivative of the English drop dial fusee clock such as the one seen in an Irish pub in Killarney (above photo).

None of the labels on my clocks have the word “schoolhouse” written on them. They are either described as a “drop octagon” or have a specific model name.

Here are a few schoolhouse clocks from my collection. Enjoy!

Sessions Drop Octagon
Sessions Drop Octagon from a school in Springhill, Nova Scotia (Canada)

Gilbert Admiral with 31-day calendar function, Colchester County, Nova Scotia

Ansonia clock project is complete
Ansonia schoolhouse clock, Berwick, Nova Scotia

Jauch wall clock
German-made Jauch wall clock, 1970s era

“Special edition” clocks inspired by the classic schoolhouse wall clock are still sold today though you will find a quartz movement inside

Brandon II by Arthur Pequegnat, Great Village, Nova Scotia

Waterbury short drop wall clock, Halifax, Nova Scotia

Trio of clocks
A trio of clocks representing 3 time zones, From the left, a Waterbury, New Haven and Sessions

“Special edition” clocks inspired by the classic schoolhouse wall clock are still sold today though you will find a quartz movement inside.

The classroom was not only place for the schoolhouse clock. Many found their way into homes across Canada and the US. My grandparents had a Waterbury time and strike schoolhouse clock in their kitchen that I remember well as a young boy (the preview clock for this post).

Schoolhouse clocks evoke fond memories for the older generation today and fortunately many have been preserved for generations to come.

My antique and vintage clock wish list

Putting together a list of all the clocks I desire really appeals to me. The more I research the antique and vintage clock world the more discerning I have become as a collector.

Most clock collectors evolve as their tastes change and after collecting for more than 10 years I have changed my thinking on clocks I collect. I have also been focusing my collection on specific styles (wall clocks are preferred over mantel clocks) and makes of clocks (Arthur Pequegnat, for example).

A good portion of my wall and mantel clocks were acquired years ago when I was less discriminating as a collector (and some need to go) but in the past couple of years, I have been focusing on exceptional clocks that have historic significance and generally those made before 1900 in an age where better quality clocks were manufactured.

This is my current list including those clocks (indicated) I have acquired:

  • Arthur Pequegnat Regulator #1 wall clock 
  • Arthur Pequegnat Moncton, time-only, double spring 15-day movement ACQUIRED – summer 2018
  • Seth Thomas regulator #2 ACQUIRED – summer 2018
  • English 8-day Fusee gallery clock
  • Ithaca, double dial calendar clock
  • Antique tall case clock, McLachlan clock – ACQUIRED – winter 2020
  • Banjo timepiece, weight driven
  • English lantern clock
  • Jeweller’s regulator with pinwheel escapement
  • Martin Cheney wall or tall case clock
  • English bracket clock
  • American crystal regulatorACQUIRED – summer 2018
  • Vedette wall clock – ACQUIRED June 2019
  • Vienna Regulator (mini) wall clock – one weight ACQUIRED – Fall 2016

The latest is a tall case clock from Newton Stewart, Scotland, circa 1850. My son-in-law has a Scottish tall case clock that is even older than this one. It was brought over by his family in the early 1800s. I have always admired that clock and wished that one day I could add a similar one to my collection. Luckily I was able to pick one up at auction in February of 2020.

Photo of McLachlan clock at an auction house

And, the search goes on for others on my list.

Waterbury York parlour clock – a fresh approach to addressing a non-functioning strike side

Back in December 2019, I wrote about the challenges of adjusting the strike side of this attractive parlour clock, a Waterbury York, circa 1900. Despite many attempts the strike side refused to work. Though I was close to a solution but I did not realize it at the time. I put it aside to think about it.

Attempt #2. Will I be successful? Read on.

A shot of the clock the day I brought it home.

The time side functioned perfectly but the strike side did not run at all when I first brought the clock home. Typically a good cleaning or a simple lever adjustment is all that is required though once I opened the movement up I saw it true colours. I detailed these surprises in my December post.

Continue reading “Waterbury York parlour clock – a fresh approach to addressing a non-functioning strike side”

Search for my past clock articles using keywords

In light of current world events the antiquevintageclock.com family wish to convey our sympathy and condolences to those effected by Covid 19

I receive letters from all over the world asking my advice on a number of clock issues such as how a particular component of a mechanical clock should work, a clock repair challenge, how to address a particular repair or more basic things such as how to find a winding key that fits, how to wind a clock or set a clock in beat.

As comedian Dean Martin once said, “Keep those cards and letters coming”

In the past 4 years, I have authored over 400 articles that have covered a number of areas such as clock history, clock repair challenges and general clock articles but rather than direct questioners to use the search box (Search for clock articles using keywords), located to the right on the main page, I simply answer the question. It usually prompts a dialogue with more questions.

Veneering a cornice on a Seth Thomas shelf clock

Please drop me a line concerning your clock issue or give the search box a try; you might find what you need. One keyword should help in your search.

In-painting a clock dial

As American comedian and actor Dean Martin once said, “Keep those cards and letters coming”.

Sessions electric table clock refinishing – a father-daughter project

In light of current world events the antiquevintageclock.com family wish to convey our sympathy and condolences to those effected by Covid 19

Finish almost completely gone
Finish almost completely gone, right side

My daughter found this vintage Sessions electric table clock, a model 3W and gave it to me as a Christmas gift. It is made, by the Sessions Clock Co. Forestville, Connecticut in 1936 and sold in Canada (a Canadian Standards Approval sticker is on the back).

Left side

On the back, it states that it consumes 2.5 watts, I guess they couldn’t call it model 2.5! It was probably a very affordable clock in its day and available almost anywhere.

At 4 1/2 inches tall and 8 1/4 inches wide, it would fit on any countertop, bookcase etc. but it lacks an alarm it would not be a suitable bedside table clock. There is only one control in the rear, a push-and-twist-in knob that sets the time. Pretty simple!

On the workbench
Stripping the finish

Everything else, the face, hands, brass bezel were in great shape but the finish on the case had almost completely worn off. It is one block of wood and likely pine and likely tinted lacquer.

My daughter and I chose to work on the finish together. We stripped the case down completely and applied a light walnut stain. Several coats of shellac followed by sanding with 0000 steel wool between coats and finishing with paste wax completed the project.

New and improved 3W

The result is a richer, darker finish, more in keeping with the original. Given that it runs so well a refinish is a complement to a very simple but stylish desk clock.

Tick Talk Tuesday #24 – key required for family clock

In light of current world events the antiquevintageclock.com family wish to convey our sympathy and condolences to those effected by Covid 19

Tick Talk Tuesday #24 – key required for family clock.

Tick-Talk Tuesday is about the letters and comments I have received from you, the reader, concerning your clock, issues you might have had, challenges you face or a clock you would like me to profile and my responses to your questions with advice on your particular clock concern. For those comments and questions that stump even me, I consult within my clock circles for the best possible answer

DM from Colorado writes.

“Dear Ron,

I hope you can help me. I have become in possession of our old family clock that my great grandfather brought for the old farmhouse. The clock is working but I do not have a key. I was hoping that you could sell me the right key to fit the clock. What I can read from the back sticker is ” Regulator H” and there may be another letter after that. “The sessions clock company of Forestville Connecticut.”  Attached is the photo, any help would be great.

Continue reading “Tick Talk Tuesday #24 – key required for family clock”

Canada Clock Co. – a frustrating movement

In light of current world events the antiquevintageclock.com family wish to convey our sympathy and condolences to those effected by Covid 19

Original time and strike 30 hour movement

The movement in this Canada Clock Co. time and (hour) strike cottage clock from the late 1880s is a mess but fixable. Some past repairs are acceptable while other leave a lot to be desired.

I’ll begin with the issues. “Repaired” mainsprings, nuts on a copper wire fashioned as a gong hammer and string “helping” the helper springs are things you really don’t want to see on a movement. The time side runs reasonably well but the strike side does not function, likely the result of fiddling with levers too many times.

clever, but dangerosu way of repairing the mainspring

The second mainspring, another “iffy” repair

Home-made copper wire and two nuts serve as the gong

String used to connect a broken helper spring

In the clock business you must always expect the unexpected. While I awaited parts, I went about cleaning the parts and bushing work .

This is perhaps the most frustrating 30-hour movement I have ever worked on

The parts arrived and included a new gong hammer, two new mainsprings and brass wire for new helper springs.

New 30 hour mainspring

New hammer gong and lever with helper springs installed

I began by installing the new hammer. Using my mini lathe I drilled a new access hole in the hammer arbour. I measured the diameter of the hammer rod and used a HSS bit to drill through the centre of the arbour. It was a reasonably good fit but to ensure a permanent hold I applied a drop of thread-locker.

The levers look like a twisting mess but there is a logic to the arrangement

This is the first 30-hour shelf clock I have worked on without a discernible warning action and it made for tricky lever positioning. Perhaps there is warning but I just could not see it. Though the levers look like a twisted mess there must be some logic to the arrangement.

The above photo shows the left side lifting lever that must be precisely adjusted and curved for the centre cam to push the drop lever over the count wheel cam to actuate the strike. The count lever blade must also line up exactly with the centre of the count wheel and precisely in the middle of the deep slot. As far as I can determine the lifting lever is the only one of the two levers that require a helper spring but I will know more after further testing.

All in all, this is one of the most frustrating 30-hour movements I have ever worked on. The movement was taken apart several times for various adjustments. I worked at for a while, left it, thought about the next steps but despite my best efforts, that strike side continues to elude me. The time side, however, works perfectly.

Some day I will have it working but for now it is on display.

Is this a German box clock?

In light of current world events the antiquevintageclock.com family wish to convey our sympathy and condolences to those effected by Covid 19

A different looking box clock

Is this a German box clock? It certainly appears to be a typical time and strike German box clock with the addition of finials. I discovered it behind a bar at a resort in Varadero, Cuba before Covid19 scared us all into our homes.

I have two box clocks in my collection, one is this Mauthe clock from the 1930s but most box clocks I have seen are relatively plain-looking and unadorned. Finding one with finials is a bit unusual.

German "box" clock by Mauthe
German “box” clock by Mauthe

It might have been made by a number of German companies, Mauthe, Kienzle, Gustav Becker, or HAC but definitely German. I cannot see any markings on the dial or anywhere that might tell me what it might be. But those finials. Were they added later on? Who knows.

I am always on the lookout for interesting clocks during my travels and hopefully, in the months to come, my wife and I can resume our travelling once the current world health crisis subsides.

The ultrasonic cleaner – is it essential for clock repair?

In light of current world events the antiquevintageclock.com family wish to convey our sympathy and condolences to those effected by Covid 19
Ultrasonic cleaner by L&R
Ultrasonic cleaner by L&R, model 140

Is the ultrasonic cleaner indispensable for clock repair? The short answer is “no”. I know many in clock repair who hand clean clock movement parts, have had good success over the years and are not about to change their ways.

In my view, there are so many advantages to having an ultrasonic cleaner you will wonder why you did not have one in the first place. Indeed, these are many reasons why the ultrasonic cleaning system is widely used across many different industries.

Follow me as I explain why the ultrasonic cleaner can help you with the cleaning of most clock movements.

What is an ultrasonic cleaner?

An ultrasonic cleaner is a machine that comes in various sizes and used to clean many things. Ultrasonic cleaning uses cavitation bubbles induced by high-frequency pressure (sound) waves to agitate a liquid. The agitation produces high forces on contaminants adhering to substrates like metals, plastics, glass, rubber, and ceramics. This action also penetrates blind holes, cracks, and recesses.

The result is very fast and effective cleaning.

20 minutes is usually sufficient

What to clean and what cleaner to use

Most brass and steel clock parts can be cleaned. Leave out leather hammers and any specific items you do not want to be exposed to a liquid. Although plain water does work, whenever possible, it is best to use a water-based detergent in the ultrasonic cleaning process. Water-based solvents are nontoxic, nonflammable, and environmentally friendly. In the absence of commercial water-based detergents, a few drops of Dawn will do.

What not to put in an Ultrasonic cleaner

Never use any kind of flammable liquid in an ultrasonic cleaner; it is plainly dangerous. Liquids with relatively low vapour pressure (ie. lower boiling points) may nebulize or convert to a small spray when exposed to cavitation in an ultrasonic bath. This means tiny mist-like droplets will be dispersed into the air, somewhat akin to an ultrasonic humidifier. These droplets combine with air to create a perfect storm for combustion. This includes flammable liquids in sealed plastic or open bags or containers, glass etc..

As a general rule, there is no safe way to use flammable liquids in any stage of clock repair. Avoid flammable liquids altogether in an ultrasonic or even when cleaning by hand.

L & R is a reputable brand; this one has a drain and a heater

Ultrasonic cleaning works

I use an ultrasonic cleaner when I clean most clock movements because of the precision and thoroughness of the process. There is nothing I know of that cleans lantern pinions better than an ultrasonic cleaner.

In the main tank, I use hot water with Deox 007 mixed with water. Deox 007 is a biodegradable, non-toxic, mildly acidic, de-oxidizer and de-greaser which has a slightly slippery feel, meaning the surface tension is low and will transmit sound easily. Using hot water also speeds up the degassing process. If your ultrasonic cleaner has a heater, use it. Note that water/liquid which is too hot will strip lacquered parts.

If the movement is particularly dirty, a pre-cleaning with degreasing soap (dish detergent) and water is recommended.

Generally, a 15-20 minute time period is all that is required to thoroughly clean a dis-assembled movement. Machines have various output powers so timing may have to be a bit of an experiment for your particular machine.

Dial removed showing time and strike movement
Dial removed showing time and strike movement in as-found condition

Clock parts must be rinsed in a bath after a period of time in the ultrasonic, so the “dirt” in the solution is not a big concern. I wash dishes by hand and by the end of the task the water in the sink is sometimes pretty nasty, that’s why rinsing dishes is important. The bath can be simply warm water or a special rinsing solution. I use two bathes of warm water.

After cleaning in an ultrasonic cleaner; the difference is noteworthy

The drying phase is critically important. All parts must be dried immediately after the cleaning and rinsing process. Rust forms very quickly on steel parts. I use either a hairdryer or time my wife’s baking and leave the parts in the residual heat of the oven, usually for about half an hour or so.

Methods may differ but I take the liquid out of the ultrasonic cleaner after each use and store it in a plastic jug. I have a fairly small US so when the liquid gets too dirty I filter it through some coffee filters. And by dirty, I mean a very dark brown. When I perceive that it isn’t cleaning effectively I just dump the liquid and refill. Since the cleaning liquid is biodegradable I pitch it on the back lawn.

Exceptions to the rule

Aluminum parts with ammonia-based cleaners will turn brass dark. Personally, I feel ammonia can be harmful to both brass and humans and I would be very careful. The ammonia combined with the overcleaning of the ultrasonic and the wrong solvent will start by differentially dissolving the zinc from the surface of the brass leaving a washed-out pitted surface. However, having said that, if you research ammonia on clock forum sites it’s still not clear who is right on the issue.

I would also not put floating balance escapements or hairsprings in an ultrasonic cleaner.

Old hammered brass movements are much more fragile and sensitive to both chemicals (ammonia especially) and the impact of ultrasonic cleaning. Since old brass, which is very porous, does not take kindly to being placed in an ultrasonic cleaner this 175-year-old English bell strike, for example, was cleaned entirely by hand.

Scottish tall case clock with English bell strike movement

Final thoughts

Can you get by without an ultrasonic cleaner? Absolutely! However, unlike other tools in your clock repair arsenal, the ultrasonic cleaner is one that not only will save valuable time but may produce spectacular results.

Although an ultrasonic cleaner is a labour-saving device, it is not a panacea. It will make things clean, but it won’t make everything look like new. If the metal is very tarnished, nothing that I know of will remove that oxidation, aside from fine abrasives.

If your budget allows, It is worth spending money on an ultrasonic cleaner.

Plate clock movement – simple but finicky

In light of current world events the antiquevintageclock.com family wish to convey our sympathy and condolences to those effected by Covid 19

German-made time-only plate clock movement

Small shelf clocks of the 1930s from BlackForest Clock Co. of Toronto shared a simple German-made time-only movement across the line. The movement has tiny wheels and pivots plus a clever twisting pendulum rate adjuster.

Continue reading “Plate clock movement – simple but finicky”

Session Electric clock model 3W – refinishing the case

In light of current world events the antiquevintageclock.com family wish to convey our sympathy and condolences to those effected by Covid 19

The only exception to my collection of mechanical clocks is this vintage Sessions electric auto-start table clock, model 3W, made by the Sessions Clock Co. Forestville, Connecticut in 1934 and sold throughout Canada (Canadian Standards Approval sticker on the back).

I wrote about this clock at the beginning of this year (2020) and have time to focus on the case.

Sessions 3W electric table clock
Sessions 3W electric table or shelf clock

From the front, it doesn’t look too bad but the side view reveals much of the finish has worn off over the years

On the back, it states that it consumes 2.5 watts of electricity. I suppose the manufacturer could not call it model 2.5. it was a very affordable clock in its day and available almost anywhere.

At 4 1/2 inches tall and 8 1/4 inches wide it would fit on any countertop, bookcase, desk or bedside table though it does not have an alarm. It is time-only with an Arabic dial and a sweep second hand. Having a sweep second-hand means that at a glance you can see that the clock is running. There is only one control in the rear, a spring-loaded push-and-twist-in knob to adjust the time.

Continue reading “Session Electric clock model 3W – refinishing the case”

Pequegnat gingerbread clock and dial inpainting

In light of current world events the antiquevintageclock.com family wish to convey our sympathy and condolences to those effected by Covid 19

In this article, I will describe the steps taken to inpaint and restore the dial of an Arthur Pequegnat time and strike gingerbread clock.

But first, what is inpainting? And what does it have to do with clock dials?

Inpainting is a dial restoration or conservation process where damaged, deteriorating, or missing parts of a dial are filled in to present a complete image.

And what does the term dial restoration mean?

Dial restoration includes adhering loose flakes, filling areas of loss, cleaning, colour matching, repairing graphics, inpainting of decorative artwork and sealing. Some dials are easier to work on than others but generally speaking American antique clocks dials are good candidates. Dial inpainting can be hit and miss, and the final results can range from fair to excellent.

Here is an earlier project. The before photo shows the significant losses on the dial of an 1850s Seth Thomas column and cornice clock.

Before inpainting

And, after inpainting. In this example, restoring the floral spandrels and the chapter ring was the most challenging part of the project.

Working on a clock dial

I was pleased with the final result though these dials are among the easiest to work on.

After: Seth Thomas dial, column and cornice clock

Now let’s turn to a circa 1918 Arthur Pequegnat Canuck time and strike gingerbread clock. There was considerable paint loss, numerals in a script that is a challenge to reproduce and a chapter ring consisting of small dashes with a 4-dot pattern every 5 minutes. To make matters worse, a previous owner had made an attempt to paint in larger sections of the dial.

Given its poor condition, I was initially tempted to buy a replacement dial; $50.00 for paper-on-tin and $4.00 for a paper dial plus tax and shipping. However, I decided to attempt inpainting.

My supplies, which I have on-hand, consisted of:

  • Level 3 – 10/0 spotter artist’s paintbrush
  • #2 artist’s paintbrush
  • A selection of satin finish water-based acrylic paints; white, yellow, red, and blue
  • Black paint for numerals
  • Pitt artist’s pen, fine tip
  • Pencil eraser
  • Toothpicks for mixing paint
  • Q-Tips to remove over painted areas and polish brass bezel
  • Woodblock

Supplies

Occasionally I use a pencil eraser to remove dirt around the centre and winding arbour hole holes. It is very effective at removing years of dirt and grime.

White is the base paint. Others colours are mixed to replicate the aged finish. There is no magic to this. It takes trial and error to match the dial colour which had yellowed considerably over the years. An exact match is more luck than skill and there are a thousand shades of off-white. I suggest painting in warm light or natural light for best results. Arriving as close as possible to the aged finish was my objective.

The numbers were in reasonably good shape and it takes a steady hand to fill in the missing sections especially the dashes on the chapter ring. For very thin lines, I use a black artist’s pen with a fine tip.

Before and after

Of course, upon close examination, you can see the infilled areas and the touched-up numbers but from average viewing distance, it is difficult to tell.

About 1/2 meter away (the case had been cleaned earlier).

While I was working in the dial I cleaned the brass bezel with Q-Tips and Brasso.

Before (inset) and after

There are some dials I leave as-is since the age and patina of the dial is an important part of the character of the clock but if it is too far gone, as in these examples, inpainting is certainly an option.

All in all a very satisfying project. Now on to servicing the movement.

My collection of Arthur Pequegnat clocks

In light of current world events the antiquevintageclock.com family wish to convey our sympathy and condolences to those effected by Covid 19

There are a fair number of Canadian clock enthusiasts that have various sized collections of Pequegnat clocks. Skip Kerr‘s extensive collection immediately comes to mind.

Although my collection is modest by comparison with just eight Arthur Pequegnat Canadian-made clocks they cover a range of models from kitchen to wall clocks.

The Arthur Pequegnat Clock Company was in business in Berlin, later renamed, Kitchener, Ontario (Canada) from 1904 to about 1941. Pequegnat clocks are well known among Canadian Clock collectors. Many are still running today and they can be easily found on local and national online for-sale sites and you might even find them on the northern border states of the US.

Here they are; I will let the captioned photos speak for themselves.

Arthur Pequegnat Maple Leaf kitchen clock, otherwise known as the “Fan top”

Restored Athur Pequegnat Bedford mantel clock
Arthur Pequegnat Bedford mantel clock (variant with larger dial)

Arthur Pequegnat Simcoe mantel clock
Arthur Pequegnat Simcoe mantel clock, Berlin period

Arthur Pequegnat Canadian Time (time-only) wall clock

Arthur Pequegnat Brandon (second version)

Arthur Pequegnat Canuck kitchen clock (otherwise known as a gingerbread clock)

Arthur Pequegnat Kitchen clock, Maple Leaf, otherwise known among collectors as the “pointed top”

Arthur Pequegnat Moncton, double spring time-only 15-day clock, post-Berlin (after 1917)

My journey goes on as I continue to purchase Pequegnat clocks adding them to my collection. I have yet to secure a tambour style clock and a Regulator #1 is certainly on the top of my list.

Fleet Time Company of Montreal – Westminster chime mantel clock

In light of current world events the antiquevintageclock.com family wish to convey our sympathy and condolences to those effected by Covid 19

Here we have a nondescript mantel clock from the Fleet time Company of Montreal. This little known Canadian clock company had a short life between the years 1936 and 1940 producing a range of two and three-train mantel clocks with movements sourced from Germany. All clocks had pendulums and were spring-driven. According to business records, the company was listed as an importer of clocks and watches. The locations were 440 McGill and then 303 St. Paul West, Montreal (Canada).

The Second World War took a heavy toll on this company as the source of movements dried up and so the future prospects of this small company (information obtained from the Canadian Clock Museum, Deep River Ontario). One wonders why they did not diversify and source movements from France and Germany like the Forestville Clock Co. of Toronto during the war years.

Wood cases were made in Canada for some models while other cabinets were imported from Germany.

Gufa chime movement

This clock has a Gufa movement and one can assume most of their 3-train clocks had this movement although some movements are marked “Foreign”. Gufa is the Guetenbacher Uhrenfabrik, located in Gütenbach, Germany. They manufactured 400-day clocks and cuckoo-clocks and later they became the “Jahresuhrenfabrik” (August Schatz & Sons in Triberg, Germany).

Battered company plate, simply says “Fleet Clocks”

Close-up of foil plaque

The movement does not work because the time side mainspring is broken. The case is in bad shape and I am not sure how I will proceed but it is beyond simply cleaning, touching up and polishing. At this point, the only option is stripping. I am always reluctant to strip the finish from an old clock unless it is the only option. In any event, the case will be a late spring (2020) project.

The case needs a lot of work

This is another Canadian clock added to my clock collection although the fact that it was assembled and sold on Canadian soil is its only real qualification.

Dating an antique Gothic Steeple Manross clock

Hi readers, in light of current world events the antiquevintageclock.com family wish to convey our sympathy and condolences to those effected by Covid 19

Dating a clock can be a challenge and often an estimate within a range of dates is the best that can be accomplished. Dating some clocks can be relatively easy as in the case of this Sessions Beveled Number 2 tambour style time and strike. Inside the back access door, it is stamped Sept 1927, the date of manufacture.

Further research about the clockmaker, the movement design and the label will reveal a date within a narrow range

Inside access door of Sessions tambour clock

Sessions Beveled No. 2

This Gilbert time and strike movement has a die-stamped year but the month of manufacture is unknown. Other markings in the case might narrow it down.

Toothpicks reminding of the location of the bell lever
Gilbert movement made in 1906

Research concerning the maker, the clock design, the model name or number and the label may reveal the exact date or something within a narrow range of years. Books on the identification of American clocks such as those by Tran Duy Ly can be very helpful.

Let’s look at this Elisha Manross Gothic Steeple clock.

Elisha Manross (1792-1856) was an important pioneer of the Connecticut clock and made a variety of clock styles, one of which is the gothic steeple pictured below.

Elisha Manross Gothic Steeple clock. Hands are incorrect; it would have had spade hour and spear minute hands

Although Elisha Manross had been active in Bristol clock-making since 1812 and earlier he shows in the Bristol tax records as making clocks from 1842-1851. His business was dissolved in 1854 and the factory was purchased in 1855 by E.N. Welch.

Manross made two steeple clocks. One is 20″ high and 10″ wide, the other is 19 1/2 inches high by 9 1/2 inches wide. The larger case would have made for other labels but the smaller size such as this one was manufactured in the Manross factory.

Elisha Manross 30 hour movement
A very dirty Elisha Manross 30 hour movement, just out of the case

This 30-hour clock by Elisha Manross has some distinctive features that help in its dating. Let’s narrow down the date by looking at the design of the movement and case. Three features make this clock interesting. One, it has very rare brass mainsprings; two, the count-wheel is located in the middle on the backplate and three, the veneer on the front columns and door is in a vertical orientation.

Brass mainsprings

Brass mainsprings were invented, patented and first used in 1836 by Joseph Shaylor Ives. Brass was cheaper and more accessible than steel in the mid-1830s and 1840s. Silas B. Terry developed steel springs for clock use in the Bristol area circa 1847, and as steel improved and became cheaper, brass springs quickly disappeared.

In the history of the American clockmaking, brass mainsprings had a very short life, between 1836 and 1850. The brass mainsprings on this movement have survived for a very long time and most clocks of this age have had replacement steel mainsprings.

Count-wheel

Many American time and strike movements have the count wheel located on the left side of the front plate just above the mainspring (or winding arbour for a weight-driven clock). Placing the count wheel in the rear of this movement adds complexity to the lever arrangement. Also absent is a strike-side cam wheel typically found on later American time and strike movements.

Manross backplate showing location of count-wheel

Veneer and vertical orientation

Exotic woods were used to cover the pine case. Elisha Manross clocks were either clad in Rosewood veneer or Mahogany. Manross clocks were produced with the Mahogany veneer in a vertical orientation, such as this clock, and Rosewood veneer in a horizontal orientation. American clockmakers did not normally orient the veneer in this manner.

Left front column

Dating this clock – let’s see what the data tells us

Records also show that steeple cases were made by Manross between 1847 and 1853. The label on the clock is in remarkable condition for a 168-year-old clock and is extremely helpful in dating this clock. On the back of the door, the left side of the upper tablet is the inscription 8/43, not once but twice. Is this the date the case was made? The door is clearly original to the case since it has the same vertical orientation as the veneer.

Records also show the sale of 705 cases (unknown as to type) to “E. Manross” during the months July-November, 1843. It is very possible the case was constructed in 1843, stored until later when the movements were placed in the case and readied for sale.

The date of August 1843 is inconsistent with the label, located on the inside backboard, which was printed by Elihu Geer at his shop on 10 State Street, Hartford Conn on or about 1850. The label was likely added to the case just prior to the sale of the clock.

We can conclude that the clock was made no earlier than 1843 and no later than 1850 and we can safely date this clock within a 5-7 year period.

Dating aside, it is truly remarkable that a mechanical device that is 173 years old is still operating to this day.

NOTE: The principal source of this blog article is the October 1993 NAWCC bulletin.

Website Powered by WordPress.com.

Up ↑