Two years ago, I acquired this Sessions schoolhouse clock at an auction with the intention of adding it to my collection of similar 19-inch clocks. The purpose behind this acquisition was to create a set of “time zone” clocks, as my children are scattered across the country. This setup allows me to easily glance up and determine the time in their respective areas.

In this blog series, I will first guide readers through the assessment process, providing a detailed account of my findings. In the second part, the next blog article, I will walk you through the movement’s servicing and testing phase.
This clock belongs to the schoolhouse clock style. The origin of the name “schoolhouse clock” is not well-documented, and it appears that the term was not used during the time these clocks were made. Instead, it was later coined by collectors to describe a particular style of clock commonly found in school settings.

Schoolhouse clocks were the standard design for early North American schoolhouses due to their larger, easy-to-read dials. They were widely hung in schoolrooms across Canada and often had simple time-only movements, although some versions included a calendar function or time and strike movements. These clocks had a utilitarian look and were known for their durability.
The design of schoolhouse clocks is believed to be influenced by English drop dial fusee clocks, which were produced in the late 18th and 19th centuries. Drop dials closely resembled schoolhouse clocks and featured conical constructions with a chain or gut line pulled by a mainspring barrel, providing even power release for improved accuracy. Complicated movements such as these did not find their way into inexpensive mass-produced American and Canadian schoolhouse clocks.

However, not all of these clocks spent their lives in schoolhouses. The back label bears the stamp “Office,” indicating that in addition to school settings, these clocks were also used by small businesses in retail areas or in office settings.
Assessing the condition of the movement
The clock was in working order when I received it. When I removed the dial which is held by 4 brass screws I was delighted to find the movement to be very clean and in very good condition overall.

The movement has been worked on in the past as there are 2 new bushings on the back plate, the number 3 wheel, and the escape wheel bushing. On the front, one bushing on the escape wheel bridge was replaced.
In addition the click spring, both click and wire have been replaced. A note to those working on Sessions time-only and Sessions time and strike clocks from this era: it’s important to be aware of the company’s history of poorly designed click springs. Therefore, it’s not unexpected to find this one replaced.
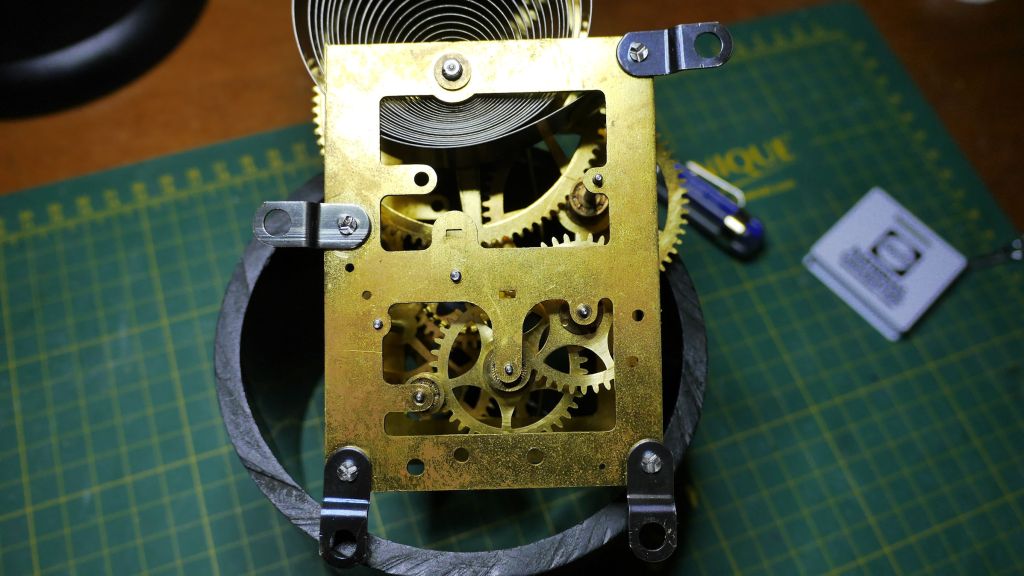
The suspension spring and pendulum leader have also been replaced. The mainspring has the letters MB stamped on the arbour loop which leads me to believe that it may be a replacement. In all, the work was completed by a competent repairer, in my view.
There is no oil remaining in the pivot holes as the oil has dried up completely. Further running of this movement as-is is a recipe for accelerated wear. Finding the right balance is crucial when applying oil. Excessive oil can attract dust and dirt, transforming it into grinding paste, whereas too little can lead to premature drying of the pivots. In general, however, the old adage holds true: less is more!
Disassembly
In view of the work done on this movement in the past, I am not expecting any further surprises or appreciable wear as I disassemble the movement.
To disassemble the movement, first remove the movement from its case. There are 4 screws holding the movement to the backboard and once released the movement easily comes out. Using a let-down key, the mainspring is restrained by a C-clamp and the 4 bolts holding the movement together can be easily removed with a slotted screwdriver. The mainspring is then taken out after which a further inspection takes place.

Next, I check for wear by removing the mainspring and reattaching the top plate with all wheels, including the escape wheel, in place. By spinning the wheels I can visualize how each wheel interacts with the adjacent one. There were no surprises but there is very slight elongated wear on the second wheel bushing hole, back plate but not enough to be concerned about at this point.
Before cleaning the movement in the ultrasonic machine I begin by pegging the holes using toothpicks. My objective at this point is to determine how much dirt and grime are present in the pivot holes. Not surprisingly there was very little grime but again the absence of any lubricating oil. I then checked each pivot for unusual signs of wear and in the case of this movement, there was little, if any, wear.
Well, that is all for now.
An upcoming article will delve deeper into the ongoing process of servicing this clock movement. Additionally, I will provide insights into the condition of the case and address any other issues that might have surfaced during the assessment stage.
Discover more from Antique and Vintage Mechanical Clocks
Subscribe to get the latest posts sent to your email.

You must be logged in to post a comment.