
This attractive shelf clock was bought on an online auction in early January 2021. From the auction photos, I expected a clock that required attention and now, having received it, I am pleasantly surprised that it is in better condition than I thought.
Under the auction studio light (first photo), the case might appear to look reasonably good. Closeup, there is a lot of oily dirt and grime. Servicing the movement will wait for another day. Restoring the case and dial is first.

Restoration of the case and dial pan
The design of the E. Ingraham Grecian 8-day time and strike shelf clock is neoclassical. It is not only aesthetically pleasing to patrons of the nineteenth century but remains so today. it is timeless.
The age-old debate about what to do with a clock case often arises. Some say, “leave it”, the finish, however grimy is part of a clock’s history. I am not of that camp. If I found the perfect classic car in an old barn I would not leave the dirt and grime on the finish to preserve its patina? Rather, I would polish it to show it off to the world.
This clock is not a candidate for stripping the finish. Stripping is a last resort. Good old fashioned soap and water work is perfect for a project such as this.
Old clocks especially those that are over 100 years old are generally very dirty and the grime is layered. The home environment was a very different place a century ago. Smoking in the home was common, many homes had wood and coal fires for heat, humidity varied because of poor insulation and anything in suspension landed on the furniture. This Ingraham clock is no exception. The rosewood veneer deserves to be shown off and that can only be achieved by peeling off the dirt to reveal the texture of the grain underneath.

For cleaning, I prefer a light coloured microfiber cloth so that I can visualize how much dirt I am removing as I proceed with the cleaning. I use several during the course of the project. Diluted Murphy’s soap is used for the case and full strength for the stubborn areas.
Rubbing is required but I don’t want to get too carried away as the cloth might snag a piece of the veneer on a corner. I start with a discreet area first to see what effect the cleaning is having. Working one section at a time, I clean down to the veneer. Any shellac that remains will be removed during the cleaning.
The case looks bleached after the cleaning but a damp cloth will show the grain, the effect shellac will have once the cleaning stage is complete.
I let the case dry thoroughly before applying the first coat of shellac. Shellac is prepared in the traditional manner, flakes and lacquer thinner and mixed to a one pound cut allowing fast drying.
For this project, I applied 2 coats of shellac. Between coats, I used 4X0 steel wool to smooth out any imperfections. After the second coat, I use steel wool to take away the glossy look of the shellac.
Next is the dial.


Above is a photo of the dial when I received the clock. It is off-center because nothing is securing the dial face to the brass bezel.
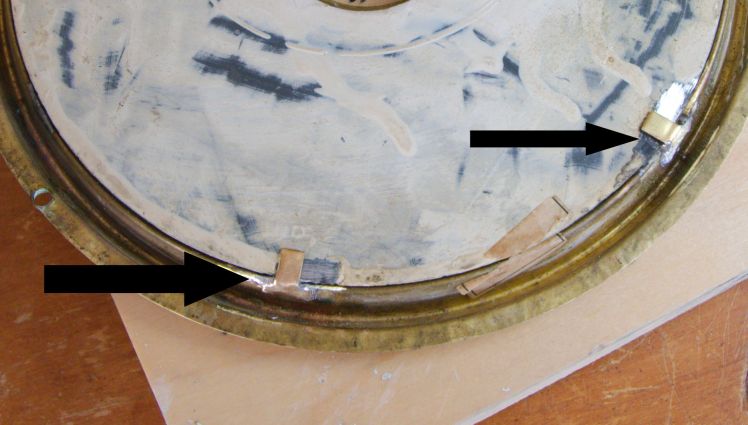
Two of the four tabs securing the dial face on the rear of the brass bezel were broken. The arrows show the two new tabs. I am not a whiz with a soldering iron and did the best I could but the results, to me, are acceptable. The thin brass tabs were sourced from a supplier. The tabs, once secured, are bent to secure the dial in place.

The numerals were in-painted. The dial was in generally good condition though there were losses outside the chapter ring. I mixed and matched paint to touch up the areas of paint loss, and installed a new grommet to replace the missing time-side one. The brass bezel, inner brass ring, and strike side grommet were polished with Brasso as the last step.

The case and dial part of the project is complete and in a future post I will address servicing the movement.
Discover more from Antique and Vintage Mechanical Clocks
Subscribe to get the latest posts sent to your email.

You must be logged in to post a comment.