Mauthe Westminster chime mantel clock similar to LL’s clock
Tick-Talk Tuesday is about the letters and comments I have received from you, the reader, concerning your clocks, issues you might have had and challenges you face and my responses to your questions with advice on your particular clock concern(s). For those comments and questions that stump even me, I consult within my clock circles for the best possible response to your question
LL writes, “I just had my Mauthe 3-train Tambour mantel clock cleaned and repaired. This is the first I’ve heard it chime in decades! I know my brother bought in England in the eighties but that is all I know about it. Can you tell me any more about the maker?”
Mauthe would have called your mantel clock a “buffet clock”.
Mauthe clocks have an interesting history. In 1844 Friedrich Mauthe and his wife Marie founded a company in Schwenningen, Germany to produce watch parts. At the end of the 1860’s Mauthe began to produce their own wall clocks (and movements). Some have been produced by home-work by so called “Gewerblern”, others have been produced in a more “industrial” way.
The Mauthe sons Christian (1845-1909) and James (1847-1915) took over in 1876. In 1886 Mauthe began manufacturing its own spring mechanism.
Around 1900, alarm clocks, pendulum wall clocks, grandfather clocks, office clocks and so called “Buffet Uhren” “Buffet clocks” were offered. The number of employees at that time went up to about 1,100 people. In 1904 the 3rd generation took over (Eugene Schreiber (1877-1939) – son of Christian Mauthe, Dr. Fritz Mauthe (1875-1951) – son of Jacob and Mauthe Alfred (1879-1911) – son of Jacob Mauthe.
In 1925 Mauthe announced a new trademark. It shows a right-looking eagle with outstretched wings, holding in its talons a three-part round plate with the letters F, M and S. My Mauthe mantel clock is unmarked. Early in 1930 the company produced about 45.000 clocks per week (with 2000 employees). About 60% were produced for export markets, England for example was one of those export markets.
Mauthe mantel clock sitting atop a Stromberg Carlson console radio
In the mid-1930’s Mauthe started to manufacture their first wrist watches, some were even supplied to the German Army (“Wehrmacht”).
From 1946 on Mauthe re-started with the production of wrist watches. Though largely successful during the post war years, sales began to decline and the company eventually declared bankruptcy closing in 1976.
These precision German movements keep very good time and are certainly worth keeping and repairing. Enjoy yours now that it chimes.
This is Part III and the final part of a three part series on my first venture into veneer repair on an antique clock. Prior to beginning this project I spent many hours researching veneer repair, watching YouTube videos and seeking advice from my knowledgeable colleagues at NAWCC.
A recent acquisition, this is an 8-day Seth Thomas column and cornice time and strike shelf clock with sleigh front. It has a Plymouth (Hollow) lyre movement with a Thomaston Conn. label which means that the clock was made shortly before the incorporation of Thomaston in the early 1870s.
ST column and cornice, as foundAn example of veneer loss
I assessed this clock in Part I and described the steps in preparation for the veneer repair. In Part II I described the process of applying veneer. Part III concerns the final finishing. Once the case work is complete I will focus my attention on servicing the movement, addressing the dial issues and replacing the clear glass with a floral pattern in the upper tablet.
The lighter coloured sections in the next photo are new veneer pieces. New veneer is found on the top of the cornice, the left cornice base, the right column support and sections of the bottom base.
Veneer repairs (light areas) are complete
Finishing is the final phase of this project. In many respects this can be the most challenging phase of the project because once the hard work of applying veneer is complete the job means nothing if the new veneer does not match the old veneer. Although it can never be a perfect match the goal is to come as close as possible.
One finish seemed to stand out above the others
I conducted an experiment on leftover Brazilian Rosewood.
I selected three stains/finishes, Minwax Rosewood gel stain, Wipe-On Polyurethane satin clear coat and yellow shellac. I utilized various light sources to see the effect colour temperature had on the results and came to the conclusion that there was one finish that seemed to stand out above the others.
In the photo below there are three swatches on a piece of leftover veneer; Rosewood gel stain on the left, Wipe-On Polyurethane in the middle and on the right is yellow Shellac. Wipe-On Poly initially struck me as the best of the three; it is subtle while bringing out the character of the Brazilian Rosewood veneer while keeping that “aged” look but it is too muted. Rosewood gel is reddish and quite dark and looked very striking compared to the original Rosewood.
I concluded that yellow shellac was the best choice. Shellac darkens the veneer and accentuates the red tones nicely. Shellac would have been been the original finish when the clock was made and it is still the finish of choice today.
Comparing the three stains
Although veneering is a challenge, it is very rewarding work and I eagerly await my next project
New veneer above cornice. The base of right cornice is original though it looks newerAfter two coats of shellacAfter three coats of shellac, the case is completeWith dial and doors re-attached, movement is out of the case at this stage
Although veneering is a challenge, it is very rewarding work and I eagerly awaiting my next veneering project.
Lyre movement serviced and oiled
With the veneer repairs completed and the movement serviced there is still work to be done on this clock. I have decided that the gesso columns will stay as-is. Next is perfecting a tablet design for the access door to replace the clear glass, and finally, making a decision regarding the dial face; whether to leave as-is, find a suitable replacement or buy a new one from a clock supplier.
Seth Thomas column and cornice “Empire” style time and strike shelf clock
Lessons learned:
Allot a significant portion of time for the project, it is time-consuming and meticulous.
For an authentic repair hide glue must be used; avoid white or yellow carpenters glue though I would think there are rare times when it would be considered.
Hide glue:
must be a certain consistency to work properly. It should drip off the brush like honey. My hide glue was too thin at the start of the project.
will last a while in the fridge. Don’t cap the glue while it cools; condensation will hasten mold growth
Stay away from plastic based modern stains and finishes and go with shellac or any finish that would have been used at the time.
Some use filler to smooth the gaps between pieces of veneer, I did not use filler for this project; it is something I might consider next time.
A light sanding of the veneer is all you need, aggressive sanding will destroy the veneer (lesson learned).
Apply painters tape on the veneer before cutting; doing so eliminates ripping and tearing.
Use a sharp hobby knife
In future I would consider replacing larger sections rather than a patchwork of small pieces though that largely depends on how much veneer you have to work with.
Clamps are essential. Get various sizes of clamps and use wax paper between the clamp and the veneer, you will thank me!
Leave the area clamped for 24 hours. Although hide glue bonds quickly clamping for a day will ensure maximum adhesion.
This was a great project and I am confident that my next veneer project will be even better. Time, patience and perseverance are keys to a successful veneering project.
This is Part II of a three part series on my first venture into veneer repair on an antique clock. Prior to beginning this project I spent many hours researching veneer repair, watching YouTube videos and seeking advice from my knowledgeable colleagues at NAWCC.
This is an 8-day Seth Thomas column and cornice time and strike shelf clock with sleigh front. It has a Plymouth Lyre movement with a Thomaston Conn. label. The clock was made in the early 1870s.
Part I explores the steps in preparation for veneer repair.
The focus of this, Part II, is the selection of the correct veneer, working with hide glue, as well as cutting, applying and trimming the veneer.
Although one is tempted to use readily available yellow or white carpenters glue the only authentic product to use is hide glue
The veneer
I am not an expert in wood finishes and determining the type of veneer was my first major task. To do this I had to rely on expertise to tell me that I had Rosewood veneer. Once I discovered the type of veneer, I had to determine the quantity and the specific repairs that are required for this clock. My research revealed that the veneer used at the time was Brazilian Rosewood. An exotic wood, Rosewood would have been used extensively by clock-makers of that era and it is the correct veneer for this project. A clock friend (thanks JC) sent me two 7 X 8 inch pieces of Rosewood veneer, more than enough for the job.
The very worst sections were the top and bottom of the case and the column bases as one would expect given wear and tear over the years. Most of the cornice veneer is in good shape as are the door sections, door surrounds and the sleighs just above the feet.
Hide glue
One is tempted to use readily available yellow or white carpenters glue but the only authentic adhesive for clock case applications is hide glue. Hide glue is the glue of choice and it would have been utilized at the time the clock was manufactured. I chose pearl hide glue which is a type of hide glue rated at 150g Bloom strength. It takes takes a little longer to gel and with the longer working time it is better for applications like this when you need time to fit, but where high strength is not absolutely essential.
If you have never worked with hide glue, it is best to start with a small batch. My first batch was larger than I needed and too thin. Simply put 2 tablespoons (30ml) of glue in a heat-resistant glass container, cover with 1 tablespoons (15ml) of cold water and let soak for about an hour or until the glue softens and becomes gelatinous. Less is more and I recommend making small quantities. For about 20CDN you can buy a supply that will last a long time.
Place the container with the gelatinous glue in a bath of water in a pot especially designed for hide glue or a double boiler which I found worked just as well. Heat to approximately 140°F (60°C) and maintain the temperature. A candy thermometer is ideal to keep the glue at an even temperature.
Home-made double boiler with temperature maintained on a hot plate
Tools
Clamps, weights, tweezers, wax paper, a sharp knife, a metal straight-edge, painter’s tape, a micrometer, sand paper, palm sander and whatever you choose to use as a double boiler complete the list of tools.
A micrometer is an indispensable tool for accurate measurements. Accurate measurements ensure a good fit, minimize the use of fillers and lessen waste.
A micrometer ensures an accurate cut
Cutting, trimming & clamping
Cutting veneer can be tricky. Veneer is thin, brittle and can easily tear. Veneer today is different than veneer used 100+ years ago, it is very thin. On some clocks you may need to double-up, that is layer the veneer to approach the height of the original veneer.
Cutting can be a challenge since you must follow the grain and those narrow strips can break very easily. Painters tape is a true friend since it prevents tearing and it is easily removed from the veneer prior to application.
Painters tape ensure a rip free cutPainters tape easily peels off
You will never have enough clamps
I chose to work one area at a time moving from the bottom of the case to the top. The next photos shows veneer sections glued and clamped into place. Clamps are essential for veneer repair but when clamps do not work other methods such as weights can be employed. You will never have enough clamps! Although a clamp need only be in place for a few hours, having it on for a 24 hours is best for maximum adhesion.
Clamping cornice veneerDoor piece and corner base piece is clamped
The upper left cornice presented a unique challenge. A section was missing just above the cornice. Fashioned out of softwood it was glued in place.
A piece of pine was cut to fitStrip of veneer glued in place; prior to trimming and sanding
In this photo the piece for the curved part of the veneer is applied. The top area of the front cornice is now ready for staining and finishing.
Small angular cornice piece on left is glued in placeTop section is almost complete except for a left side cornice section (not visible in this shot)
As with any other project there will always be a slight colour variance as one would expect over the course of a century or more but the goal is to come as close to the original finish as possible
As mentioned the worst areas were the very top and very bottom of the case, expected after years of wear and tear. Another area which had veneer loss were the column bases. When possible I used old veneer to repair small areas but I found it very brittle and hard to work with. From my research I discovered that there are methods of softening old veneer but that can wait until the next project.
Right column base, prior to sanding and trimming
After many hours the veneer work is now complete The next step is colour matching the new to the existing veneer. As you can see in the following photo the chip held by green tape shows that Rosewood Minwax Gel stain is a close match to the older veneer. My experimentation did not end. Part III explores other finishing options.
As with any other project such as this there will always be a slight colour variance as one would expect over the course of a century or more. The goal is to be as close as possible to the original finish.
Colour matching test: the green tape is holding a chip that has one coat of Rosewood stain
Now that the veneer work has been applied the next and final stage is finishing. Stay tuned for Part III in a few days time.
This is Part I of a three part series on my first venture with veneer repair on an antique clock. Prior to beginning this project I spent many hours researching veneer repair, watching YouTube videos and seeking advice from my knowledgeable colleagues at NAWCC.
Repairing veneer on a clock case is inevitable. As much as I love old clocks I will eventually purchase clocks that need a little TLC in the case department. This is that day. Collecting and repairing clocks is not only about cleaning and servicing the movement but the care and repair of clock cases. Aesthetics are equally important in clock work. A clock not only must run as it should but it must be appealing as well. Many of the clocks in my collection are in excellent condition and have required very little case restoration, nothing more than a touch up here and there. I have avoided clocks that need too much work. For example this 30-hour Waterbury Ogee required extensive movement repairs but the clock case was in exceptional condition.
The veneer on this Waterbury 30 hour Ogee is in excellent condition
The Seth Thomas case is in generally poor shape, has some crude repairs along with many corner chips and missing veneer sections here and there
One of my latest clocks offered me my first opportunity to learn the art of veneering. I really wanted this 8-day Seth Thomas column and cornice time and strike shelf clock and I was willing to overlook the veneer issues.
The clock is from the American Empire period which defined the early and mid nineteenth century design movement in American architecture. It has a Plymouth lyre movement with a Thomaston Conn. label. It has the two original 8.5 lb weights and pendulum bob. The lower tablet is original but the upper tablet which would have had a complimentary design is missing and replaced by clear glass. The dial is original having been introduced in the late Plymouth Hollow era circa 1862 up to about 1879 according to this site. The clock was made between 1875 when Thomaston was incorporated to 1879.
The case was intact save for one trim missing piece on the top section of the left cornice. There have been a number of crude repairs over the years which made the restoration somewhat frustrating but the veneer work was certainly within the limits of my capabilities.
Seth Thomas 8-day column and cornice with sleigh feetPlymouth ST 8-day lyre movementCornice trim piece made from pineNew pine piece replaces missing section
The case is in relatively good shape but has some crude repairs along with many corner chips, missing veneer pieces here and there over the entire case save for most of the front cornice veneer and the sleighs which have stood up very well. The gesso columns have some finish loss but they will be left as is. The dial face has loss on the corners, barely visible floral designs on each corner, loss around the chapter ring and a large area of missing paint on the lower left bottom. There are three options for the dial face; a replacement dial, a repaint or leave as-is though this is a decision to be made at a future date. The clock did not come with hands but I have a spare set of Ogee hands that are appropriate for this clock.
Structurally the case is sound with no loose or moving parts save for a left side cornice which has let go and held on loosely by a small screw. The back panel looks secure though Robertson screws were used to re-attach it, a later repair since Robertson screws were not invented until 1908.
Dial in generally poor conditionLoss of veneer on the corniceAnother view of the same cornice showing a poor attempt at a repair
The photos show that a previous owner tried unsuccessfully to hide the damaged veneer by applying a “matching” paint. I found wood filler beneath the paint which was used to raise the painted area to the level of the veneer. An appalling attempt at a repair.
Chipped veneer below sleigh footCloser view of left foot with veneer chipped off
The bottom left foot had corner veneer damage as one would expect after years of wear and abuse. On the left edge of the foot you can see the same dark paint used to hide the cornice damage.
Having reviewed the work to be done it is now time to move to the next step in the restoration of this clock case.
The art of veneering is a steep learning curve
The art of veneering is a steep learning curve. Part of that requires acquiring new skill-sets and acquiring an understanding of protein adhesives and finishes.
Part II, in one weeks time, will describe the steps in the application of veneer, trimming and sanding. Part III will detail the final finishing.
Canadian clock collectors are passionate about Arthur Pequegnat clocks. In private sales and online for-sale sites most sellers are knowledgeable enough to know that they are very desirable. A Pequegnat will sell for many times more than a comparable mantel clock, that is, in Canada.
Arthur Pequegnat Simcoe model mantel clock
The Arthur Pequegnat clock company had an illustrious albeit short history
The Simcoe is my fourth Arthur Pequegnat clock. It is very similar in dimensions and style to the Jewel. Whereas the Jewel is basically a unadorned box the Simcoe has a piecrust dial bezel, claw feet on each corner and lions head handles on each side. It has a coil gong for the hour strike and a bell for the half-hour passing strike.
To collectors it is referred to as a”Berlin” clock. Although it is impossible to date Pequegnat clocks precisely the name Berlin distinguishes clocks made before 1917 and those made after and up to 1941 when the factory finally shut its doors. Clocks made prior to 1917 were inscribed “Berlin”, Ontario on the dial face since Kitchener was known as Berlin until midway through World War I. From 1854 until 1912 it was the town of Berlin and City of Berlin from 1912 until 1916. Because the name Berlin had a negative association with the war against Germany the city administration chose the name Kitchener. Kitchener is the present seat of the Regional Municipality of Waterloo, Ontario (Canada).
Time and strike movement with steel plates, a common feature with Pequegnat clocks
The Arthur Pequegnat clock company had an illustrious albeit short history. Arthur Pequegnat, a watchmaker by training, was born in Switzerland in 1851. Arthur immigrated to Berlin, Ontario Canada in 1874 with his wife, parents, brothers and sisters; a grand total of 18 family members.
Arthur Pequegnat clocks such as a simple mantel clock you see here can command hundred of dollars in Canada
By the late 1870’s Arthur was operating a jewelry store and watch repair in Southern Ontario. By the middle 1880’s Arthur and his brother Paul were operating a shop in Berlin, Ontario. After ten years the brothers went their separate ways, both operating successful jewelry shops in Southern Ontario.
In 1897 Arthur expanded his Berlin jewelry shop to include the manufacture of Bicycles. However, by 1904, with the decrease in the demand for Bicycles, Arthur began to re-focus on the clock industry, by manufacturing his own clock movements at his Berlin Bicycle Manufacturing plant. Arthur obviously visualized a profit in clock making as many clocks at the time were imported from the United States. At first the wooden clock cases were made by local furniture makers, however in time he manufactured his own clock cases. Although the Arthur Pequegnat Clock Company was widely regarded as the only true Canadian clock company, lesser known companies such as the Hamilton Clock Company and the Canada Clock Company, though not as successful, predated it.
The Simcoe is a relatively nondescript clock. I passed by it in the antique store without realizing that it was a Pequegnat. My wife spotted it and I returned to take a second look. Sure enough, a Pequegnat!
The yellow oak case is in very good condition with one or two small scratches and a chip just above the top of the bezel. The dial pan has had an ugly repair, there are two brass tabs at 12 o’clock and 6 o’clock protruding though the front of the dial.
Piecrust bezel
The dial face has some crackling but is otherwise in good condition. The piecrust bezel is in very nice shape as are the claw feet and lions heads.
Lions head on case side
The movement looks very clean with little evidence of wear. There is an inscription on the back dated Jan 10, 1970. It was likely serviced on that date. In any event it does not appear to have had much running since then. Unfortunately, there is no label.
Ornate front feet
The movement was taken out of its case, inspected for wear and found to be in very good condition. The movement was oiled, returned it to its case, the beat was set and it is running strongly. The clock will be inspected in one years time to determine if servicing is required.
This weeks goodwill find. It was 10.00 but it had a blue sticker on blue tag day so it cost 5.00
Unknown mantel clock
Clock owner posted his excellent find on a popular social media site. Here is the conversation.
Person 1, “Can’t lose at that price. Hermle movement I presume.”
Clock owner, “Yes with a quartz battery operated time train. The gong and chime are wind up”.
Person 2, “Cool. What do you mean ?? Pic of movement ?”
Person 3, “Yes, how does that work? very curious.”
No answer from clock owner and no photos of movement but there are two arbour holes.
In defense of the seller it could be electro-mechanical as Hermle made a few such clocks in the 1950-60s. Any thoughts or ideas? I think it has been converted.
In my past life I was a community college instructor. My students ranged in age from age 20 and beyond but most were around the early 20s.
For years I had an analogue clock just above my office door. I often met with students but when I was pressed for time (not meaning to be rude) I would casually glance at the clock over the office door rather than look at my wristwatch. One day I asked a student what time we should meet again. They said, “well, what time is it now?” I said, the clock is right there, pointing to my office clock. They looked at it quizzically and said, “I can’t tell the time from that”, “I never learned”. What I heard hit me like a ton of bricks and this was a very bright student.
The big hand is on the left
The biggest difference between the Millennials and their predecessors is in how they view the world
We talked.
Me: Where is the small hand pointing?
Them: What do you mean, small hand?
Me: I pointed out the difference between the long and the short hand, the long indicating the minutes and the short, the hours.
Them: Between 3 and 4.
Me: So that means it is 3 something. Where is the long hand pointing?
Them: On the 6.
Me: What’s 5 times 6?
Them: 30.
Me: So it’s 3:30. Simple.
Them: Oh!
Are smart phones destroying our present generation? Is the digital age having a deleterious effect on our young people? Many scholarly articles and vigorous debate attempt to explore how the present generation thinks and as you would expect there are many theories.
It’s no wonder that analogue mechanical clocks are hitting their lowest price levels in years
As a community college instructor I should have been aware of generational differences and the impact that smart phones and the digital world have had on our present generation. I was making assumptions that how we learned way back when was very much like how young people learn today. Boy, was I wrong! The biggest difference between the Millennials and their immediate predecessors and even my generation is in how they view the world; young people today differ from previous generations not just in their views but in how they perceive the world around them as sound-bytes, fleeting images and instant messages. The experiences they have every day are radically different from my generation.
The little hand is between the twelve and the one
Time for them takes on a different dimension. Time is at the same time important yet unimportant. Time for young people is not measured in imprecise phrases like “about a quarter to”. It has a certain curious precision that is at odds with my generation (1950s and 1960s). What time is it? To them the time is precisely “seven thirteen”, not “half past” or ” a quarter past”. And don’t get me going on fractions!
In the following months all the clocks on the college campus were replaced with digital versions. One day I had a conversation with the facilities manager and he said, “we took them all down because the students can’t read them”. It brought me back to my conversation with the student and I completely understood.
I collect antique analogue clocks and it makes me sad there there is a generation, and perhaps future generations going forward who will not appreciate the beauty and utility of the that “old fashioned” analogue clock. Will these clocks be lost to a generation who feel that they are completely irrelevant? I hope not!
It’s no wonder that analogue mechanical clocks are hitting their lowest price levels in years. Case in point. I bought an circa 1835 Daniel Pratt Jr. reverse column and splat 30 hour clock at an auction recently and paid just 30CDN (24USD).
Daniel Pratt Jr. reverse ogee and splat 30-hour clock, bought at recent auction
To this generation analogue clocks (and antique clocks for that matter) are meaningless, unnecessary and pointless.
But to us old folks they continue to have a certain charm that cannot be explained, well, to young people, anyway!
Clocks have been more than just timekeepers throughout history; they are reflections of art, culture, and technological innovation. Whether for practical use or decorative appeal, clock styles have evolved to match the tastes, craftsmanship, and technologies of their times. Here’s a look at some of the most iconic and varied clock styles.
The clock is an instrument designed to keep and indicate time. It is one of the oldest human inventions. The clock has evolved through the ages from sundials in ancient times to early tower clocks of the 14th century weight-driven clocks and finally spring-driven clocks from the 1840s to the 1970s.
The world of mechanical clocks encompasses a wide variety of styles, and distinguishing between them can often be confusing—such as understanding the difference between a shelf clock and a mantel clock. In this article, I’ll navigate through these terms and highlight the most common styles or types, using examples from my own clock collection to illustrate them.
Mantel Clock
Many auction sites and even professional websites use the word mantle. The correct terminology is “mantel”. A mantle is a shawl or coat worn by women, an important role passed on from one person to another or the earth’s crust. A mantel is the top framing of a fireplace or a shelf above a fireplace opening.
A mantel clock is designed to fit on top of a fireplace or shelf. A mantel clock can be time only, time and strike, or a chiming clock. Generally, if there are 2 winding arbours it is a time and strike clock, if the clock has 3 winding arbours is it a chiming clock that is, it will play a tune on the quarter hours, the most common being the Westminster chime.
Mantel clocks might also be referred to as shelf clocks or buffet clocks.
Kitchen Clock
Arthur Pequegnat kitchen clock
Kitchen clocks are often referred to as gingerbread clocks or parlour clocks. At times, it can be difficult to differentiate between a kitchen clock and a parlour clock. Gingerbread clocks are distinctive because their designs are typically created by steam-pressing the wooden front face. However, some clocks, like the one above, are made using a powered cutting saw but are still classified as kitchen clocks. Additionally, some of these clocks included alarm mechanisms. The terms gingerbread, kitchen, and parlour are often used interchangeably.
Another type of kitchen clock is shown below. This is an 8-day time-only delft wall clock made by Forestville.
Delft Clock from ForestvilleE. N. Welch Whittier model
A parlour clock is generally considered more ornate than a kitchen clock, although it may still be referred to as a kitchen clock. It is placed in front hallways, entryways, and so on. The designs are always cut and there may be finials, a mercury-filled pendulum or very ornate design, garish trim pieces, and a decorative tablet.
Vienna Regulator
Gustav Becker two-weight Vienna regulator
There are many styles but most are of the single-weight or two-weight variety. The definition of a Vienna regulator is always open to debate but the consensus among collectors is that they are weight-driven, made in Austria/Germany, ornate in design, have porcelain dials, decorative crowns, large pendulums, and finials on the top and bottom.
The broad definition of Vienna Regulator includes those that are spring-driven. Though not defined as “regulators” it is acceptable among collectors to refer to them as a Vienna style.
Cottage Clock
Canada Clock Co Hamilton Cottage Extra
Sometimes called a mantel clock or a shelf clock, they are usually diminutive in size to occupy a smaller space. They are found in bedrooms and kitchens and are sturdily built since they are often designed to be portable. They come in time only, time and strike, or may have an alarm function.
Carriage Clock
French Carriage Clock
Carriage clocks are portable and were very popular around the turn of the 20th century. French-made carriage clocks are more collectible and fetch generally higher prices although American ones can be quite desirable. Carriage clocks are designed to be portable and are time-only but some are time and strike (with a repeater function) while others may have an alarm function.
Crystal Regulator
Ansonia Crystal Regulator
Crystal Regulator clocks are identified by a brass case with 4 crystals or glass panels. Porcelain dials, Roman or Arabic numerals, ornate in design but sometimes quite garish. Most are 10-12 inches in height though some are smaller. Makers are American and French though French crystal regulators are called four-glass clocks and tend to have higher value. Distinctive by their mercury or faux mercury pendulums. Some have visible Brocot escapements and the time and strike movements are always visible.
Cuckoo Clock
Cuckoo clock
These clocks are pendulum-regulated and make an automated sound like a cuckoo when it strikes the hours. Some can be very intricate with several animated characters. Desirable ones are antiques from the Black Forest region of Germany. Modern ones are generally frustrating to repair, cheaply built, and are poor timekeepers.
Lantern Clock
Converted lantern clock
A lantern clock is a type of antique weight-driven wall clock, shaped like a lantern. They were the first type of clock widely used in private homes. They probably originated before 1500 but only became common after 1600 and in Britain, around 1620. They became obsolete in the 19th century. The one pictured above has been converted into a fusee movement.
Alarm Clock
Baby Ben alarm clock with seconds hand
Alarm clocks are wound once per day and designed to do two things, wake you and display the time. They are cheap, and are average timekeepers but have long-lasting and reliable movements.
Desk Clock
Kienzle World Time clock
These sat on fancy office desks or credenzas in office locations. They are either time-only or time-and-strike. Most were time-only to minimize distractions in the office environment. Some are very attractive and have unique designs and are more decorative than utilitarian. This one above is called a World Time Clock by Kienzle.
Wall Clock
German Mauthe Box clock
A wall clock is broadly defined as any clock designed to be hung on a wall, making it a practical and visible timekeeping solution. Wall clocks come in various styles, from simple and functional designs to highly decorative pieces. This one by Mauthe is often described as a German “box” clock which became popular after the First World War and made into the 1940s.
Schoolhouse Clock
Ansonia schoolhouse clock
They are known as schoolhouse clocks because they hung in many schoolrooms in North America. Usually distinctive by their octagon shape and short or long drop feature with a glass door displaying a swinging pendulum. Many thousands were made; they had cheap mass-produced softwood cases and robust movements. Most were time-only though some were time and strike and others even included a calendar function.
When they were marketed years ago they were not called “schoolhouse clocks” but rather, clocks made for the schoolroom.
Novelty Clock
Chairman Mao Zetong waving as the clock ticks
These clocks are designed for the tourist trade with interesting features. In the case of the above clock, a smiling Mao Zedong has his little red book in hand and is waving “to the masses” as the clock ticks.
Ogee Clock
Waterbury OG clock
It is so-called because of the curved molded wood case. It might also be referred to as an OG clock. The design originated in the United States in the 1830s, distinguished by a case (usually pine) the front outer edges of which are curved into an S-shape (Ogee). This shape is formed by the union of a convex and a concave line. A mass-produced variant of the shelf clock, the Ogee clock typically stands about 30 inches (75 cm) high and is usually weight-driven. The movements were generally made of brass (earlier ones were made of wood) and ran for 30 hours or eight days. This is a 30-hour weight-driven version from the 1870s.
Tall Case Clock
Ridgeway Hamilton Country, Westminster chime
Tall case clocks are known by various names depending on the region. They are referred to as tall-case clocks in American terminology, long-case clocks in British terminology, hall clocks in Canada, and sometimes as floor clocks. However, the most commonly used term is “grandfather clock.”
They are usually weight-driven, with the weights on chains or cables, and are distinctive by their obvious height. They are always 6 feet or over but can be as high as 8 feet high (1.8 to 2.4 meters). They often feature elaborately carved ornamentation on the hood (or bonnet), the frames, the throat, and the dial or clock face. Older ones have 30-hour movements but all modern grandfather clocks run on an 8-day cycle.
Smaller clocks are called grandmother and granddaughter clocks. They are under 6 feet.
Anniversary Clock
Kundo standard size 400-day clock
These clocks are also called torsion clocks or 400-day clocks. 400-day clocks are torsion driven having a long suspension spring to which a weight oscillates back and forth. Typically these clocks operate at 8 beats per minute and run for long cycles on a single wind, up to 400 days. These clocks were popular as wedding gifts or gifts to mark special occasions. They are relatively simple to repair but can be finicky to set up. The newer quartz clocks are very accurate but do not replace the charm and curiosity of the older mechanical ones.
Some might call them purely decorative.
Tower Clock
Tower clock in Holguin, Cuba
In the early 14th century large mechanical clocks began to appear in the towers of Italian cities. There is no record of any working models preceding these public clocks that were weight-driven and regulated by verge-and-foliot escapements. They are referred to as Turret clocks in the UK.
In conclusion, while there are sub-categories for some of the clocks described above, this overview provides a general understanding of the commonly used terms. Having this knowledge can be especially helpful when shopping for a special gift or identifying the style of clock you may have in your possession.
Okay, there are 9 hours left on the bid for this Vienna striking clock and it is at 104GPB (178CDN) so it could go a lot higher. But 257CDN for shipping!!! Factor in the exorbitant shipping cost and import duties (~40CDN) you are now looking at close to 300CDN + the clock. I suppose as a seller you gotta make your money somehow!
Mini Ogee by New Haven, the gaps in the door indicate that the front was once veneered and later stripped
This spring driven 30 hour New Haven Ogee clock is a loud ticker and rapid striker so distinctive that I can hear the ticking outside the room it is in like a mischievous puppy who wants to remind you where it is.
Judging from other New Haven clocks I have researched from this period, 1875 seems to be the approximate date of manufacture. The case measures 18 1/2 by 11 3/4 inches (47cm X 30cm) and the movement measures 3 1/2 by 5 inches (9cm X 12.7cm); a small ogee styled clock some would call a mini.
The clock is a mere reflection of its former self but not unattractive
The New Haven clock Co. has had a long and illustrious history. In 1853 the Haven Clock Company was founded in New Haven, Connecticut by Hiram Camp (1811‑1892) and other clock-makers. The company’s mission was to mass produce inexpensive brass clock movements for use in clocks. In April, 1856 The New Haven Clock Company bought out a competitor’s company, the Jerome Clock Company. They moved their production to the former Jerome factory and New Haven began making clocks under their own trademark. In 1870 some of New Haven’s clocks were marketed under the Jerome & Co. brand.
In 1885 the company stopped selling clocks other than their own New Haven brand. In 1890 the company developed serious financial problems and efforts were made to keep it solvent until 1897 at which time the company emerged after reorganization. In 1902 Walter Chauncey Camp (1859-1925) began to turn the company around. In 1923 Walter Camp stepped down as head of the company and is succeeded by Edwin P. Root.
In 1929 Richard H. Whitehead replaced Root as president of the company but New Haven again faced financial difficulties compounded by the Great Depression in November, 1929. Whitehead was able to keep the company afloat during these troubled times and the firm regained profitability. From 1943 to 1945 the company turned to the war effort, producing products almost exclusively for military use. In March of 1946 The New Haven Clock and Watch Company became the new name of the firm after it reorganized once again. It returns to what it did best before the War, making clocks and watches.
The 1946 reorganization eventually leaves the company vulnerable to foreign investors and it lost control to a consortium of Swiss watchmakers. The man who had successfully shepherded the company through the hard times of the Depression years, resigned as president. In 1956 the New Haven Clock and Watch Company filed Chapter 10 bankruptcy in a U.S. court. Its fortunes have declined precipitously since Whitehead’s departure and it never recovered. In 1960 the company went out of business and the production lines closed. The facilities were sold through a combination of public auction and private negotiation in March of 1960.
Coiled gong – a replacement from an E. N. Welch or a Gilbert.
This 30 hour New Haven Ogee looks good from a distance but closer inspection reveals a number notable issues. The movement appears original to the case and the case is in fair condition having been reconditioned at one time. Although the sides of the clock are veneered, the veneer on the front has been stripped off presumably because there was too much loss/damage. There is also some veneer loss on the top right side. Crude chisel marks on the left front indicate that the veneer in that area might have been more difficult to strip off. Unfortunate, but I have no intention of re-veneering the front. From a distance it still looks good and the casual observer will hardly know the difference.
The coil gong is a replacement and is in a slightly different location than the original gong judging from screw holes to the right. I can only surmise that the original gong somehow broke. This gong is probably from an E. N. Welch or a Gilbert.
New Haven 30 hour movement, back plate
30 hour movement – front plate showing factory installed oil cups
There are oil sinks on the front but not the back plate. The sinks on the front plate are stamped by the factory and were made to look like a more expensive clock since most would not see the rear plate. An odd decision by the manufacturer but a common practice.
Side view of 30 hour movement showing count wheel and cam wheel
The plates are pinned (rather than the newer bolts or screws) and there are two solid gear wheels suggesting that it is an earlier version of this particular 30 hour movement. The suspension spring and leader are a replacement as expected given the age of the clock. The pendulum bob is a replacement and so is the dial face.
I took the movement from its case, inspected it for wear and applied clock oil. The clock is running well and does not require immediate servicing.
The clock is a mere reflection of its former self but not unattractive.
I have an elegant Grandfather clock in Cherry wood and works perfectly! Daniel Dakota with gold finish. It is 38″ high with no scratches. Looks Brand New! Westminster Chimes every hour. Works with batteries. Beautiful triple pendulum.
38″ high (97 cms) for a grandfather clock! Now that’s really “stretching” the definition of a grandfather clock. And what’s a triple pendulum?
Mercedes makes a great car. Do they make clocks? No! Is this Mercedes novelty timepiece a great clock? Read on.
Attractive ceramic clock with time-only movement
This very attractive 30-hour Mercedes ceramic mechanical shelf clock of the Baroque Meissen style (debatable) from the 1970s is more of a novelty item than a clock.
It is a time-only alarm clock movement made by Gebrüder Hauser and marketed under several names one of which is Mercedes. Ceramic clocks on eBay or any other auction sites will reveal the Mercedes name as well as other retail names on similar-looking clocks. For example here is a similarly styled Alana clock. Same casting sans gold detailing.
The Alana, similar to Mercedes but without the gold-colored accents
This Mercedes novelty clock is in excellent condition with no chips, cracks or any sign of wear. But is it worth anything? Not a lot.
History of the company
The Gebrüder Hauser clock factory (Die Uhrenfabrik Gebrüder Hauser) was founded in 1923 by Otto and Josef Hauser in Weigheim, Germany. Josef Hauser resigned in 1926 and moved on to form his own company. The company name Gebrüder Hauser then received an additional owner, Otto Hauser.Aside from alarm clocks, clocks with pendulums and chess clock works were produced.
Spring winder, time set screw and speed lever on rear of the clock
In 1951, the son, Eduard Hauser joined the company.From 1955 onward small affordable alarm clocks and chess clockworks were manufactured.In 1965 Norbert Hauser joined the company and the company name was changed to KG.
The Gebrüder Hauser KG clock factory in Weigheim was eventually closed on 31 July 1998.
Are they common?
There are a number of variants of this clock, mechanical, electrical, and quartz. The mechanical version will command higher prices and is more desirable. Unfortunately, they are throwaway clocks and the cost of servicing would be far more than they are worth.
Nevertheless, it makes for an attractive mantelpiece and as a gift, it is likely the recipient will not keep it wound.
This is a very nice reproduction grandfather clock top. Quartz movement, pretty dial and nice chimes. Good working order and no need to wind! Keeps good time. This looks lovely on a mantel, top of book case or on a desk. Bottom case was broken in a freak wheel chair accident, but a new one could be fashioned by someone with the time and a bit of wood working experience. Just don’t have the time to do it! $40.00.
What happens if you service a clock and let it sit without running it? What happens if the clock is not run and stored for a year, does the oil dry out? Is it better to run the clock once a month to get the oil moving? If the clock is sitting for a year should I refresh the oil before running the clock? These are all good questions. I will attempt to answer each one.
Unfortunately, most people let their clocks run until they start to show signs of needing servicing
It largely depends on where the clock is located. Environment should always be a consideration in whether to run your clock constantly, or not. Is it in a smoke and dust free environment? Can the humidity be controlled? Are there pets? Pet hair can find its way into the strangest places.
Mauthe mantel clock with Westminster chime
I like to check all of my clocks on a 2 year schedule. If all looks well, I may not do anything except look it over and add oil where necessary. I might repeat this for 4, even 6 years before signs of wear show up. Or, there may be signs of wear at the first check at 2 years. If wear is evident, I might note it and monitor it several months later and address the wear at that time. This approach will keep your collection in good shape with a minimum amount of work. If there are pets in the home you may want to inspect your clocks at more regular intervals. If the clock is sitting for a year without running should I refresh the oil before running the clock? Yes, but only if there is no or very little evidence of oil in the pivot holes.
However, a clock that is allowed to sit dormant for one year should be essentially as you left it. If you used a good quality oil, an oil specifically designed for clocks, it should not break down over the course of one year. A thin coat of quality oil in an unused clock will disappear over about 4 years with little or no trace of residue and that is the time that it needs re-oiling. The buildup of sludge often seen is the end result of repeated over-oilings over the course of many years.
I know collectors who run a small number of their clocks daily but some intermittently, perhaps once or twice a month or a year, enough to keep the wheels and the oil moving. I have some specialized clocks that I will run only occasionally like my Kienzle World Clock in order to lessen the wear but keep the parts moving. Why? This a very frustrating clock to service and I want to extend the service interval as long as possible.
Kienzle World Time clock
Getting back to the home environment I should mention mention that concentrations of some indoor pollutants are often 2 to 5 times higher than typical outdoor concentrations. In environments with air born particulates, tobacco smoke and animal dander your clock should be sealed properly by making sure that access doors/panels are closed, that broken dial glass is replaced, large holes in the clock cases are sealed and clocks are away from areas of the house that produce higher amounts of dust and humidity (kitchens and bathrooms).
Unfortunately, most people let their clocks run until they start to show signs of servicing and at that point repairs can be costly if you are not doing the work yourself.
Taking good care of your timely treasure will reward you with years of service.
30-hour Waterbury Ogee with a beautiful veneered case
This 30 hour Ogee clock was purchased in the fall of 2017. I was eager to add this clock to my collection as it is the one particular style of clock that I do not have. From my research on Waterbury clocks I determined that it was made in or around 1870.
I decided to turn the worn trundles inward and seal them with Permatex (medium strength thread-locker) so they are fixed rather than rolling; not ideal but reversible
While the case is in remarkable condition for the age of the clock the movement has suffered the ravages of time.
Simple 30 hour movement, top plate removed
Testing over the course of a day or so revealed that clock would not run for more than a few minutes. The movement was taken out of its case and inspected to determine what needed to be done to get it to running condition.
I expected punch marks and there were a number. In the old days clock-makers would attempt to address pivot wear by closing the pivot holes with a stake or punch. Not ideal but a common practice. Bushing work was definitely required. The pivots, on the other hand, were in very good shape and polished up nicely.
Punching the bushing home
My first task was to address the bushings. Ten bushings were installed, 5 on each plate. The front bushing work included the escape wheel bridge, always a challenging spot to bush. Next I addressed the other serious wear issue – the trundles on all of the lantern pinions.
Lantern pinions on the escape wheel
The trundles on the lantern pinions were in bad shape as you can see in the photo above. The wear seen here was identical on all 4 lantern pinions. Notched trundles were not what I expected.
The trundle work was certainly the most interesting part of the repair. My experience with lantern pinion work is zero. After some research the method I selected was to hand drill through the top shroud to release the worn trundles.
Drilling through the shroud to release worn trundles; I used a smaller bit than the one pictured here
After releasing the worn trundles I used 1.10mm pivot wire which is ideal for this purpose and matched the worn trundles precisely.
Test fitting of pivot wire before the wire is cut to proper length
I began with the fly. I drilled into the top shroud. I then cut 1.10mm pivot wire into the required lengths then rounded the ends with a cut-off disc on a Dremel. After the fly was completed I addressed two more lantern pinions in the same way. I staked the shroud ends to seal the trundles inside.
With three done the escape wheel lantern pinion was next and that is when I ran into a snag. The escape wheel shroud is reversed (see photo below), so I cannot drill into the top shroud without a lot of guess work. Using needle nose pliers I decided to turn the worn trundles inward and seal them with Permatex (medium strength thread-locker) so they are fixed rather than rolling. This is not ideal but it is reversible.
There does not appear to be a definitive answer as to whether the trundles should be free-moving or fixed although I suppose they are designed to roll with the gear teeth. At some future point the trundles on this wheel will need to be replaced.
So, how do you get at those trundles?
The clock did not come with a pendulum bob so, a new one was attached. The suspension spring and leader was replaced to address a crimped spring that resulted in a wobbling pendulum bob. I used .09mm suspension spring in the correct length. The clock now runs well and it has completed a number of 30-hour cycles.
I suspect that this will be a clock that will not be run daily, the inevitable hassle of constantly winding a 30 hour clock but I am pleased that it is back in running order and I will ensure that is runs on special occasions.
I am a retired educator living in Nova Scotia Canada. I collect vintage and antique clocks that I repair and maintain. I also write about horological areas of interest, interesting clocks and clock stories when I search for new acquisitions.
As most bloggers know the key to building a successful blog is not only attracting new visitors but keeping existing ones interested enough to come back
Baby Ben alarm clock with seconds hand
In the spring of 2015 I began my journey into blogging. The first few months of writing about clocks, clock collecting and repair were very challenging. How could I interest those who not only collect antique and vintage clocks but have just a passing interest? As time went by I began to realize that there was plenty to write about, that the world of clock collecting and repair is incredibly vast and that there is much to learn.
This blog has given me an opportunity to profile my own clock collection, walk the reader through the challenges of restoring and repairing my clocks and the knowledge gained from those experiences.
Cuckoo clock
As I write this article my blog has over 49,000 total views, 33% from United States, 17% from Canada and the remainder from around the world including the United Kingdom, Australia, Romania, Germany, India, The Netherlands, South Africa, Malaysia and 80 other countries. The top 5 articles this year were:
Mauthe Mantel Clock
Daniel Dakota Wall Clock
What is my clock worth?
How to wind a mechanical clock
U.M. Muller Box Clock
As most bloggers know the key to building a successful blog is not only attracting new visitors but keeping existing ones interested enough to come back. In the past year alone viewership has doubled. My visitors average 1.8 articles per visit with an average of 88 views on a typical day in 2017. November and December peaked at 100+ views per day.
Swiss made smoothing broaches
Providing enough stimulating content so that visitors want to return is always a challenge. I post 7 articles a month, sometimes one or two extra, usually spaced 4-5 days apart, on various topics of interest. I also attempt to appeal to all facets of clock collecting and repair from profiling my own acquisitions and experiences restoring and repairing my clocks to articles of general interest. I also inject historical horological context as much as possible.
I receive about 30+ comments per month on average. All comments and inquiries are welcomed. Interesting comments come from people who typically ask me how much their clock is worth, particular problems they have with their clock, strategies for repair and information about the history of their clock. All questions are answered to the best of my ability but I make no pretense that I am a trained professional.
Miniature one-weight Vienna wall clock, circa 1870
In 2018 my intent is to continue to write interesting articles about clocks in general as well as profiling my modest but expanding collection of antique and vintage clocks. I also plan to explore special areas of interest.
Future articles include, “Letting a clock sit without running”, “Mercedes clock – not made by the car folks”, my 4th Arthur Pequegnat clock, a second installment of the Waterbury Ogee 30 hour clock, a mini New Haven Ogee that has some curious modifications, how to set up your grandfather clock, “What style clock do I have?” and more Crazy Clock Ads.
Ingraham Huron mantel clock circa 1878
Mauthe Westminster chime mantel clock
Stay tuned and if there is an area of interest you would like to see me to explore, drop me a quick note. If you like what you are reading express “Like” it at the end of each article.
Thanks for your comments, your encouragement and your continued support.
You can still buy a brand new Westclox today and few people realize that the company was a pioneer alarm clock manufacturer.
Baby Ben alarm clock
This is a nondescript Baby Ben clock; thousands were sold but unlike older alarm clocks made in the USA and made and/or assembled at the Peterborough plant in Ontario (Canada), this one was made in China.
The Baby Ben has had a long and interesting history. The Baby Ben movement was originally marketed in 1910 and first nationally advertised in 1915. The 5-year delay occurred because the company was going through organizational changes and it took 3 years to improve the reliability of the Baby Ben movement.
An early Baby Ben, the Westclox LaSalle alarm clock
In 1912 Westclox opened a sales office in Toronto, Canada as part of its policy to establish world markets. Between 1920 and 1922 production began at the plant in Peterborough, Canada. At that time parts were shipped from the LaSalle-Peru plant for final assembly in Canada. Unfortunately, there is no information on which clock parts were made in Canada and which parts were manufactured in the Peterborough plant through the years.
Thousands of Baby Ben alarm clocks were manufactured and sold through the 1920s to the 1970s. In the early 1980s production in Canada ceased. “Westclox” and “Big Ben” trademarks were acquired by Salton Inc. in 2001. In October 2007, Salton sold its entire time products business, including the Westclox and Ingraham trademarks, to NYL Holdings LLC, which, to this day sell clocks under the Westclox name. In addition to clocks the company’s line of business also includes the wholesale distribution of jewelry, precious stones and metals, costume jewelry, watches, and silverware.
Baby Ben alarm clock with second hand
Back controls
I have not had the chance to look inside this alarm clock but from its style and other design elements it is from about 2001 when production shifted to China under General Time Corporation, parent company of Westclox, just prior to the sale to Salton and before quartz clocks entered the mainstream. It is the Style 10 Baby Ben with radial numerals and a sweep second hand.
This example is still working and keeping good time. I bought it to study the Baby Ben movement.
Though every bit as reliable as the older American and Canadian alarm clocks it is unfortunate that we lost this segment of the industry to the Chinese. For more information on the history of Big Ben and Baby Ben clocks you can go here called appropriately enough, Westclox History.
During this festive season of giving, let us take time to slow down and enjoy the simple things in life. May this wonderful time of the year touch your heart in a special way. Wishing you much happiness not just today, but throughout the New Year.
If there is a clock under the tree consider it a timely gift to remind you of days gone by and of happy memories when families got together to celebrate love and togetherness.
During the early days of the industrial revolution a certain practice lasted well into the 20th century. These were days before alarm clocks were affordable and reliable when workers had to rely on professions that we would not think would ever have been considered mainstream work.
One of these professions was the person whose job it was to wake people up. The profession is sometimes referred to as the knocker-upper. It was the job of the knocker-upper to make sure people got to work on time. Large numbers of these persons worked in the industrial centers of England and Scotland where the poor could not afford their own watches.
They were often women or the elderly but occasionally police constables would work as knocker uppers to supplement their income. Aided with a long stick the knocker upper would tap on the bedroom window and proceed to the next customer’s house. He or she would not dawdle, 3 or 4 taps and they would be swiftly on their way. Other methods were often used; a rattle, or soft hammers and even pea shooters.
With a long stick the knocker upper would tap 3 or 4 times
My how times have changed. How do you get yourself up in the morning?
Probably housed an English bracket clock at one time. Case measures 15″ wide 17″ high and 7″ deep, one tiny bit of trim is missing., wood has great aged patina. $275
Ridgeway Hamilton Country, now owned by the Howard Miller group of companies
You’ve decided on a new location for your grandfather clock. Now it is time to set it up.
Before you do anything ensure that the clock is level and preferably on a hard surface. Wood floors are great but carpeted floors are not optimal. There are 4 leveling wheels or points on the bottom of the clock. Using a spirit level spin the leveling wheels or points counterclockwise or clockwise to achieve a perfectly levelled clock. If you wish to screw the case to the wall to stabilize it, this can now be done as long as it is standing straight up and not leaning backwards. Stabilizing the case also reduces sympathetic vibration.
Steps for setting up your clock
Release the chains or cables that were bundled during transport.
Hook the weights. If you had marked them or if they have location direction on the bottom (L, C, R; “L” for left, “C” for centre and “R” for right) ensure that the correct weight goes where it should. The weights are not the same although they may look identical. On most modern grandfather clocks each weight provides the motive power necessary to operate the time, chime and strike trains of your grandfather clock. The manufacturer has determined that a weight powered by an exact number of lbs will affect how the clock will run. For example, the chime train requires a specific weight. If the weight is too light the chimes will run slowly or not at all. Generally speaking, the heaviest weight goes on the far right side chime train, as it needs more power to run the chime hammers.
Pull the weights up if your clock has chains or use a winding crank to bring the weights up if equipped with cables. For a properly striking and chiming grandfather clock the weights will more or less descend at the same time. Check through the side vents that the cables are not tangled. A tangled cable will stop the clock.
For cables: not only check to make sure that the weight is hooked but the cable is also in the cable pulley.
Release the chiming rods by carefully pulling off the protective Styrofoam or cardboard.
Return the side vents or access panels that slot in from the inside. They will drop into their channels.
While holding the pendulum guide with one hand (using cotton gloves), slip the pendulum in through the front door with your other hand an place the pendulum hook over the pin or through the slot on the pendulum guide, and lower the pendulum until it is hanging securely on the pendulum guide.
The pendulum rod hooks onto the suspension springLyre pendulum
Let the Grandfather Clock operate for ten minutes until the pendulum settles into an even swinging motion. An even swinging motion means that there is an equal time between the tick and the tock. In clock terms, it means that the clock is in beat.
Reinstall any decorative ornaments such as finials that friction fit into their respective holes.
If your clock has a moon phase dial: To set the moon dial, apply slight pressure with your fingers to the front of the moon dial. Rotate the moon dial clockwise until the moon is positioned according to the current moon phase. Never force it, it should move easily. If the moon dial will not rotate wait 6 hours and try again. As long as the grandfather clock operates it will display the correct moon phase. If the clock stops for more than a day the moon dial will have to be reset.
Moon phase dial is adjustable by carefully moving it clockwise
Although some grandfather clock instructions say that you can move the hands backwards, it is not a method I would advocate. Never move the hour hand. The hour hand will move with the minute hand. The hour hand is a friction fit and moving it will knock the hourly strike out of sequence. By moving the minute hand Clockwise it is not necessary to wait for the Grandfather Clock to chime as the minute hand passes each quarter-hour. The movement has a self-correcting feature that synchronizes the chimes with the time. If the clock does not synchronize, give the clock an hour or so before making any further adjustments.
If the clock does not strike or chime, make sure that the silencer lever switch is in the “chime” position.
Allow the clock to acclimatize to the new environment before regulating the movement. A clock that is regulated keeps the correct time. Regulation is achieved by turning a screw on the bottom of the pendulum bob. Turning the screw clockwise will make the clock go faster and turning the screw counterclockwise will make it run slower.
Close and lock the front access door.
Ridgeway cabinet key
Consult your owner’s manual for setting special features not covered above.
Tick-Talk Tuesday is about the letters and comments I have received from you, the reader, concerning your clocks, issues you might have had and challenges you face and my responses to your questions with advice on your particular clock concern(s). For those comments and questions that stump even me, I consult within my clock circles for the best possible answer.
D writes
“Hi there. I came across your posts while searching for a repair manual for my clock.
I have a Daniel Dakota 15 day clock which runs about 15 minutes fast each day. I long ago lost the instructions/manual but thought you may be able to give me a tip or two to slow down the movement.
Let me know!”
D’s clock is similar to this Daniel Dakota wall clock
My reply.
“Thanks D,
First, I assume that it is a mechanical clock with winding arbours. Here is an excerpt from one of my blog articles posted earlier this year.
Regulating your mechanical clock – its easier than you think
Regulating your clock is the process of making repeated, precise adjustments to its mechanism with the goal of enhancing its accuracy and ensuring it functions as a reliable timekeeper over an extended period.
The running of your mechanical clock is influenced by three key factors: neglect, friction, and the environment. These elements will determine whether your clock can maintain accurate timekeeping. The article ends with tips on regulating your clock and the effects of mainspring power on timekeeping.
Let’s look at each factor.
Neglect
Neglect is easy to understand: without proper care, a clock will lose its reliability as a timekeeper. Placing a clock in a sunny spot, especially in a hot window, can cause the case to age prematurely and dry out the movement. Setting a clock near a heat source, like a heating vent, can affect its performance. Transporting a weight-driven clock without securing the weights can result in broken case parts and shattered glass. Moving a pendulum clock without removing the pendulum can cause internal damage.
Additionally, turning the hands backward should be avoided unless the manufacturer specifically permits it in the clock’s instructions.
Using a winding crank
Friction
Each moving part of a clock must be in optimal condition. The gear train should move freely, but excess friction will negatively impact the clock’s performance. Regular lubrication is crucial to prevent this. Friction causes wear, and over time, wear can lead to costly and time-consuming repairs. As bushing wear accelerates, the clock’s functionality will deteriorate, eventually causing it to stop.
Close-up of bushing wear; the pivot hole is oval when it should be circular
It’s good practice to inspect your clock’s movement every year or two and add oil if the pivots are dry. If you notice a buildup of thick, dirty oil around the pivot holes during your inspection, it’s time to service the clock’s movement. This can be done either by you, if you have the necessary skills, or by a clock specialist.
Six bushings installed on the back plate of a Sessions Westminster A mantel clock movement
Once the lubricating oil is used up or dries out the clock continues to run but the wheels are running without lubrication in their pivots holes. Once the pivot holes are enlarged (see above) the gears begin to run too deep into each other and the clock eventually stops. In clock circles the proper function of one gear operating with another, smoothly is referred to as “meshing”. Once wear becomes a factor, winding the springs no longer helps, as the springs lack sufficient power, or the gears fail to mesh properly, preventing them from overcoming friction in the gear train.
This leads some owners to think the clock is stopping due to being “over-wound,” when in reality, it’s simply worn out, or there is so much debris and dried oil in the mainspring that it sticks and refuses to unwind.
Preventative maintenance can help avoid costly repairs.
Servicing a clock is a separate topic altogether but black or green oil around or in the pivot holes is an indication that re-oiling will be ineffective; dis-assembly and cleaning of the movement is necessary.
Mixing old, dirty clock oil with new oil will speed up wear, and adding more oil won’t improve its performance.
Environment
Changes in the ambient temperature of your environment will affect it’s timekeeping rate. It is quite common to make seasonal adjustments to your clock. If you are in a temperate climate such as my part of the world, humidity, and temperature changes have a noticeable effect on the rate-keeping of any clock. Increasing the ambient temperature will slow it down, from the expansion and lengthening of the pendulum rod (unless it has a compensating type pendulum).
Clocks perform better in the more controlled environment of a home, but damp basements, window sills, bathrooms, areas above heating elements or vents, garages, and other humid spaces are unsuitable for mechanical clocks. Harsh environments can damage both the movement and the case, leading to issues like cracks, fading, and detached veneer in addition to a myriad of problems with the movement.
Pendulum bob with regulating adjustment
Regulating your Mechanical Clock
Regulating a clock often means making incremental changes to the length of the pendulum by means of a rate adjustment screw located at the end of the pendulum, or as in the case of a French clock pendulum (above) a rating screw inside the bob. Turning the rating screw clockwise shortens the pendulum (faster) and counterclockwise lengthens (slower) it.
Usually, one full turn of the screw means adding or subtracting a minute per week. To simplify the process some clocks have a rate adjustment arbour on the dial, typically at the 12 o’clock position. That way you do not have to open the access door at the back of the clock to adjust the rating nut on the pendulum.
Rate adjustment arbor
If you have a double-ended key, the smaller end is used for the rate adjustment arbour. The “S” (slow) and “F” (fast) settings correspond to adjusting the clock’s speed—slowing it down or speeding it up. Clocks may have either one of these adjustments, but sometimes both (adjustable pendulum and rate adjustment arbor), as on this French shelf clock.
French mantel clock
Rate adjustment is a trial-and-error process and typically takes a week or longer. If you can adjust your mechanical clock within a minute or two per week you are doing well. You will gradually gain a feel for the kind of adjustment required to regulate your particular clock.
Clocks without pendulums are those that have lever escapements, floating balance escapements, or balance wheel escapements. Regulation is achieved by moving a lever from slow to fast (as indicated on a wheel for instance) or adjusting weights in one direction or another on the escape wheel. There are specific directions on how to this and it is best to consult the instruction manual on your clock or search for resources online.
Mainspring Power and Regulation
When winding a spring-driven clock you are winding a sturdy coiled metal spring. The mainspring is an energy storage system or a power source. When you turn the key the winding gets tighter until you cannot turn the key any further. This stored energy (or potential energy) is now ready to be released but because a clock has reduction gears and an escapement (method for energy to escape) the energy is designed to be released at a steady and controlled rate. The purpose of the gear train is to convert the slow rotation of the main wheel into the faster rotation needed to tell the time. Each wheel in the train turns faster than the previous one.
A spring-driven clock tends to release most of its energy at the beginning of a cycle and releases less energy towards the end of it’s winding cycle which is typically an 8-day period. Most clocks will run longer than eight days but will lose more time as the spring supplies less power.
Regulating some spring-driven clocks can be challenging due to the way they release their power, though this can vary depending on the clockmaker. If your vintage or antique spring-driven mantel or wall clock is accurate to within 1-2 minutes per week, it’s performing quite well.
Sessions Beveled No 2 tambour style clock and French carriage clock
My Sessions time and strike tambour-style clock typically runs about one minute fast at the start of the week and around one minute slow by the end of the week. This is normal.
This one-weight Vienna wall clock is accurate to within 30 seconds a week
On the other hand, weight-driven clocks are more accurate since they release power at a constant rate through the winding cycle. Weight-driven clocks are generally more reliable timekeepers and are easier to regulate.
Junghans Crispi wall clock with compensating pendulum
Neglect, friction, and environmental factors play a significant role in a clock’s ability to keep accurate time. By ensuring proper maintenance, placing your clock in a location free from heat and humidity, and regularly checking for adequate lubrication, you can extend its lifespan, maintain its value, and enjoy dependable performance for years to come.
Regulating a clock often means making incremental changes to the length of the pendulum by means of a rate adjustment screw located at the end of the pendulum. Turning the rating screw clockwise shortens the pendulum (faster) and counter clockwise lengthens it (slower). Usually one full turn of the screw means adding or subtracting a minute per week.
In your case I would make several counter clockwise turns of the rating screw at the bottom of the pendulum to begin with and see how it does over the course of a day or two. Make sure that the pendulum bob actually drops when turning the screw counter clockwise.
If you can get your clock within 2-3 minutes a week you are doing well.”
My hope was that it would be a relatively straight forward exercise
This is Part 1 of servicing this 30 hour Waterbury time and strike movement. I honestly thought it would be relatively straight forward exercise. Dis-assemble, clean the parts, polish the pivots, do a little bushing work and voila! Not so.
I have worked on many clock movements but I have never seen quite the extent of wear that I found on this movement. 150 years certainly takes its toll.
Ogee clock showing replacement pendulum bob
Some time ago I profiled this Ogee clock. To reiterate, in 1839 the first prototype movement was produced for Chauncey Jerome by his brother Noble in Connecticut, USA. Jerome thought that a simple one-day clock could be produced far more cheaply than those with wooden movements at the time. Brass movements were more robust, could be transported easily and were unaffected by humidity. The simple case added to the movement was the Ogee named for its “S” shaped moldings. The success of the Ogee clock convinced other makers that there was money to be made in clock production.
This particular 30 hour time and strike Waterbury Ogee clock was produced at the height of Ogee clock production (1870s) and many thousands were sold. This is a very fine example. Absolutely nothing needs to be done to the case; it is in exceptional condition. The movement, well, that’s another story. This was not a working clock when I got it.
Waterbury clock movement
After disassembling the movement I discovered two things. One, there was evidence that it had been worked on before – as expected. There were punch and stake marks on the movement plates to close pivot holes and there was considerable wear in the lantern pinions.
Front plate has been removed
Four of the wheels have lantern pinions, with 5 trundles apiece. Trundles are the loose wires within the 2 shrouds. Dust and dirt as well as misalignment of wheel and pinion due to worn pivot holes can exacerbate the wear issue. The trundles on all 4 lantern pinions are very worn as you can see in the next two photos. I discovered why this clock does not run. When the gear teeth hits two worn trundles at precisely the right angle it locks the gear and stops the clock.
Worn trundles within lantern pinion
Another wheel with worn trundles within the lantern pinion
Professional clock-makers encounter these issues fairly regularly. Indeed, one of the most common operations in clock repair is replacing bent, broken or worn trundles. There are different methods of performing this service and the method I will employ is to drill into the shroud, extract the worn trundles, cut new ones out of pivot wire, insert them and re-knurl the shroud.
In the meantime bushing work was performed; 10 bushings were installed, 5 on the back plate and 5 on the front, including one on the escape wheel bridge. I re-assembled the movement knowing that the trundles had to be replaced, but despite new bushings the movement ran only marginally better.
Part II (Jan 2nd) details the procedure I followed to replace the trundles in the lantern pinions. Stay tuned.
Halifax (Nova Scotia, Canada) was devastated on 6 December 1917 when two ships collided in the city’s harbour.
Taken from the Dartmouth side
Results of the deadly blast
Today marks the 100th anniversary of the Halifax Explosion.
On Dec. 6, 1917, the Belgian relief ship Imo rammed into the French munitions vessel Mont-Blanc, which was carrying TNT through the narrowest part of Halifax harbour. A fire on board the French ship ignited her cargo, causing a devastating explosion. The Mont-Blancexploded at 9:04:35 a.m., sending out a shock wave in all directions, followed by a tsunami that washed violently over the Halifax and Dartmouth shores. More than 2.5 square km of Richmond were totally levelled, either by the blast, the tsunami, or the structure fires caused when buildings collapsed inward on lanterns, stoves and furnaces.
Two thousand people were killed in the Halifax Explosion and another 9,000 were injured. The explosion is the worst man-made disaster in Canadian history.
Seconds later a Junghans Crispi wall clock fell off a wall in a house on Princess court, North End Halifax. The following is the story of that clock.
I bought the remains of the clock from a gentleman in Halifax who related the story of how this clock was passed down to him through his wife’s family. It was important to him that someone who had a love and an appreciation of old clocks should continue with the restoration after he had rebuilt the frame some 30 years ago.
Thus began the six month journey of restoring the clock to its former glory. During the restoration I was able to obtain an old catalog image (supplied by a member of NAWCC) to guide me through the rebuilding process. Some of the smaller trim pieces were missing and because they are impossible to locate they had to be either purchased from a clock supply house or handcrafted.
How the clock came to me
Four Junghans clocks, the Cripi is second from the left
Junghans Crispi wall clock
It is now a wonderful tribute to that terrible tragedy on December 6, 1917.
Having moved modern grandfather clocks these are some useful some tips when transporting your clock. If you are unsure, a professional will certainly perform the service but consider the cost before you decide since you will pay travel time plus disassembly/set-up time, shop supplies and tax.
A call to a professional is unnecessary if you follow these simple steps.
Ridgeway Hamilton Country circa 1996, Hermle movement, cabinet by Pulaski Furniture Co.
Never lift up or carry your grandfather clock without first partially disassembling it. This is very important as you risk damage to your valuable clock. Moving your clock just a few inches from one area of a room to another requires that you do it carefully and correctly.
To preserve its finish, use cotton gloves to handle the weights, pendulum and other brass clock parts.
The weights are not all the same although they may look identical
Follow these steps:
Raise the weights to half wound for chains. Cables will need to be hooked separately by string to the bottom of the case.
Unhook the weights. If not already marked, add tape and pencil to mark the weights L, C, R; “L” for left, “C” for centre and “R” for right. This is to ensure that the correct weight goes back where it should. The weights are not all the same although they may look identical. On most modern grandfather clocks each weight provides the motive power necessary to operate the time, chime and strike trains of your grandfather clock. The manufacturer has determined that a weight powered by an exact number of lbs will affect how the clock runs. For example, the chime train requires a specific weight. If the weight is too light the chimes will run slowly or not at all. Generally speaking, the heaviest weight goes on the far right side chime train, as it needs more power to run all of the independent chime hammers.
Take the side vents out of the case or tape them from the inside. They lift out of their channels from the inside.
Remove the pendulum by holding it (with cotton gloves) from the middle and slightly move it up. It should unhook easily.
Lyre pendulum
Secure the chains or cables by bunching them from bottom to top and wrapping them in newspaper and place a rubber band around the package so that they do not move around. Pipe cleaners or twist ties are also great for securing the chains/cables.
Put each weight in a sock or in bubble wrap.
Place the pendulum in a folded blanket.
Punch holes in a strip of an egg carton to hold the chiming rods or use Styrofoam.
Weights should be separated from the clock during transport.
Lie the case down for transport ensuring that there is sufficient protection for the glass.
Lock the access door. Use a large blanket to surround the clock and place cardboard between the blanket and the front glass.
Ridgeway cabinet key
Some movements can be taken out for transport but for modern grandfather clocks, this is seldom required. Nonetheless, ensure that the movement is secure in its case.
Hermle movement
If you have decorative ornaments such as finials that friction fits into their respective holes they can be lifted out.
You should now safely transport your grandfather clock.


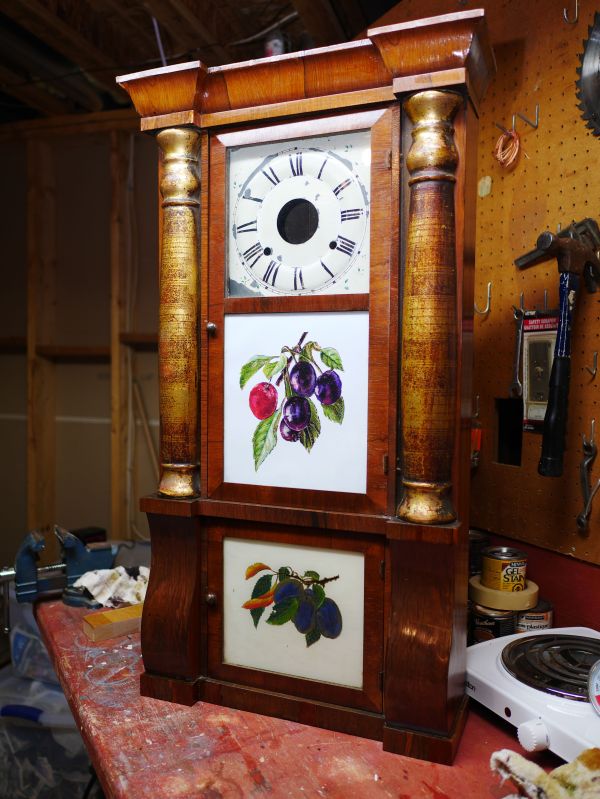


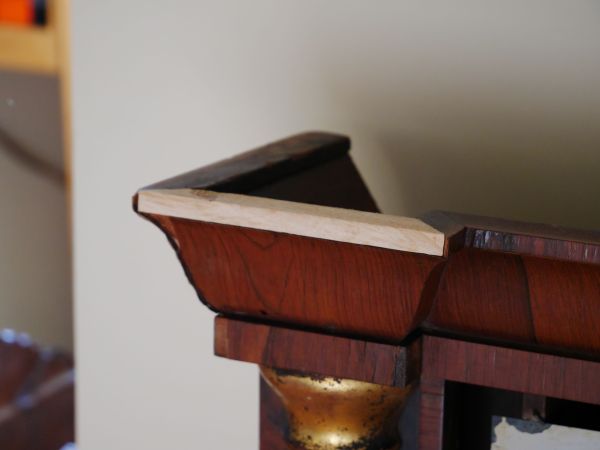


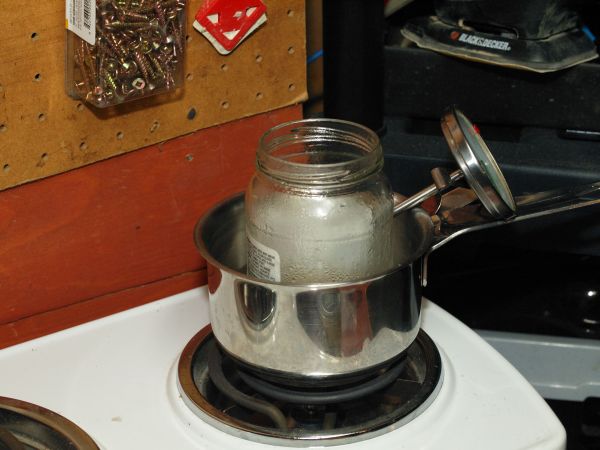


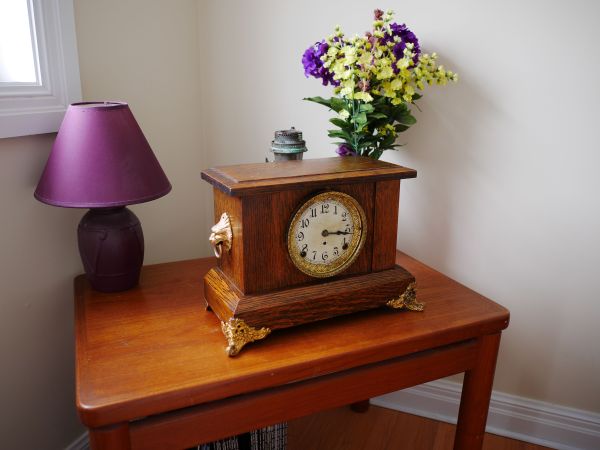


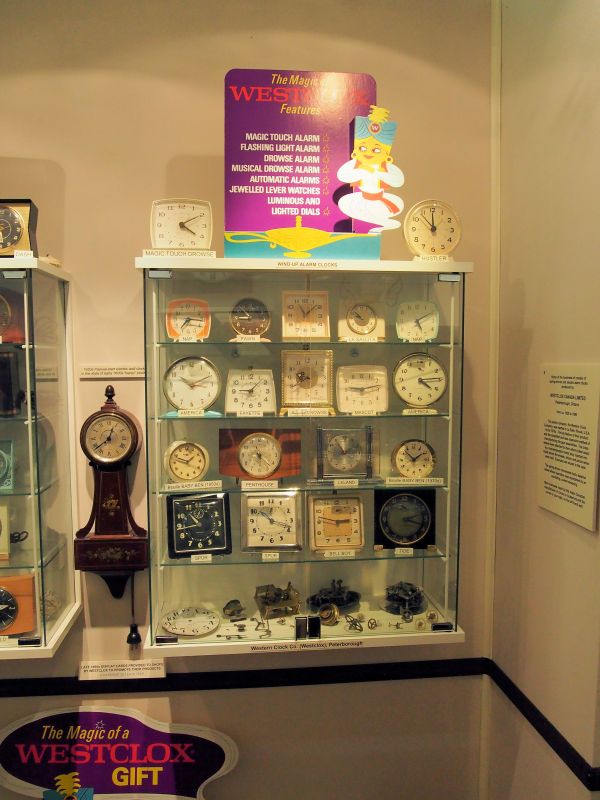
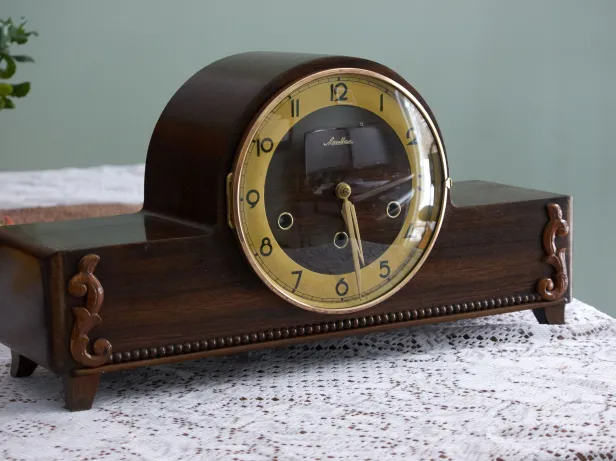
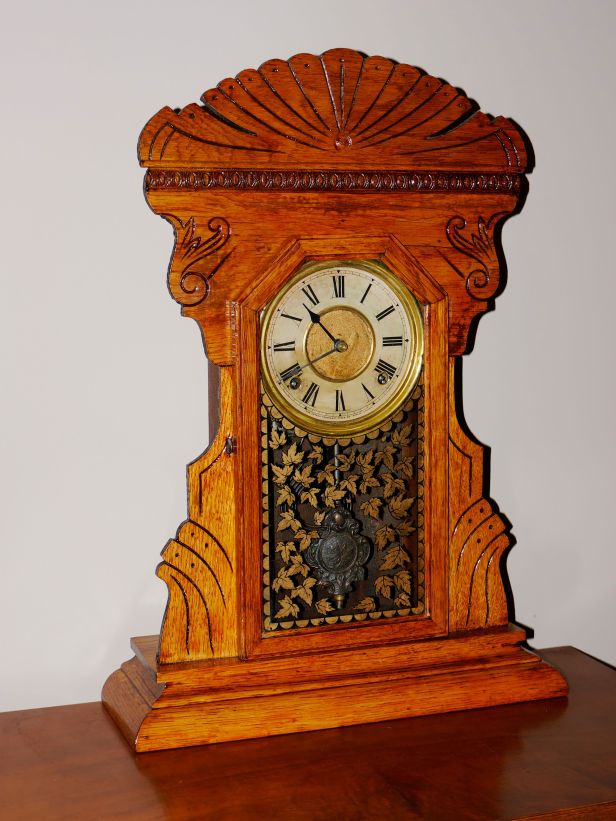

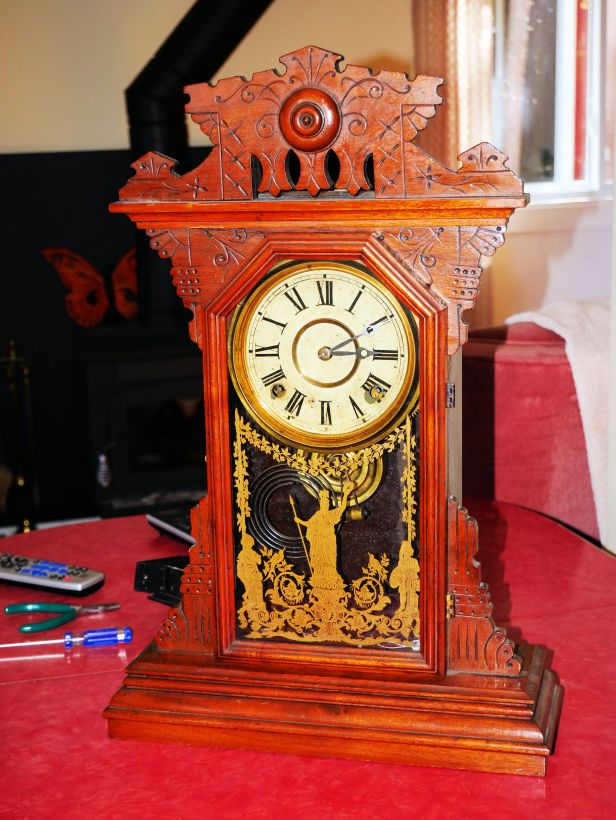
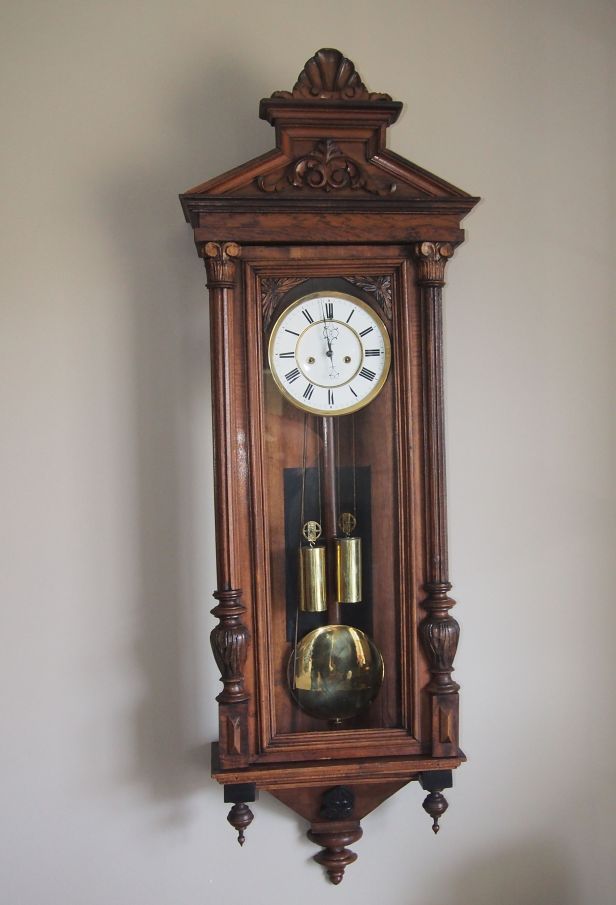
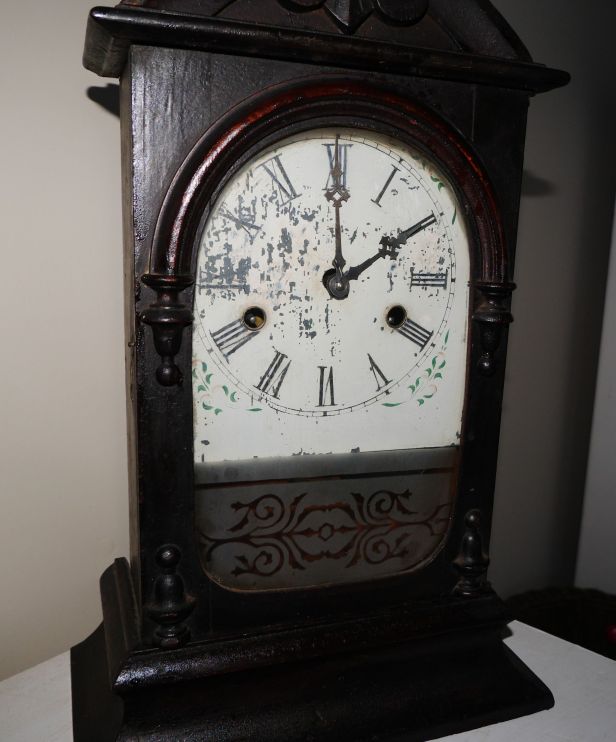
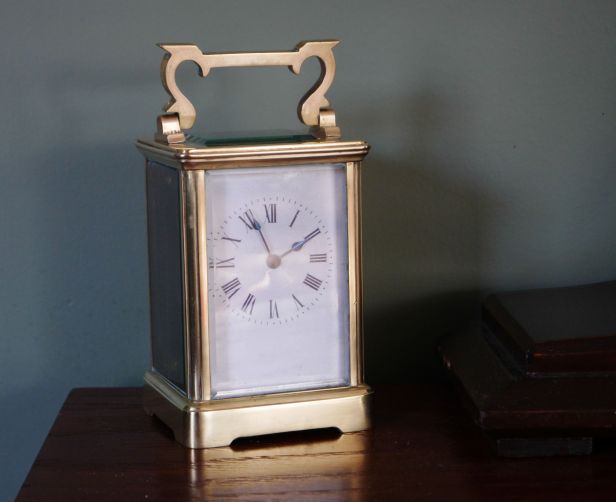
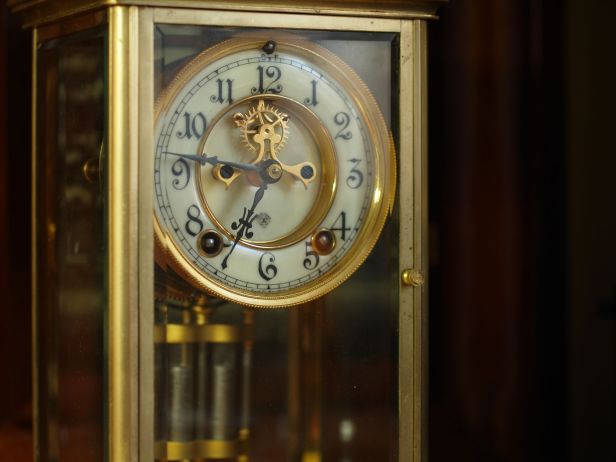


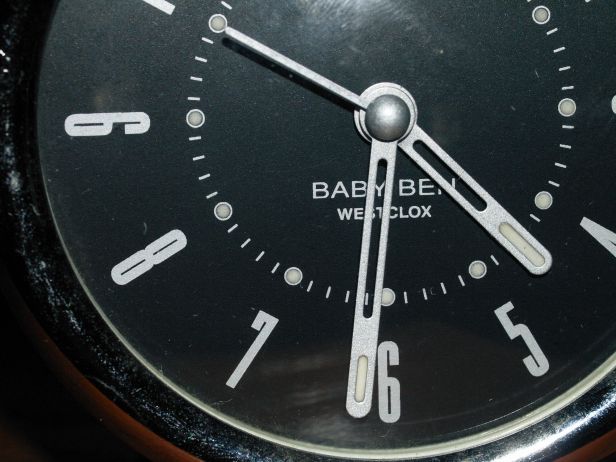
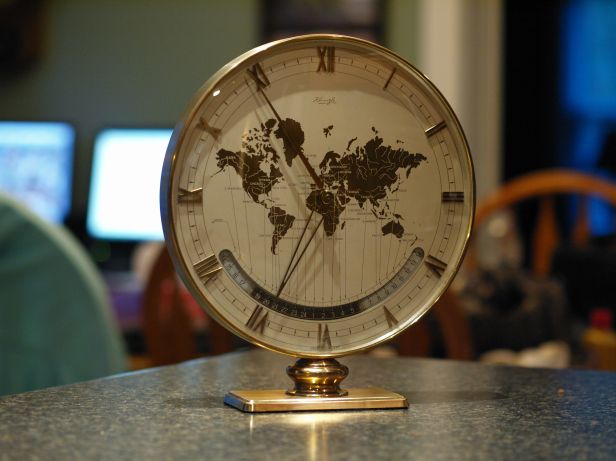


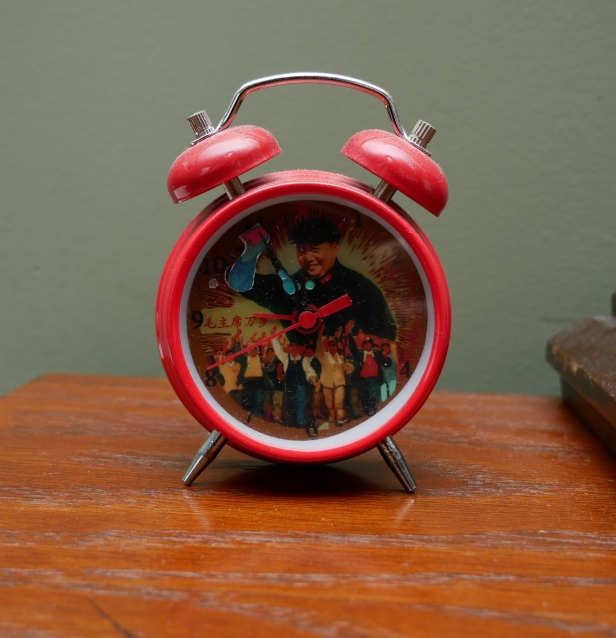


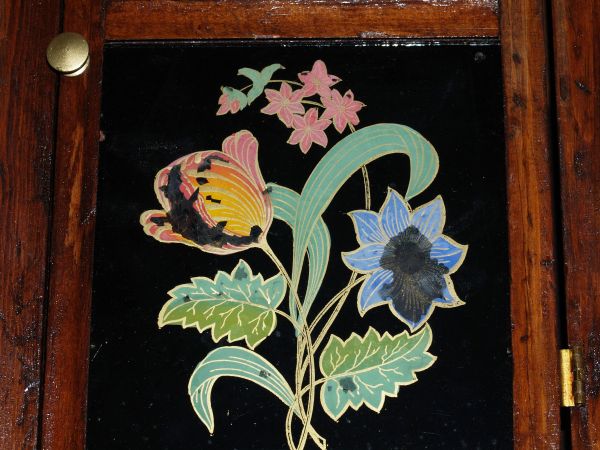
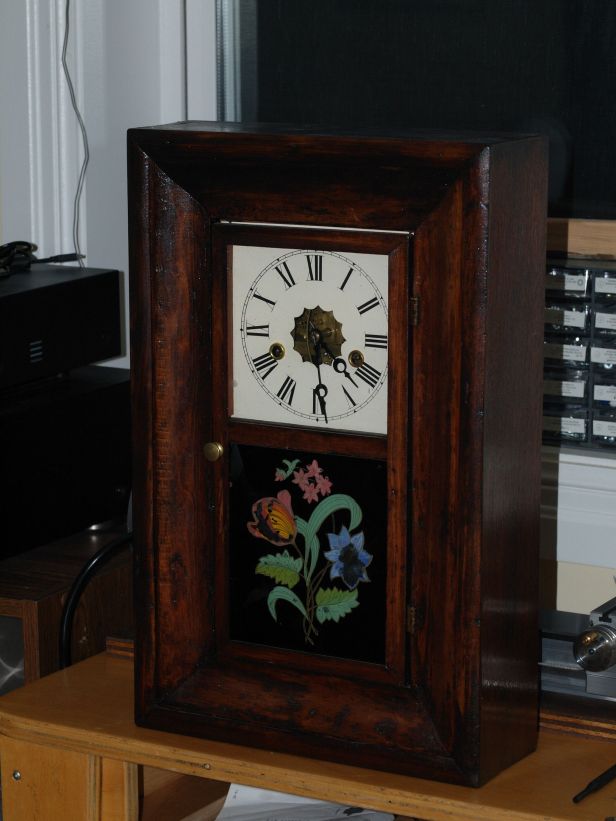
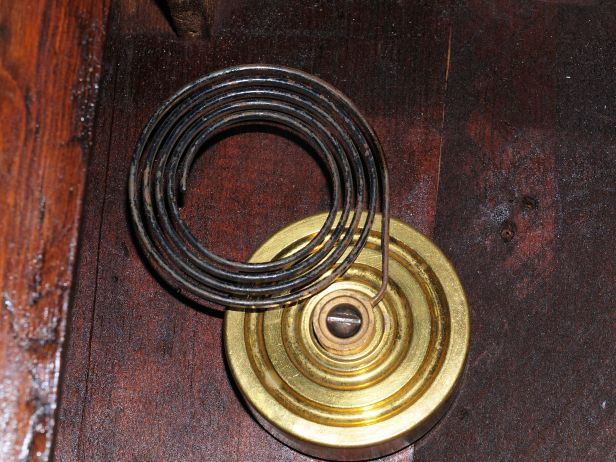
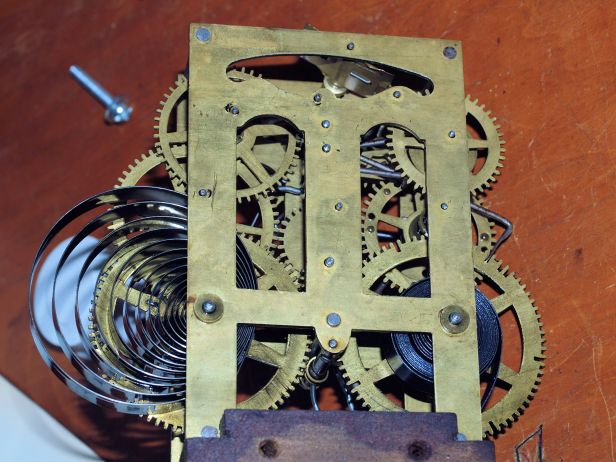
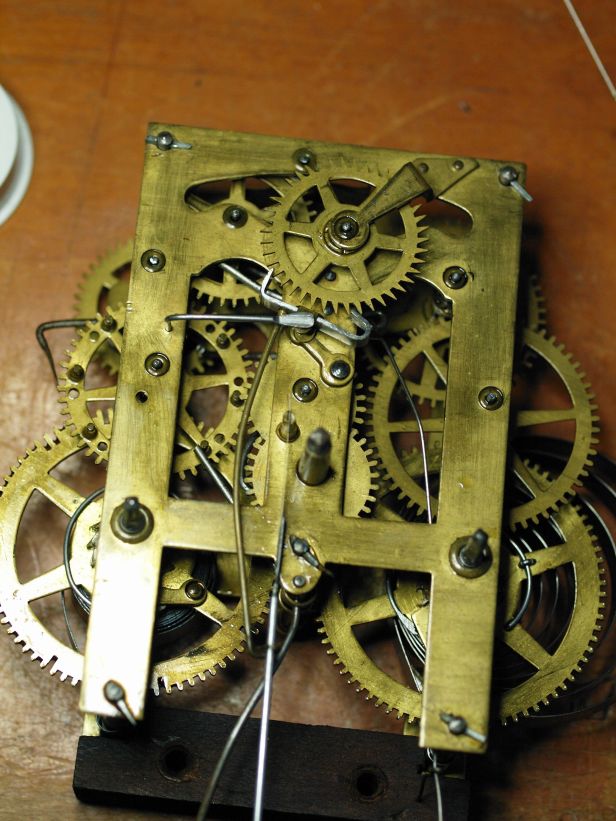
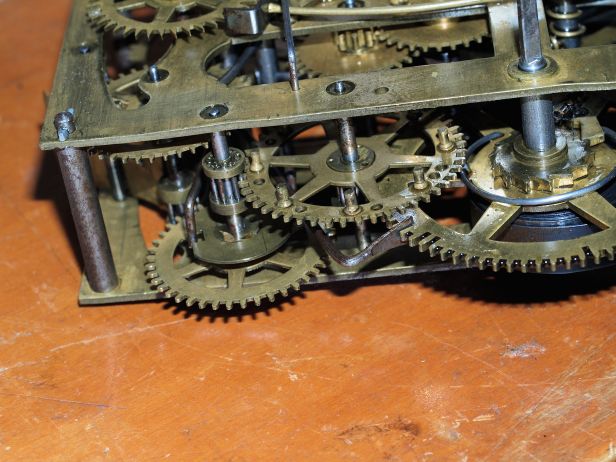

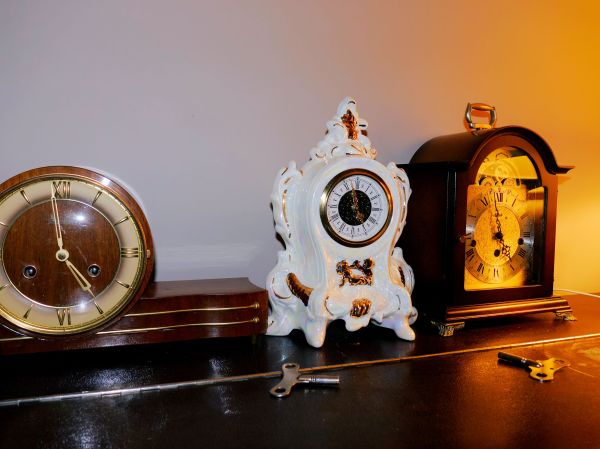
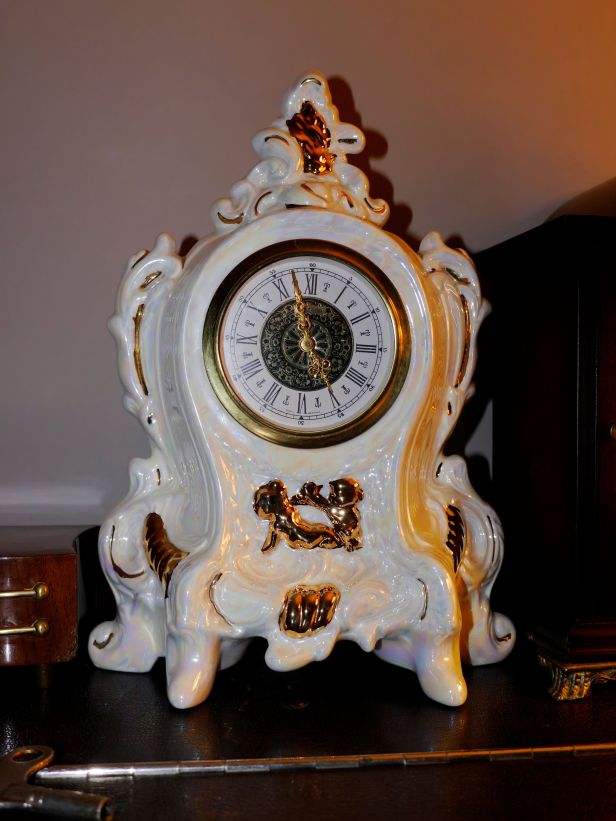

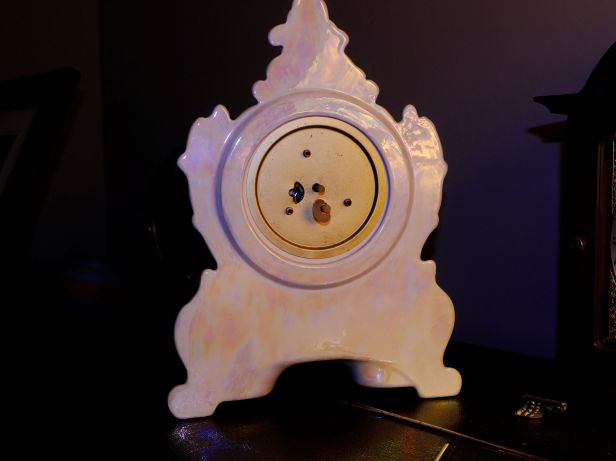

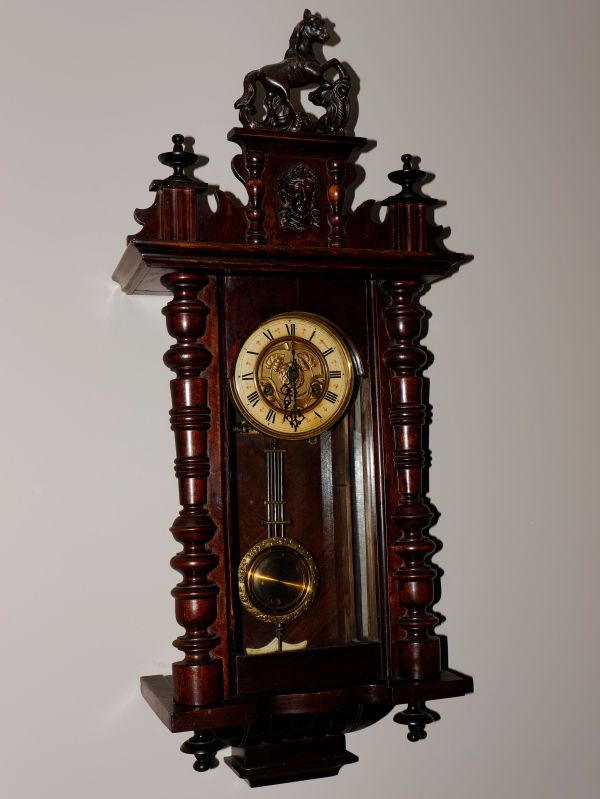
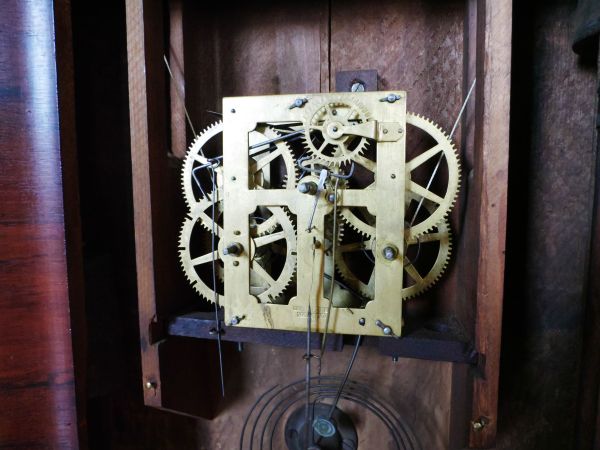
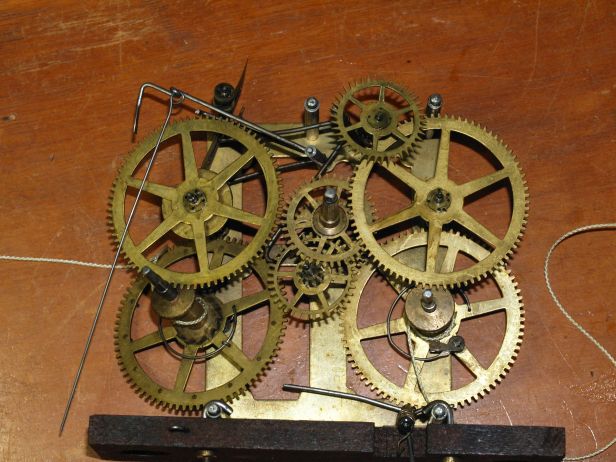
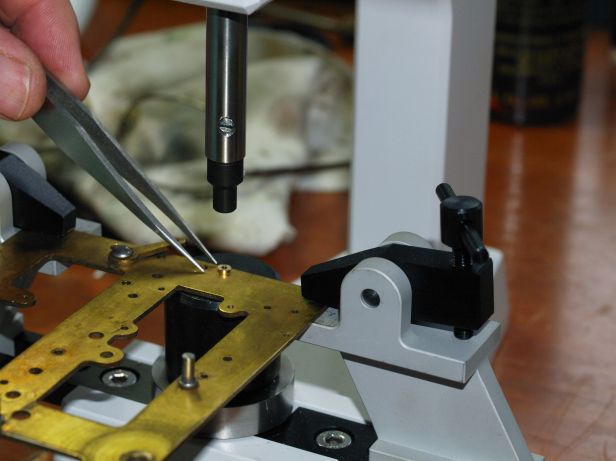

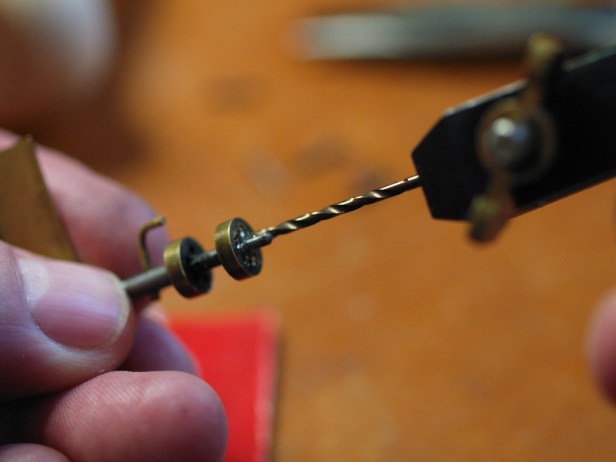
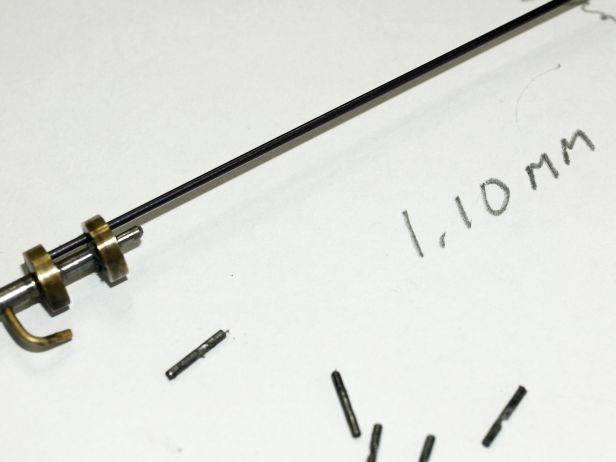
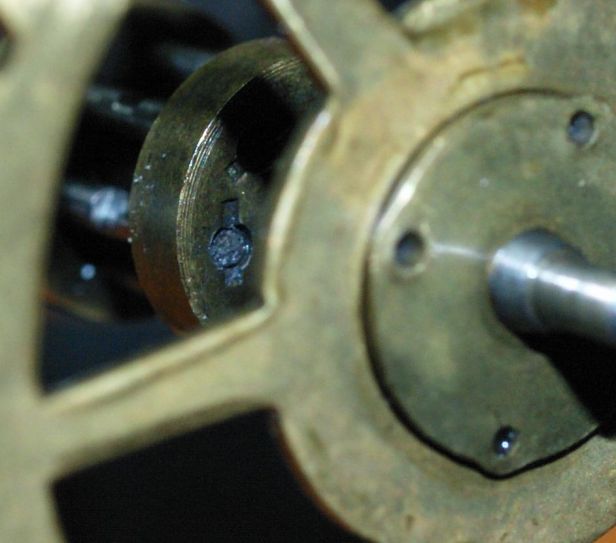

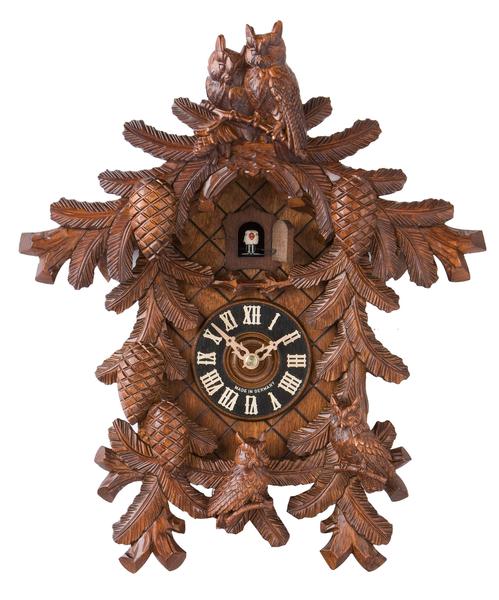

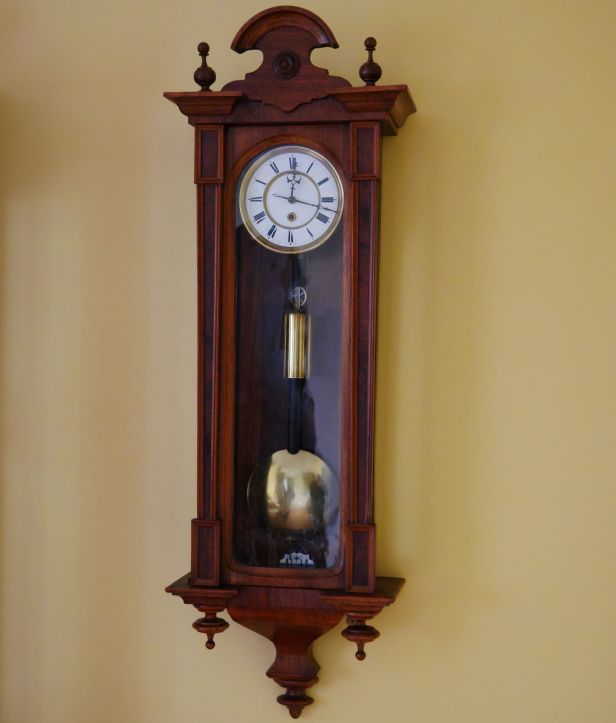
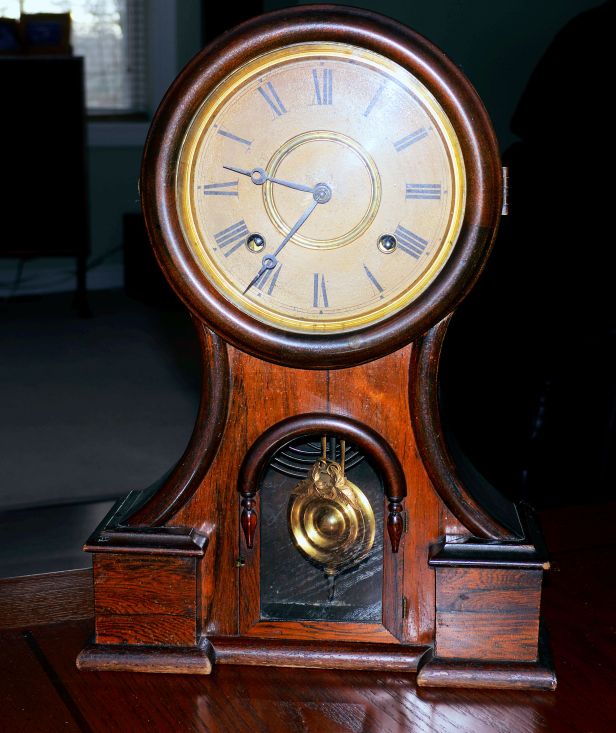
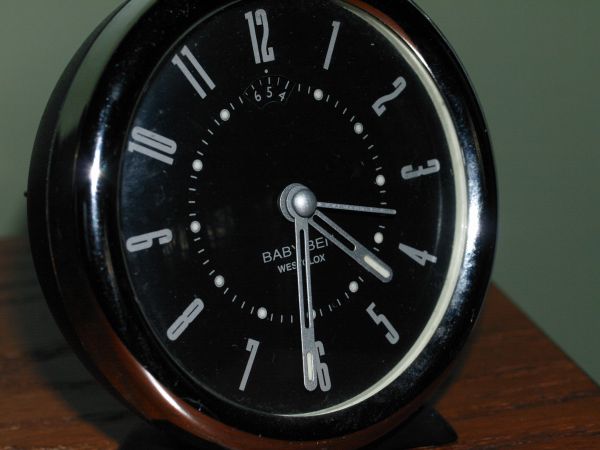
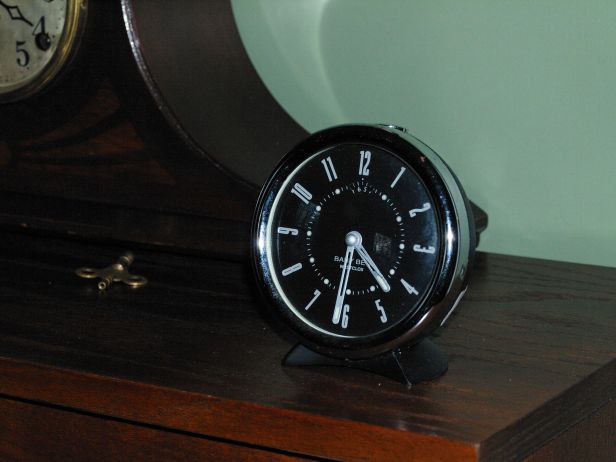
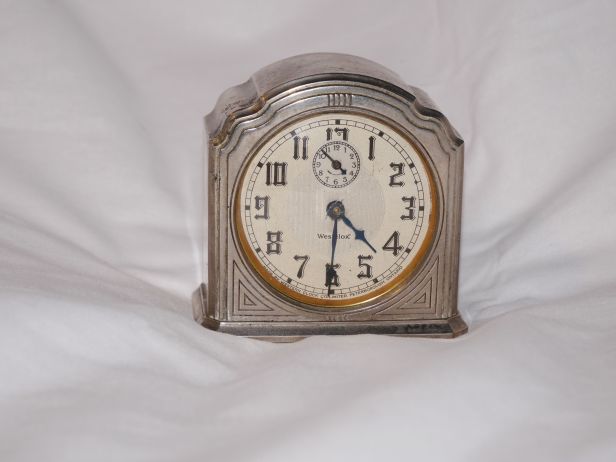
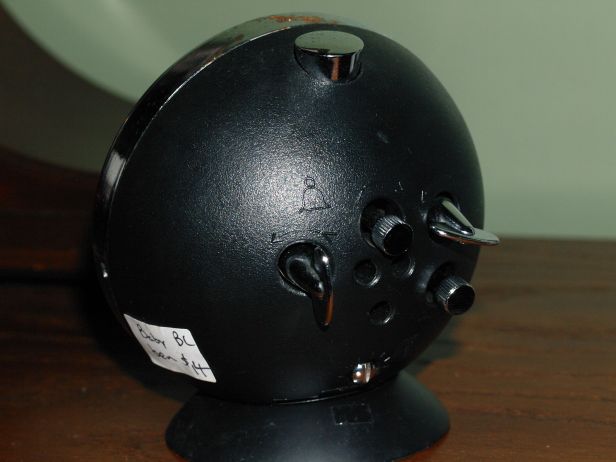

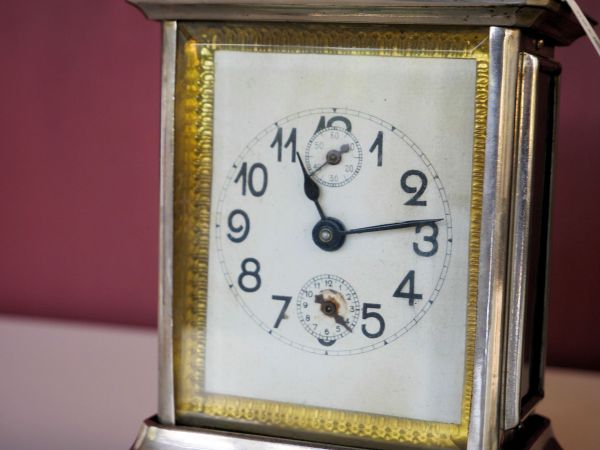
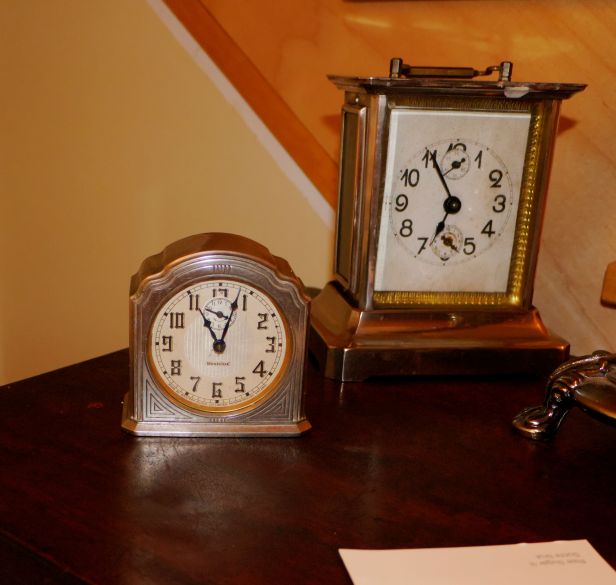


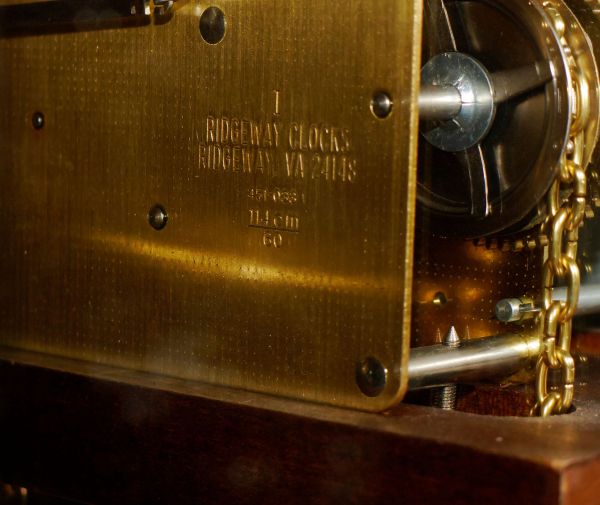
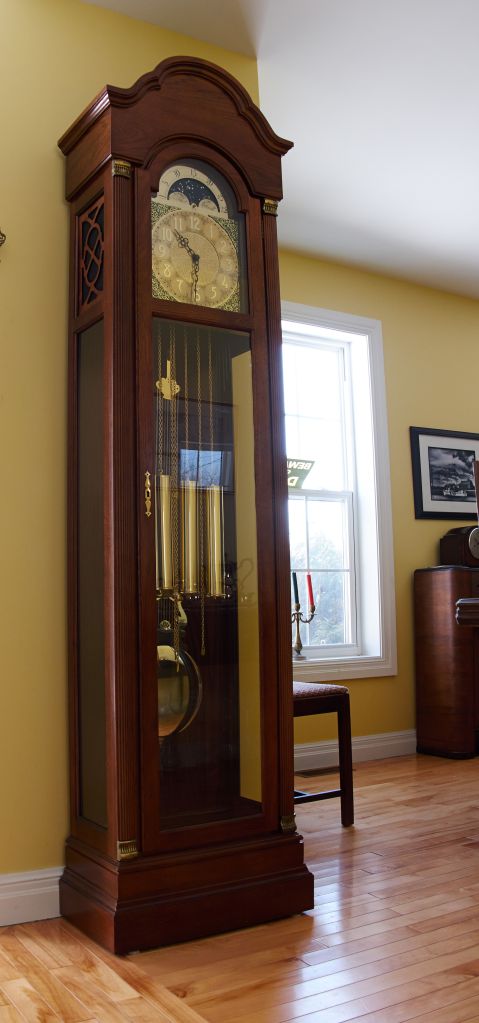


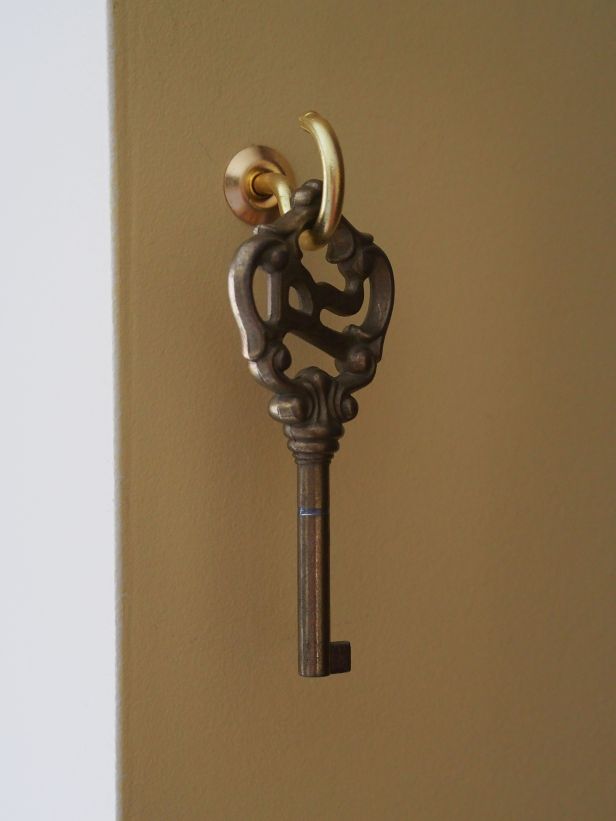
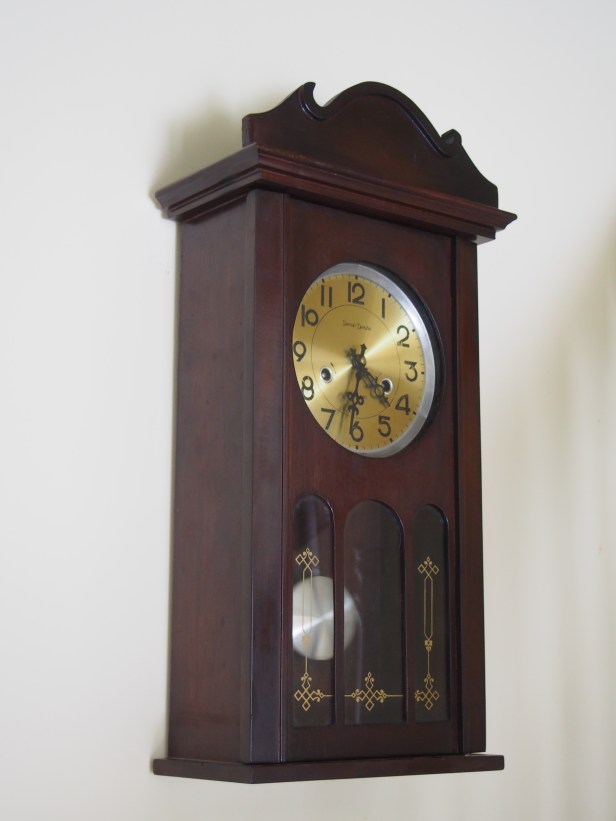
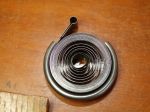
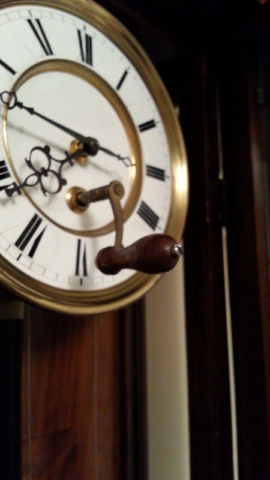
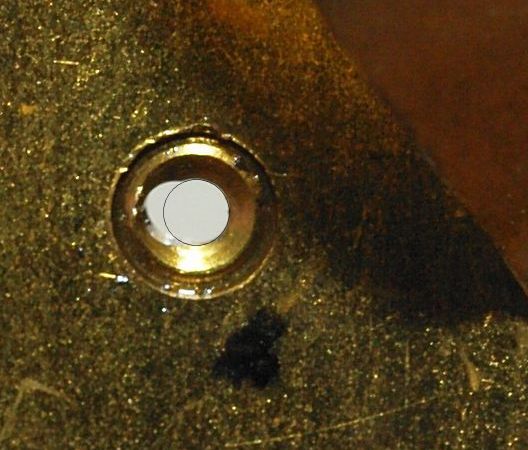
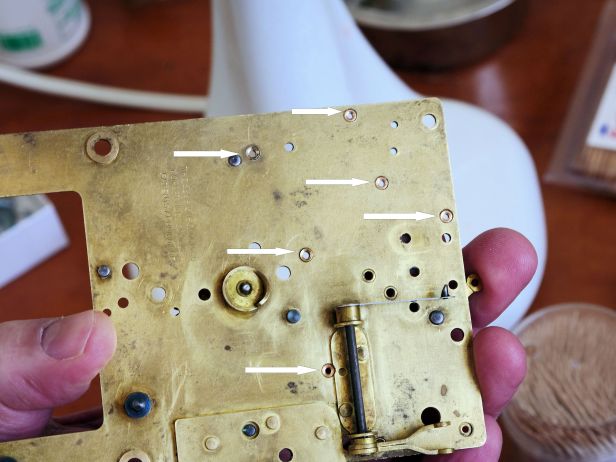
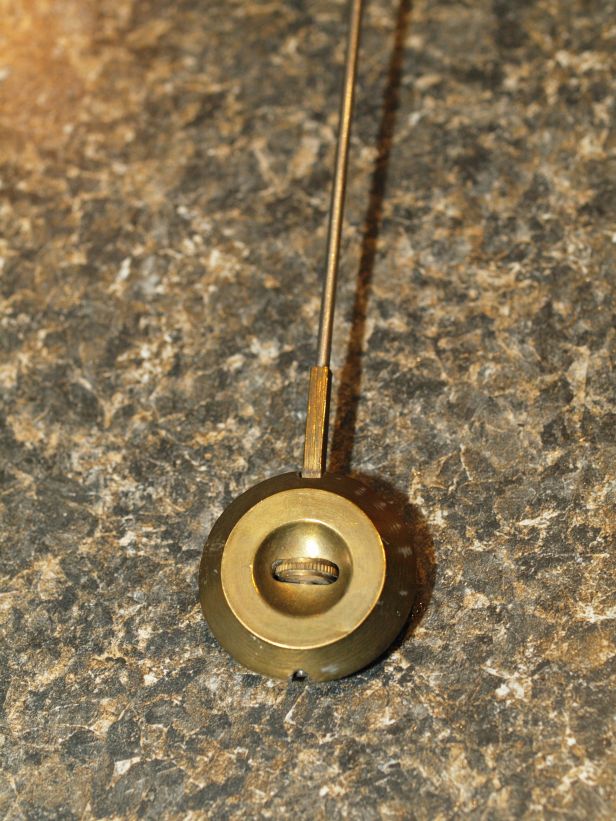
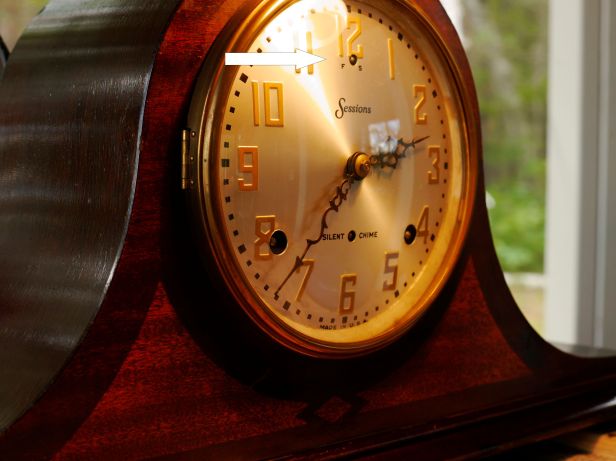

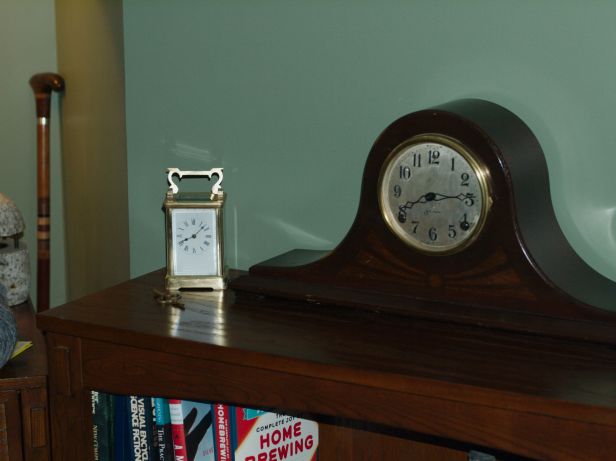
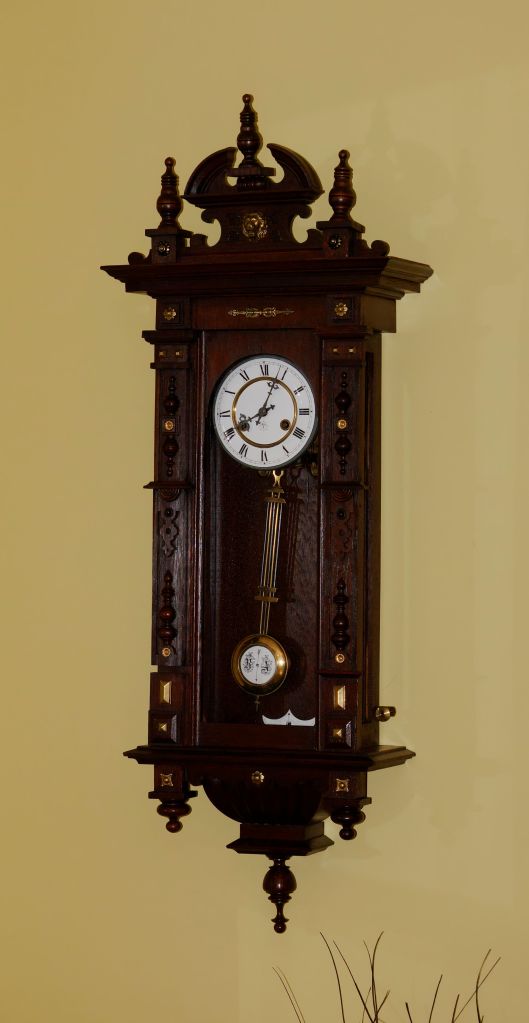
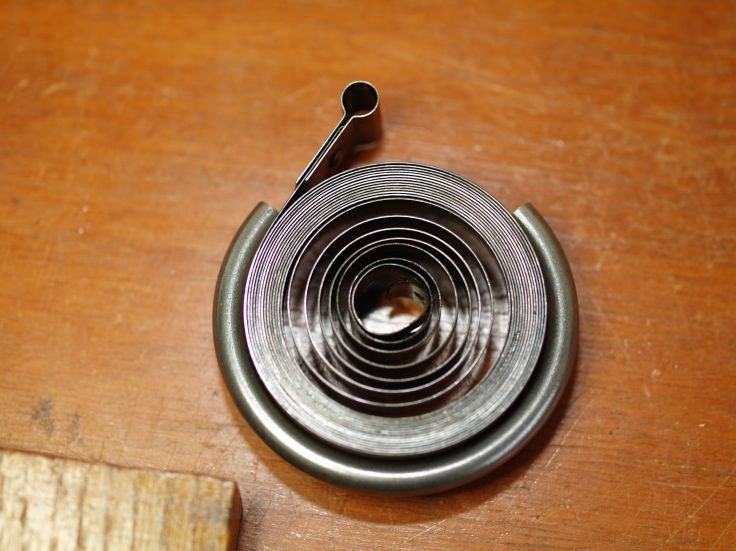
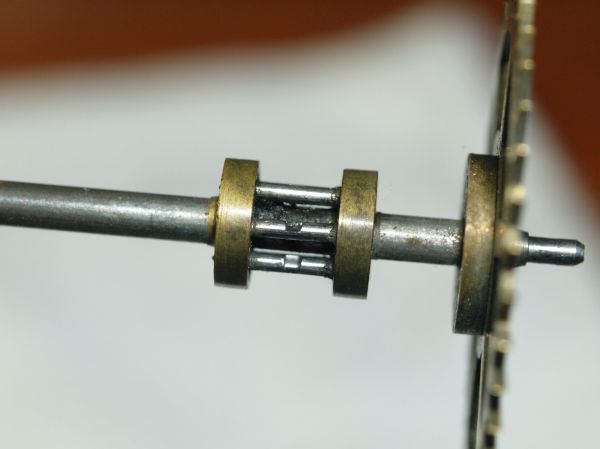
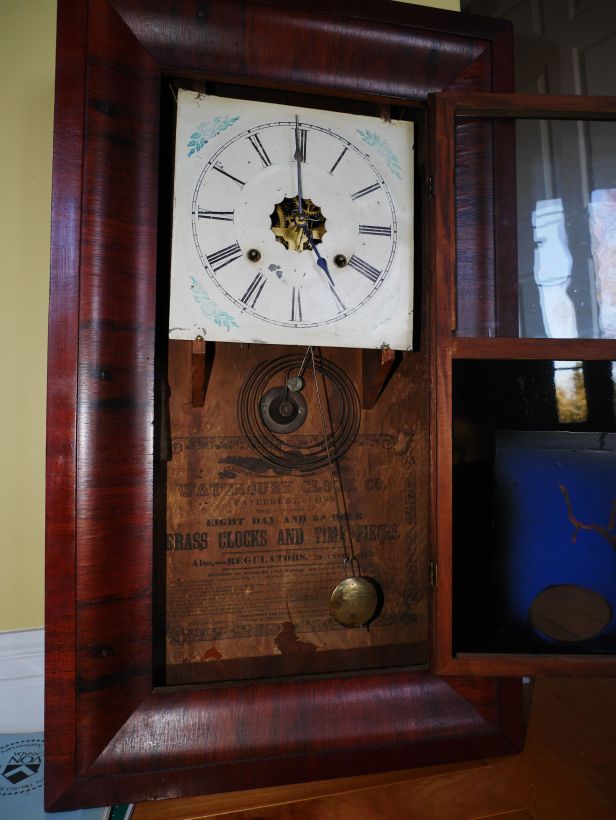

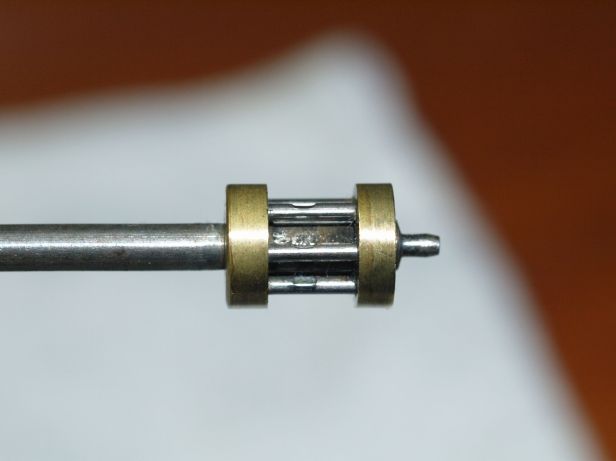

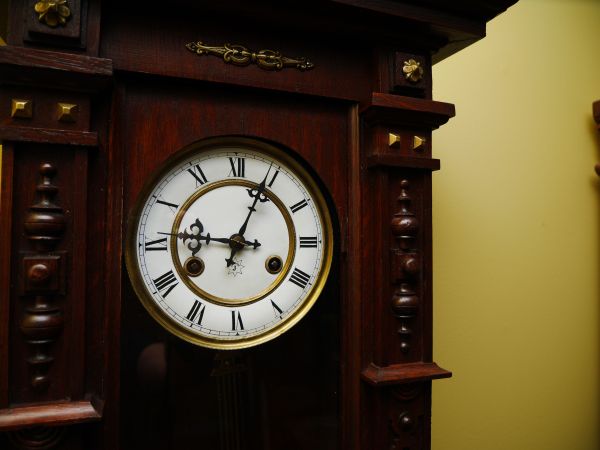


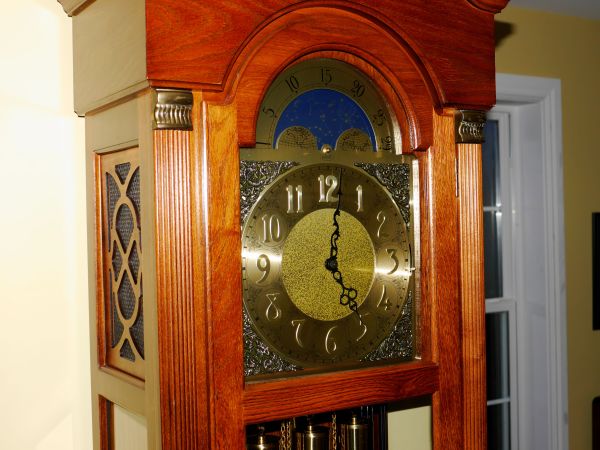


You must be logged in to post a comment.