Winter, along with the dry conditions of a typical Canadian home, can play havoc with wooden clock cases. In Canada we generally shut the doors and windows to keep the cold air out from mid November to mid March and we may stay inside for days at a time. During our Canadian winter we have difficulty controlling indoor humidity. Most modern homes have a commercial style air-exchanger that is designed to control relative humidity but it can only do so much.
I have dozens of clocks and most do not seem to mind the changes in humidity from season to season other than a rate adjustment. Those vintage clocks that are adversely affected tend to be clocks with thin veneers that separate from the frames of the cases. Less affected are Ogee clocks with thicker veneers.
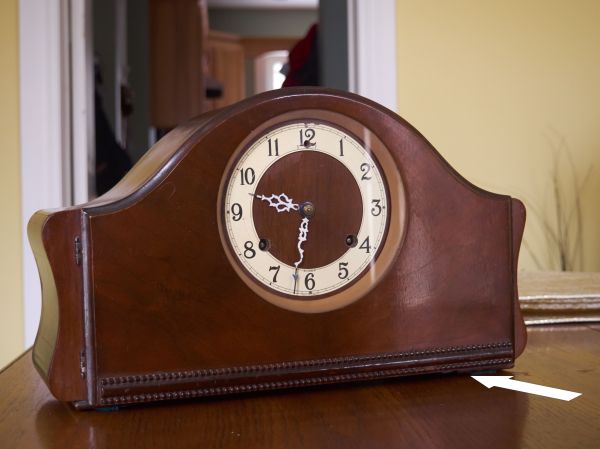
My Ingersoll-Waterbury time and strike clock from the mid 1940s is a 70 year old clock and not a particularly valuable one to begin with but has been affected with peeling veneer. The peeling veneer is unsightly and must be addressed.
I am not opposed to using modern materials to repair a vintage clock and in this case yellow carpenters glue was used to close the gaps on both the left and right rear of the case. Yellow carpenters glue has a bonding strength of 3 tons and for maximum effect is should be clamped for 24 hours.
Split veneer on left side, rear
Both sides of the case were splitting open. The right was slightly worse than the left. Although I have several clamps I only had one to spare for this little project so, the job was spread over a few days.
Right side is clamped
Wax paper is placed between the clamp and the veneer to prevent the glue from adhering to the clamp itself.
Once the glue has bonded, the case is lightly sanded in the affected areas, the remaining cracks treated with wood filler and touched up with a dark stain.
Stain-able filler in the small cracks that remain
Two coats of shellac are then applied.
Not perfect but an improvement.
Clocks and museums
I am not fanatical about humidity as far as my collection is concerned but museums go to great lengths to control humidity. In museums temperature and humidity are interrelated, and must be monitored and controlled in conjunction with one another towards the goal of preservation. Room temperature is usually established according to the needs of visitors, and is set between 18 and 20°C. The relative humidity for the correct conservation of the works displayed usually lie in the limited range between 45 and 50%.
Clocks react to humidity differently. Clocks with wood pendulum rods need seasonal adjusting as the wood contracts and expands with changes in humidity. Wall clocks that have tight doors in the summer are easier to open in the winter as wood contracts.
High humidity can be mitigated through the use of humidifiers if there is sufficient concern about dry air and its effect on clock cases. It is a good option in the winter months.
If you have a modest collection of clocks I would not worry about humidity issues but you can be assured that seasonal changes can have an affect on your clocks.
What other machine have you acquired that has worked continuously since it was made 150 plus years ago and still does the job it was intended for? Mechanical clocks revolutionized people’s perception of time by displaying neutral, uniform units that showed the passage of time. Though not as accurate as the modern electronic timekeeper the mechanical clock remains a marvel of engineering and innovation.
The constant search for clocks
Locating antique and vintage clocks involves travelling, meeting fascinating people and discovering a clock’s particular history. Each story is unique and some stories are sad. I recently arranged the purchase of an antique French shelf clock, arrived to pick it up and discovered that the person was terminally ill and selling off his clock collection to provide for his wife after he had passed. I really felt sorry for the fellow. Of course, many stories are happy ones.
I enjoy clocks for what they are. I often think about the men who conceived them, built them and the craftsmen working in small factories in places such as New England with primitive (by our standards) tools and the harsh conditions they endured. Life to them was a day-to-day struggle. That the clocks are still with us today is a testament to the pioneers of clock-making.
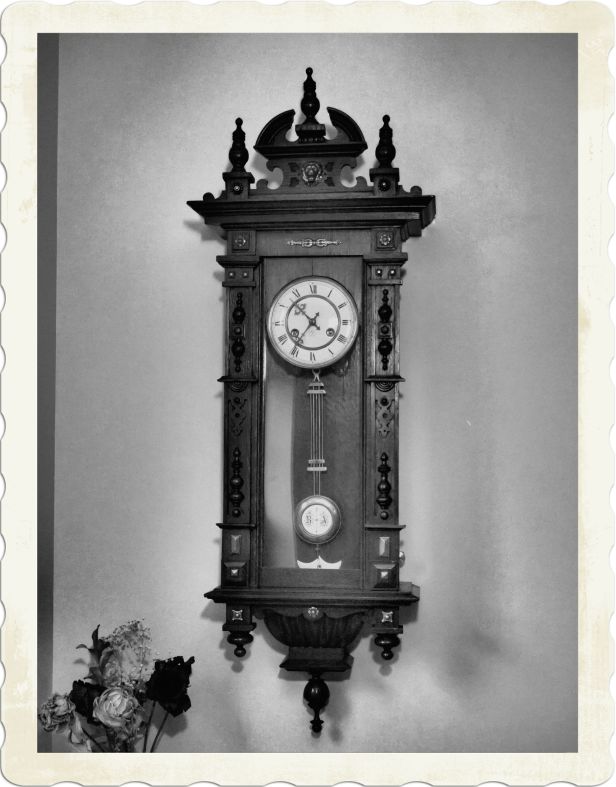
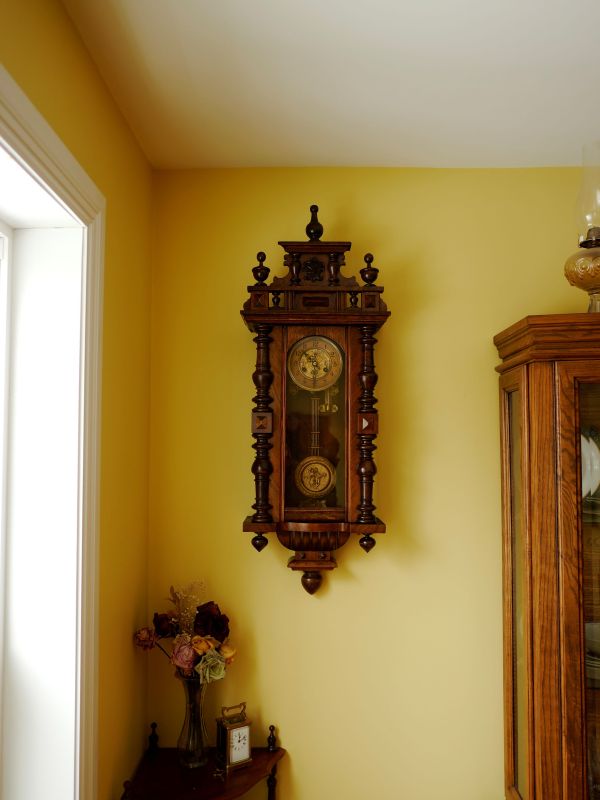
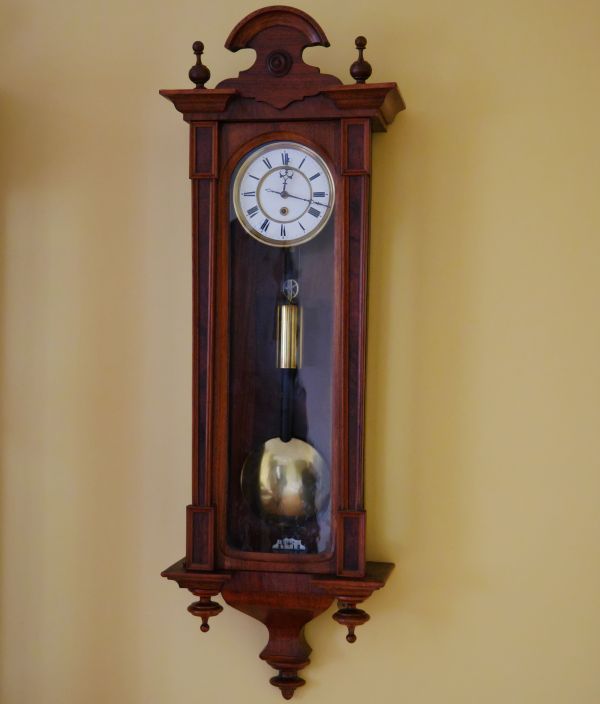
Miniature Vienna Regulator wall clock, circa 1870
There are a lot of clocks I find intriguing. There are some people that collect complex clocks and I appreciate them as well but I lean towards beauty in simplicity. For example, the miniature Vienna Regulator pictured above is a time-only clock made during the Austrian-Hungarian empire (1870). It is simple, little can go wrong and after nearly 150 years it is still running strong.
There is a certain joy in collecting and repairing clocks. The hobby of clock-making allows one to escape from negativity, put aside worldly matters, effectively manage stress, and dispense with everyday concerns. Occasionally clock problems are very challenging however, the joy in discovering a solution is immeasurable. Beyond that, clocks are an art form and should be appreciated for what they are.
As a collector, the number of clocks I have is not important. The size of my collection is also not important but by trimming my acquisitions from time to time I keep it manageable.
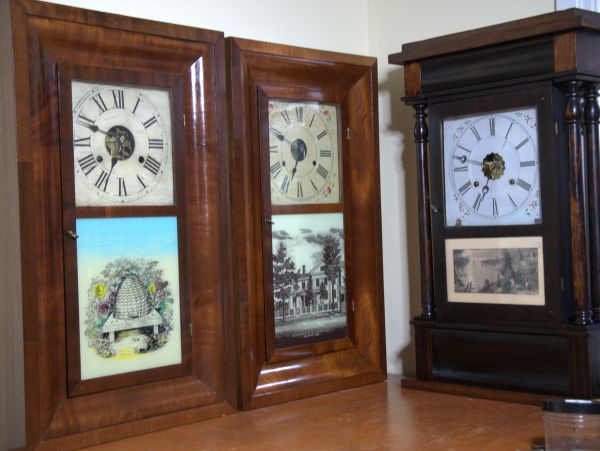
One cannot deny the classic style of an American Ogee clock. This one is in great shape and required almost nothing to get it to top form. 30-hour shelf clocks are abundant but not many cases survive years of wear and tear.
Dial removed to show the 30 hour movement
This George H. Clark 30-hour shelf clock is a very good example of Connecticut form. The case form is called an “og” or “ogee”, a mathematical term that describes the “S” curve shape in the primary molding that surrounds the door.
The clock has a brass time and strike, weight driven movement with an excellent original printed paper label on the interior reading in part “Made and Sold at/46 Courtlandt St/New York…. George H. Clark”. It measures 28 x 17 x 4.5”. This rectangular shaped case is decorated with nicely grained mahogany veneers. The veneer has very little if any losses.
The dial face
The upper section of the door is fitted with clear glass. Through this one can view the painted wood dial. The wood dial tells me that it is an early pre-1850 clock. This dial is formatted with a Roman numeral time track.
It is always a challenge matching 100+-year-old paint but by combining white. brown and yellow acrylic paint I was able to approximate the original colour. Some Roman Numerals were touched up with black acrylic paint.
The wood dial before touch-upsAnd after numerals and face given a matching paint; you can see the difference in the number 4
I also glued two small blocks under the left and right “L” pins to centre the dial correctly.
The door is open showing the gong coil and the pasted label in very good condition
The lower section features a beehive painted tablet. The tablet is a replacement but fairly close to what would have been there at the time.
Beehive design; not original but in keeping with the style
Observations regarding the movement
The movement looks like an early (unmarked) Waterbury, ca. 1860 type 2.411. Waterbury movements have “quarter-round” corners, while most other ogee movements tend to have the “tombstones” or plain rectangles. The movement could have been swapped but It is difficult to tell.
A clean Jerome style movement
Everything except the movement points to a period between 1840-50. If the movement is a replacement it was likely an early replacement.
30-hour movements will run surprisingly well with horrible pivot wear. However, regarding repair, my view is this: I do not normally install new bushings in every single pivot hole on the movement. If a bushing hole is passable I will leave it as-is but if the hole is quite oblong I will install a new bushing to mitigate potential gear meshing issues in the future.
Addressing the movement
I will also ignore some past repairs. For example, in this particular movement I noticed 4 punch marks around the escape wheel bridge pivot hole. As most clock repairers know using a punch to close a pivot hole was an acceptable practice many years ago though it is not considered a good practice today. In this particular case, the pivot hole was in good shape and I decided to leave it as-is. After assessing the movement further, I installed one bushing on the second wheel front plate strike side (S2) and the second on the second wheel strike side rear plate (T2). Just two bushings. As to the three lantern pinions, they were in very good condition.
Reassembly was routine. The time side ran fine.
Adjusting the strike side was not easy and should have been a simple procedure. The problem was not only correctly positioning the warning pin on the fly but ensuring that the warning hook lever could actually meet the warning hook. The levers in this clock had been bent every which way making it a real challenge to find the correct angles. It did not strike correctly before servicing. Trial and error combined with colourful language certainly helped correct the strike.
The finished clock
The gong block and coil were also cleaned up. Tip; it helps to put the same screws back in the same holes. Seems trivial but it is a good practice. Not all screws are the same.
Gong block removed and cleaned
Little time was spent on this clock and I was fortunate to have an almost perfect case. The previous owner knew how to take care of the case but the movement neede work. When many of these clocks stopped they simply became decorations but I am sure that this one will run reliably for many more years to come.
I asked reader and fellow horologist Bob G. if he could kindly give me permission to profile one of his favorite clocks, an Ansonia Marquis crystal regulator circa 1904. This is a very impressive clock that showcases the best of Victorian style at the turn of the twentieth century.
The photos are Bob’s and I will let them largely speak for themselves. But first some information about the company.
Much has been written about the Ansonia Clock Company. The company’s history can be found here. Formed in 1844 the Ansonia Clock Company had a relatively long life but went into receivership just prior to the infamous stock market crash of 1929. The machinery and dies were sold to a Russian holding company thus ending the long reign of one of Americas best known clock companies.
“…there came an order to supply the Soviet union with men and machines to make watches and clocks, neither of which products ever had been manufactured there. Representatives of Amtorg went to the Ansonia Clock Company in Brooklyn and to the Duber Hampden Watch Company of Canton, Ohio, and bought them lock, stock and barrel. Then they hired most of the skilled employees of the plants to go to Russia and operate the familiar machines. These have been installed in a new, many-windowed building in Moscow, where Russian apprentices are beginning to master the trade.”
An inglorious end to a fine clock-maker. Now to Bob’s clock.
Clock face showing Brocot “open” escapement
Bob writes:
the Ansonia “MARQUIS” crystal regulator mantel clock is an eight-day time and strike with open escapement, jeweled pallets, porcelain dial, thick beveled glass and a brass bezel. The hands and pendulum appear original and it came with an old key which is probably a replacement. There are no hairline cracks or chips that I could see in the dial or the beveled glass. The pendulum is the same as the one shown in the 1904 catalog.
Pendulum bob showing faux mercury in two glass tubes
Ansonia listed the MARQUIS in its 1904 catalog. It may have been produced a couple years either side of that date. The original price in 1904 was a whopping $40.00, not cheap for that time period. $40.00 in 1904 is equivalent in purchasing power to $1107.48 in 2019.
The clock measures 15½ inches high and 7½ inches wide with a 4-inch porcelain dial. The case is listed in the catalog as polished brass, “rich gold” ornaments.
Side view of the Marquis
I purchased this clock as part of a large collection. The owner had passed away, and his grandson was settling the estate. The grandfather had opened a jewelry store and clock shop over 73 years ago and the store is still in operation today.
This clock needed a good cleaning, and the brass was badly tarnished.
Tarnished brass baseAfter cleaning and polishing
The gold ornaments were left intact to preserve the rich patina.
Ornamental features, the legs and crown
The entire clock was disassembled, and the brass parts were run through an ultrasonic cleaner, then polished.
Back plate, coiled gong and hammer
The movement was also taken apart and cleaned. All the bushings and pivots were in good condition. One of the jeweled pallets needed to be adjusted and reset with shellac.
Trim pieces in place
It took about a week to get this beauty all back together and running again, but it was worth the effort to see it ticking away and keeping great time.
Thank you Bob. A most impressive clock.
The jeweled pallets are made from garnet, a precious stone consisting of a deep red vitreous silicate mineral. Here is an interesting 1905 catalog showing Ansonia’s collection of crystal regulators. Page 24 shows the Marquis with a price increase to $41.80. As Bob pointed out, a hefty price for a clock in its time.
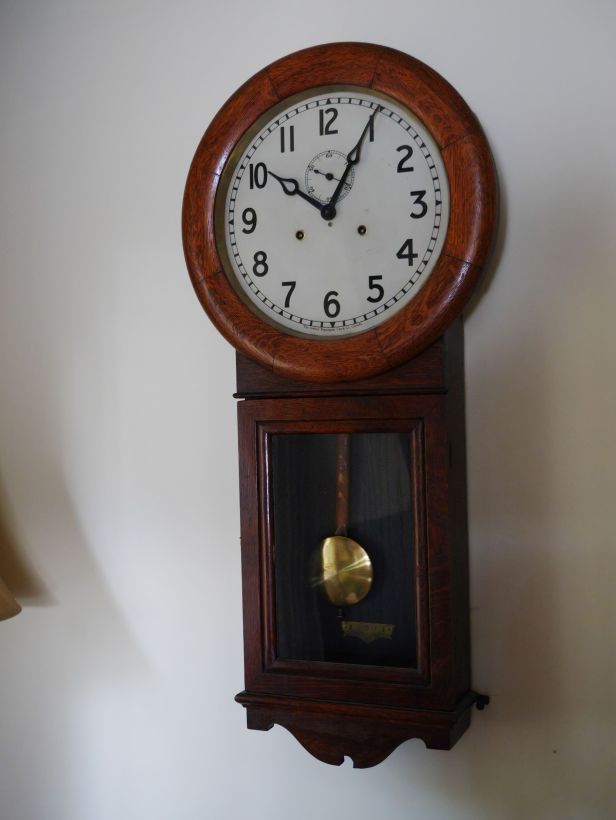
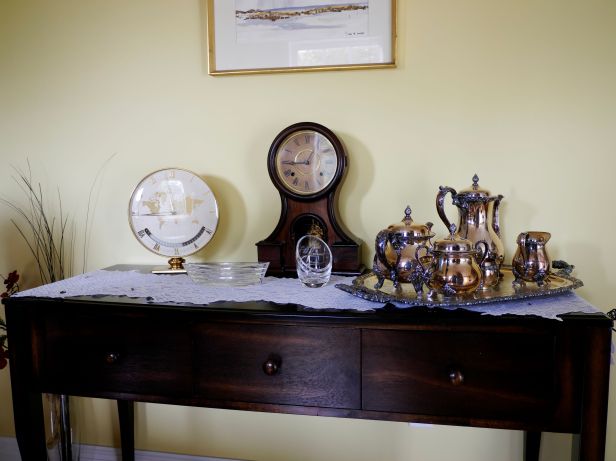
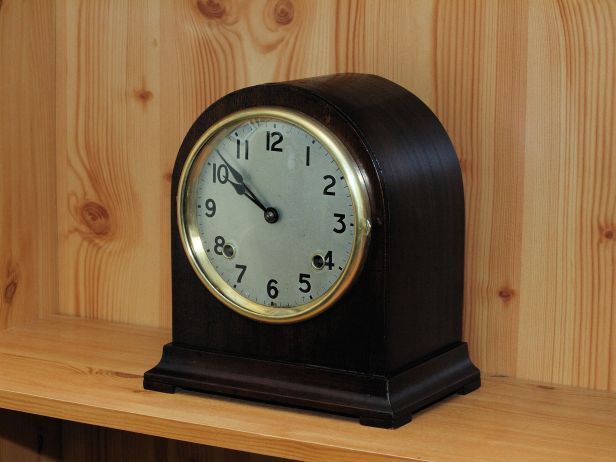
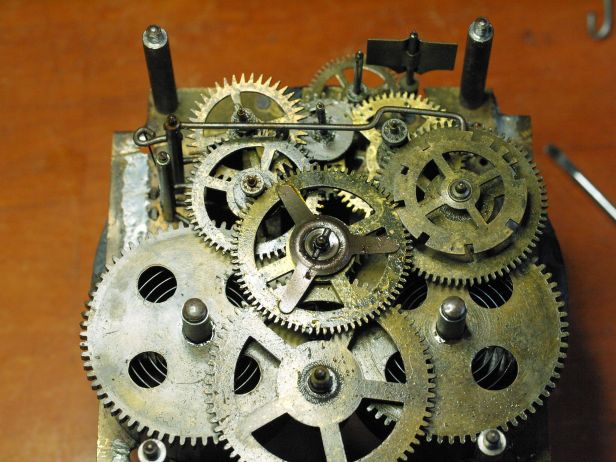
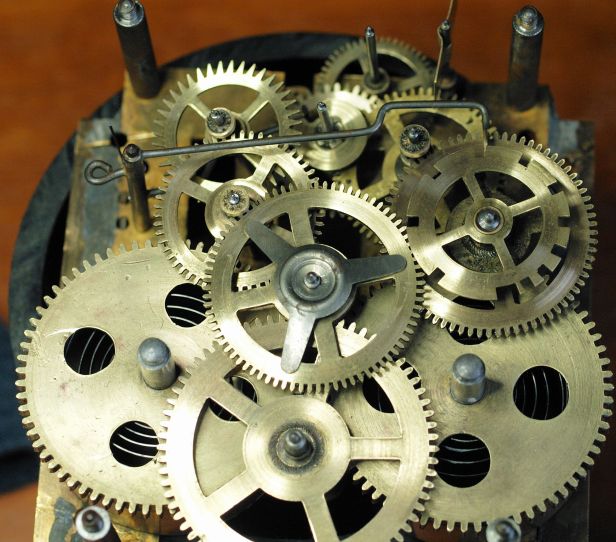
These three 30 hour clocks in the opening photo were serviced in the fall of 2018. The fourth (shown next) is a Waterbury Ogee from about 1870.
It was never my intention to collect 30-hour clocks but I am attracted to this style of clock. Thousands were made, they are surprisingly cheap and come up often on online for-sale sites. Many have the cases that have suffered the ravages of time though these are in very good condition. However, buyers and collectors tend to stay away from 1-day clocks because of the hassle of winding them every day.
I marvel at the engineering and innovative technology of clocks made over 150 years ago and how popular these clocks were in their day.
Waterbury 30-hour Ogee clock
On the left in the opening photo (and below) is a George H Clark, pre-1850. It features a Jerome-like movement and a wood dial.
George H. Clark 30 hour OgeeAll of the clocks on this page have similar movements to this Jerome
Touch-ups to nicks and scratches were all that were required to improve the look of the case but the movement required a good cleaning as well as a couple of bushings.
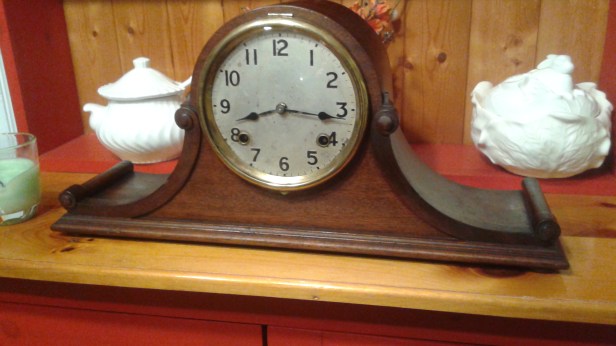
The middle clock (also seen below) is a Chauncey Jerome Ogee clock. The label dates the clock to about 1855-56 just prior to the company’s bankruptcy.
Chauncey Jerome 30 hour Ogee clock
Eight bushings were installed on this clock. Some of these clocks need a lot of work while others require a good cleaning.
On the far right (and blow) is a Sperry and Shaw 30 hour New York style 4 column shelf clock. The movement was disassembled and cleaned but did not require bushing work. The case was also freshened up.
Sperry & Shaw 4 column clock with a Canada Clock Co 30-hour steeple to the right
I am fascinated with 30 hour clocks. Yes, they require winding every day but I enjoy it and it has become one of my daily rituals. The sound of the gong is not particularly pretty but it is distinctive. You always know when an Ogee clock is striking in a house.
What other mechanical devices keep running after 150+ years?
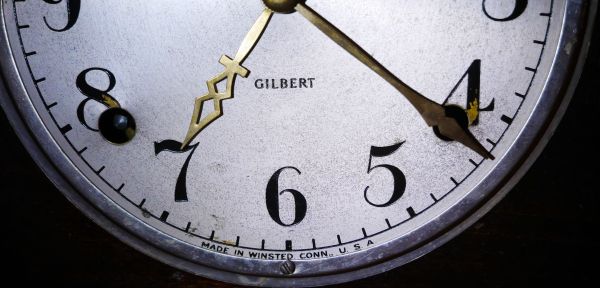
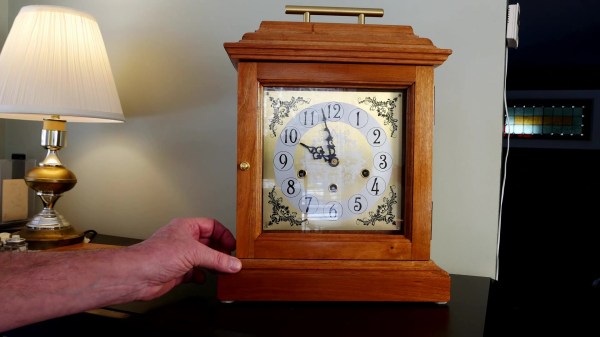
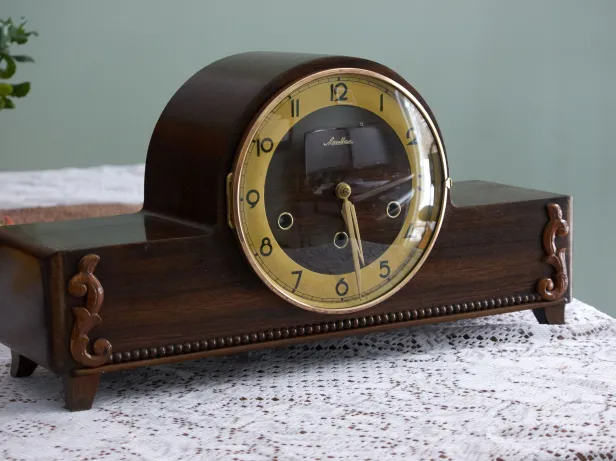
This Gilbert tambour style mantel clock is model 2038 with a bim-bam strike or what Gilbert called a Normandy chime. The model number along with the words “Normandy Chime” are stamped on the bottom of the case. Gilbert called this the “Normandy Chime” as it was reminiscent of the old bells of Normandy (Corneville) in France. In terms of nomenclature within clock circles, calling it a “Chime” certainly adds to the confusion as this would be considered a striking clock rather than a chiming one.
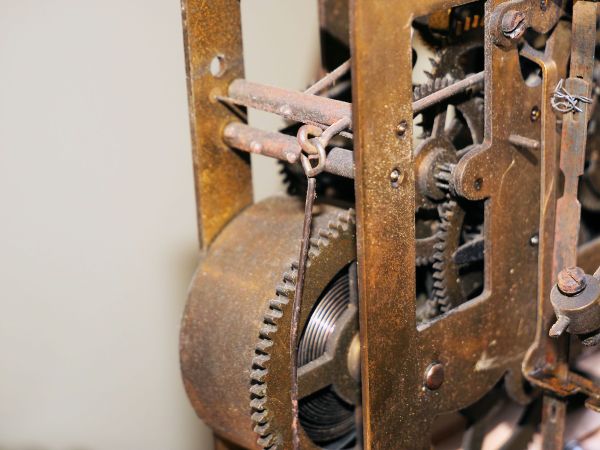
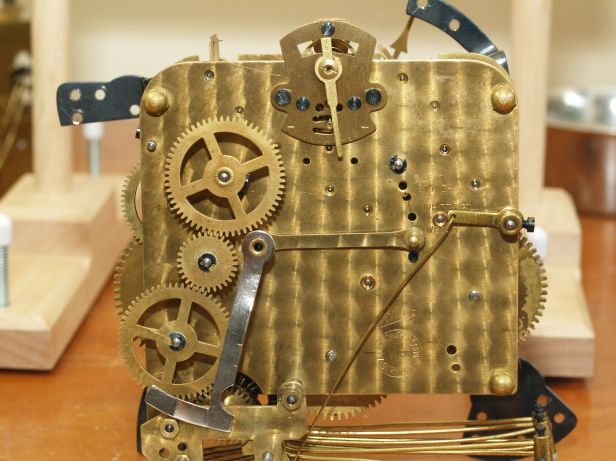
Whoever did the past bushing work chose to avoid the motion works area, and for good reason
The Movement
And now to service the movement.
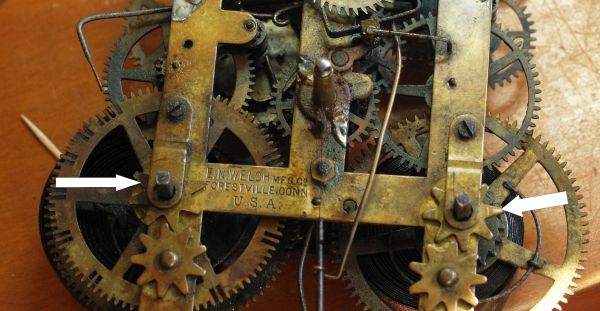
Dis-assembly of the movement is done in the conventional manner with the exception of two items. Both the striking disk (upper arrow) which runs off the cam wheel and the passing strike L bracket (lower arrow) which runs off the centre cannon are friction fit and must be pulled off beforehand to work on the movement. I don’t have a puller but two small screwdrivers positioned across from each other will lift the parts off with minimal effort. Do not polish the ends of these two rear pivots.
Arrows showing striking disk and passing strike L bracket
A prior examination of the movement revealed that it is generally good shape. Overall, the lantern pinions are in good condition with minimal wear. There has been extensive bushing work completed in the past. I see six replacement bushings on the back plate and seven on the front for a total of thirteen which suggests that there was a lot of wear. They are all in very good condition which tells me that the work was done fairly recently.
It also tells me that whoever did the past bushing work chose to avoid the motion works area and for two reasons. It is a tough one to fix because there is so little brass to work with and there is not a lot of torque on this wheel so it can be left as-is.
Although the following photo does not show it well, there is a lot of play in the bushing hole. This is the only one that is addressed in this servicing because I wanted to ensure good meshing of the motion works gears.
Motion works gear with bushing wear
To address the motion works bushing I sought advice from my colleagues at the NAWCC forum site with comments ranging from doing nothing to immediate replacement. The best advice came from a member who suggested I install a smaller diameter bushing and broach out the hole to fit the pivot and that is exactly what I did. A #46 Bergeon bushing was chosen with a diameter of 3mm and an inside diameter of 1.30mm. The pivot is 1.48mm and the result is a side wall that is about 0.80mm. This should allow the gear to mesh nicely and since there is not a lot of torque on this gear the fix should last a long time.
Re-assembling was straightforward. There are no helper springs on this movement so there was no tension pushing on the levers. The only adjustment I had to make was to pull the movement slightly apart to correctly align the stop pin to the stop lever so that the movement strikes as it should.
Arrow showing stop pin (my healing thumbnail from a mainspring that let go)
Since the movement has a Normandy chime the striking hammers are located outside and to the bottom of the movement.
Striking hammer assembly for Normandy Chime
The final process in re-assembly is to attach the hammer mechanism. But before doing so two parts are re-attached, the strike wheel and the L bracket which are pushed back into place. Once in place they can be moved slightly to sync the hourly and half hour strike.
Some folks give Gilbert movements a bad rap but they are not much different than a Sessions, or similar inexpensive movement of that period and the fact that this one is still functioning after over 90 years has to say something for its engineering.
Although there are two dozen clock books in my collection I am always on the look out for more. Some of my books profile various types and styles of clocks, some explore the history of horology while others are concerned with clock repair and case restoration.
Part of every vacation or daily outing in my province of Nova Scotia or elsewhere in Canada involves scouring the used books stores for clock books. Sometimes I am lucky and manage to locate some good ones but quite often I will leave used book stores disappointed.
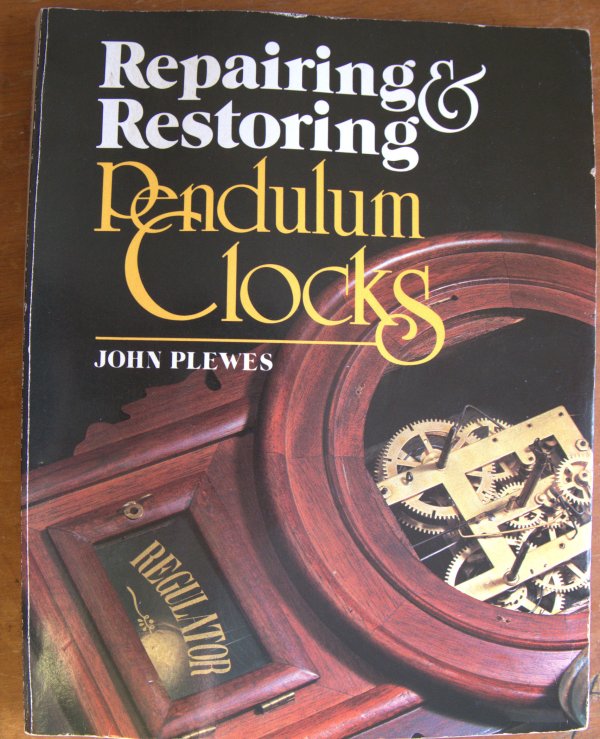
The table of contents describes what he covers in his book.
Contents of the bookSpecialized procedures
Although the book is no longer in print it provides excellent examples of clock repair procedures by describing step-by-step instruction for overhauling and repairing many movements plus the repair and restoration of dials, and cases of antique pendulum clocks. Commonly found clocks that you are likely to inherit or find on online auction sites, flea markets and antique stores are covered.
John Plewes covers clocks from Britain, Canada, the US, France and Germany. There are plenty of diagrams and photos in the book to assist the amateur or expert repair person .
For example, Chapter 4 covers the Pequegnat Regulator #1 8-day movement.
“The finest clock made in America”; Pequegnat advertisement. This clock hangs in the Canadian Clock Museum
The clock is markedly similar to the Seth Thomas Regulator #2 shown below.
Seth Thomas Regulator #2
Plewes makes several interesting points regarding the design of this clock. He discusses the difficulty in finding a replacement weight and often the lighter Seth Thomas weight is substituted which leads to the clock stopping after a while. Plewes is surprisingly critical of the #1 at one point stating that the hands are too heavy since they influence the force applied to the train. The pendulum arc changes when the minute hand indicates 20 minutes after, as against that at 50 minutes. The solution, he feels, is to counterweight the hands or install lighter hands. Plewes opines that the whole point of a regulator is to maintain the constant arc and Pequegnat seemed to have missed that point when designing the clock.
Plewes covers a lot of ground in his book. Some of the advice is certainly beyond the skill level of an amateur clock repair person but if you are interested in growing within the world of clock repair and case restoration it will provide an invaluable resource.
Also included are safety tips, shop techniques, and a glossary of terms.
The book was last published over 30 years ago but If you can find it, and are interested in clock repair from a Canadian perspective it is well worth the cost.
The problem; a run-on strike. The solution; remove the movement, poke around looking for the cause, find it almost immediately and apply a quick fix.
The story
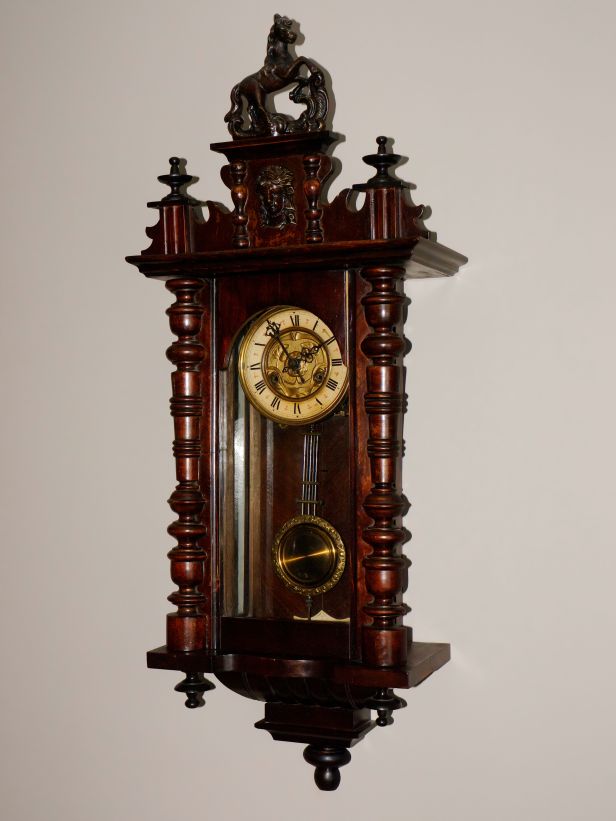
My winter (2017) project was an antique German Junghans Crispi time and strike spring driven wall clock made in the style of a Vienna Regulator. It was manufactured in Schwenningen, Germany in 1899. It came to me as a box of parts. I put hours of work into this project so a malfunctioning movement was a bit of a disappointment.
When I originally disassembled the movement for servicing I made two errors. In my attempt to correct a bent star wheel paddle, I managed to snap it off.
Strike paddle
However, I also managed to snap off the paddle wheel arbor spring which is essentially a thin steel wire which maintains paddle tension during the strike. At the time I did not have the right tools to repair the break. Hmm! After a professional servicing, all is right.
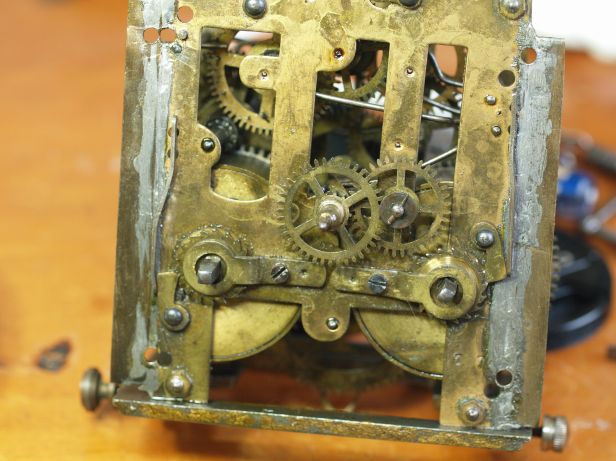
Return spring that had become loose after two years (first photos taken of the movement)
Fast forward to 2019
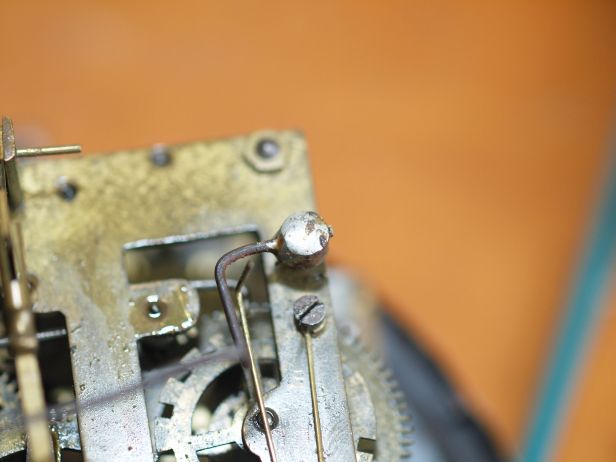
Now, two years later the strike side decided to malfunction. It was striking incessantly. I decided to check out the problem. I took the movement out of the case, removed the clock face and immediately noticed that the strike tension wire had wiggled out of the arbor so that nothing prevented the paddle from stopping, hence the run-on strike. As I mentioned this was one of the repairs made on the clock when it was professionally serviced.
The solution is Loctite. Some purists will scoff but I believe there is place for modern materials in clock repair so long as the repair is functional and discreet. I positioned the spring correctly and applied Loctite where the wire runs into the paddle arbour and allowed it to dry for 24 hours.
After the repair the clock is striking as it should. However, it took me a couple of days to find the correct beat. For some reason this clock must be absolutely level to function correctly. If it is off by just a smidgen it will not run. Anyway, everything is fine now.
The world of horology reveals an assortment of interesting expressions as well as the misuse of words and terms. For classic example; why do some refer to shelf clocks as Mantle clocks when a mantel is something you wear like a shawl or a cloak? Mantel, such as a shelf over a fireplace, is the correct term.
I want to focus on one very common expression. How many times have you the heard the expression, “it was running fine till I over-wound it”? I have heard it often enough on clock forum, Facebook sites and among acquaintances. It is an ubiquitous expression. Do not blame the last person winding the clock for they are not the cause of a so-called “over-wound” clock or one that stops mysteriously.
Over tightening
While it may be technically accurate that a mainspring can become damaged by repeated over-tightening that is, winding the spring until it is tight, and then continuing to tighten it more just to be on the safe side, there is another reason why this occurs.
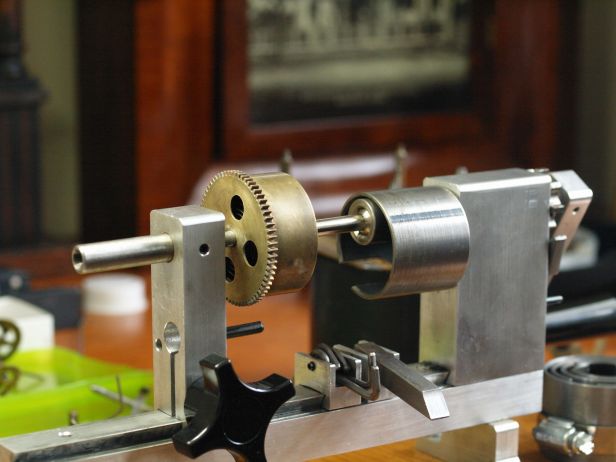
Take a spring barrel like the one in the following photo.
Barrel and winding arbour
When the spring is wound it is coiled tightly around the winding arbour. The other end of the spring has a small hole which is hooked over a small stud, which is riveted into the interior wall of the barrel.
The hole allows the spring to be hooked to the inside of the barrel
The hole in the spring can become fatigued because of years of repeated “over-tightening”, and/or the stamped hook or riveted stud breaks free. “Over-winding” is not the reason.
A dirty movement
American open mainspring clocks “appear” to be “over-wound” because of a buildup of old oil, rust and dirt in the mainspring coil which causes the coil to stick and the spring to seize.
Clocks which might appear to be “over-wound” and non-working can be persuaded to run again by letting down the mainspring completely with a let-down tool, liberally applying mainspring oil and rewinding. This procedure is by no means a substitute for a good cleaning and it does not address other issues that may be causing the clock to stop but it is one step in troubleshooting your clock movement.
It is only when the movement is disassembled and the mainspring is removed from the arbour that you can examine the condition of the mainspring and decide whether to keep it or replace it. Dirt and old oil can be easily cleaned up. Light rust on a mainspring can be removed with emery paper or steel wool; heavy rust and the mainspring should be replaced. Inspect the spring for cracks or breaks. In many situations the mainspring can be saved.
In some cases the click can let go because the rivet securing the click becomes fatigued. For example, Sessions clocks have weak clicks and rivets. Inspection and remediation of a bad click is a typical procedure when servicing a Sessions clock.
Open mainspring click riveted in place.
Do not expect a newly acquired clock to have been serviced recently or at all unless the seller can prove it. Moreover, servicing a mechanical clock on a regular basis is an important part of ownership.
“Over-winding” is one of those terms that one hears quite often and is a very common myth.
The first day of spring is called the vernal equinox (sometimes also referred to as the spring equinox or March equinox) and it is almost always either March 20 or March 21 though it will fall on March 20 for the next two years in a row. The first day of the spring season is the day of the year when the Sun crosses the celestial equator moving northward.
Spring is often called the season of rebirth and renewal. It is also seen as the time of the year when we Canadians crawl out of winter hibernation and greet longer and warmer days with enthusiasm and renewed energy.
1910 Ansonia Crystal Regulator
In the pursuit of horological interests what will Spring mean for this writer?
This weekend (March 2019) my wife and I are in Fredericton, New Brunswick. Part of our mini vacation is to check out antique shops and flea markets for interesting clocks.
Otherwise, at home I am putting the finishing touches on the servicing of an Ansonia Crystal Regulator and determining next steps for a recently acquired Gilbert tambour clock.
Gilbert tambour style mantel clock circa 1925
Clocks coming up on the bench are an Arthur Pequegnat Brandon for inspection and oiling, another Gilbert Mantel clock for servicing and case repairs and a Jauch wall clock that I am servicing at for a friend.
Arthur Pequegnat Brandon II
In June I am attending the National Association of Watch and Clock Collectors national conference in Massachusetts (USA) where I hope to interact with like-minded individuals within the world of horology and perhaps learn new things. I am looking forward to it.
On many German antique pendulum-driven clocks, including those made by manufacturers like Mauthe, you’ll often find various numbers stamped or engraved on the back plate of the movement. These numbers serve different purposes and provide valuable information about the clock’s origin, design, and specifications.
In this article, we will explore some of these numbers and explain their purposes.
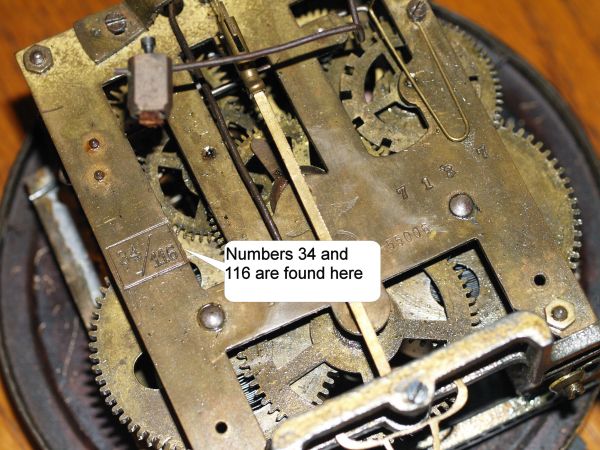
In the lower portion of the backplate of the movement in question, there are a series of numbers. Some of these numbers have a clear explanation while others are somewhat of a mystery. For example, one number, the beats per minute number, helps a clockmaker regulate the movement during servicing.
Let’s begin with the number 34. The number 34 refers to the measurement in centimeters from the top of the suspension spring post to the bottom of the pendulum regulating nut.
Nomenclature of a German pendulum assembly
The 34 cm measurement includes the following: the top of the suspension spring post, the suspension spring, the pendulum hanger, and the pendulum rod and bob. Within this total length, the suspension spring measures 2 centimeters. The pendulum rod, from the hook to the bottom, measures 26.5 centimeters
The number 116, located next to the number 34 on the movement, refers to beats per minute (BPM). Clock train tables typically express the timing of a movement in beats per hour (BPH). A movement running at 116 beats per minute will have 6,960 beats per hour. This information is invaluable for a clockmaker when regulating a movement during servicing.
Heinrich Kielmann patented hanger
On the movement pictured above is a peculiar number that does not relate to the running of the trains themselves.
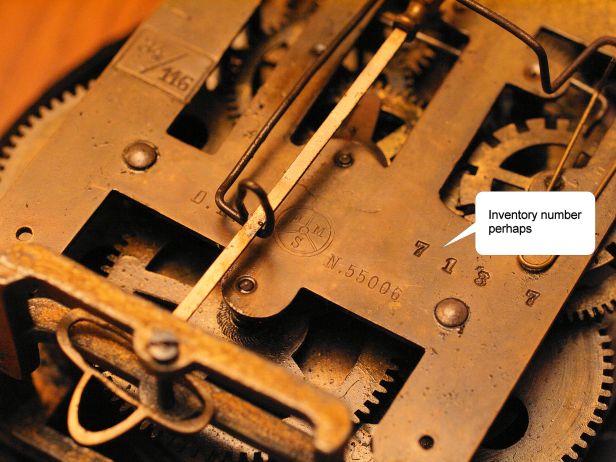
The number 55006 is a patent number, issued to Heinrich Kielmann (Ruhrort/Rhein) in 1890 or 1891. The patent concerned the hanging of the pendulum. Kielmann not only manufactured loose movements for other makers but also allowed them to produce their own movements using his patented pendulum hanging system. This is why movements from various manufacturers may bear this patent number.
You might also come across another number.
The number 7137 is a mystery
In the example above, the number 7137 could indicate a production number or a coded method of expressing the date, known only to the manufacturer. Occasionally, numbers may be reversed, as seen in earlier Junghans clocks, or they could represent a production number, where 7137 might correspond to the specific number of this clock within the range of movements produced that year. Without access to the database of Mauthe clocks, the last number remains a mystery.
Should you receive a movement without a pendulum rod, or a bob, these measurements can be invaluable for sourcing replacement parts. Knowing the precise length of the pendulum, the type of suspension spring, and the size of the movement can help you find or fabricate compatible components, ensuring the clock can be properly restored to working condition.
Alternatively, understanding these numbers will undoubtedly deepen your knowledge of clock collecting and repair.
In the process of adjusting the strike side on a George H Clark 30-hour clock I decided to make a video showing how to remove and install a 30-hour movement from its case.
George H. Clark 30 hour movement before servicing
Part of the video concerns the adjustments required for the clock to run correctly but also shows the steps required to safely remove and install a 30-hour movement with a couple of worthwhile tips.
IMPORTANT: In the video, I did not include the fact that the two holes in the movement seat board are access points for pins that insert into the side support boards. Along with the top block they are intended to secure the movement in place. I have five Ogee clocks and none of them had pins when I received them. Inspect the movement mounting first. If you should have a clock with the pins they must be pulled before the movement slides out. (Thank you for pointing this out JC).
On March 10th Daylight Savings Time began at 3:00am in Canada. Over 100 years ago on July 1, 1908, the residents of Port Arthur, Ontario, today’s Thunder Bay, turned their clocks forward by 1 hour to start the world’s first DST period.
Spring ahead, Fall behind
In Canada we refer to it as Daylight Saving Time (DST); the British call it “British Summer Time” and “summertime” in other areas. It is the practice of advancing clocks during summer months so that evening daylight lasts longer while sacrificing normal sunrise times. Typically, regions that use daylight saving time adjust clocks forward one hour close to the start of spring and adjust them backward in the autumn to standard time. We have a little expression, “Spring ahead, Fall behind” to make it easy to remember what to do twice a year. In Canada, it is the second Sunday in March and the first Sunday in November.
Junghans Crispi time and strike wall clock
There is a constant dispute about the benefits and drawbacks. Proponents say that it conserves energy and has a psychological benefit of extending the daylight hours. Opponents say that the energy arguments are inconclusive.
Regardless, people must remember to change their clocks. It is a time-consuming exercise, particularly for those owners of antique and vintage mechanical clocks that cannot be moved backward safely though obviously moving 1-hour forward is much simpler.
Arthur Pequegnat Moncton wall clock
But why go through this nonsense; let’s just get rid of DST! I advocate a move to “permanent daylight saving time” that is, staying on summer hours all year with no time shifts. My mechanical clocks will appreciate it and yours will too!
Having a movement without a case is like a car engine without the body
I discovered this Aug Schatz & Sohne W3 (circa 1960) movement at a local antique store for under CAN$20. My wife said, “You should buy that, maybe you can make a case for it”. “Hmm”, I thought; that would be above my pay grade. The movement looked interesting and it was not expensive so, why not! But, having a movement without a case is like a car engine without the body but I was confident that one day I would have the solution.
This is a type W3 movement. “W3” refers to three chime tones, St Micheal, Whittington and Westminster.
Rear plate of the W3 movement showing chime selector and chime/strike hammers
I put out a plea and two people contacted me to say they had a case that would fit. One lived in Australia and the cost of shipping the case was too high. Another corresponded twice but I sensed he realized that his case would not fit. So, I put the movement away. On a positive note it runs well.
Schatz and Sohne W3 movement installed in a custom case
The pursuit of a custom made case
In the spring of 2018 my son’s girlfriend suggested that her grandfather could build the case. He loves doing this kind of work, she said. Although skeptical at first, I accepted her offer. Though a skilled craftsman her grandfather is over 90 years of age but spends as much time as he can in his woodworking shop in rural Virginia. He agreed to do the work. I sent the measurements to him but he preferred to have the movement in hand so it was sent to Virginia. He was able to use the movement as a guide in constructing the case. The clock was returned to me in December 2018 and it looked absolutely perfect.
Now to the installation of the chime block
The dimensions of the case allowed ample room to place a chime block. The block and rods are 7 1/2 inches long but even so there was not much room to spare on one end. The 8-rod chime block is from a Canadian clock supplier and is designed for a Hermle triple chime movement. There are not a lot of 8-rod chime blocks available through suppliers and given that I had little choice I had to assume that it would work for my clock and it does!
This video describes the placement of the chime block and some experimentation to achieve the optimum sound.
The tapered sections of the rods are an inch long and the hammers must be positioned to strike the wide point of the rods for best results. The oak base was trimmed to fit, allowing for about an eighth of an inch between the rods and the hammers. To close the distance to the rods the hammer wires are bent and centered on the rods. As they are brittle, chime rods should never be bent!
Chime block and oak piece forming the base
Once I was satisfied that the chime block was correctly positioned the block was secured. First I screwed the chime block to the hardwood base with 4 brass slotted screws. And finally, I secured the chime block through the base using two 1 1/4 inch slotted screws through pre-drilled holes.
I gave the case one more coat of shellac before putting it on display.
I am impressed with the outcome. Not all movements have such a happy ending.
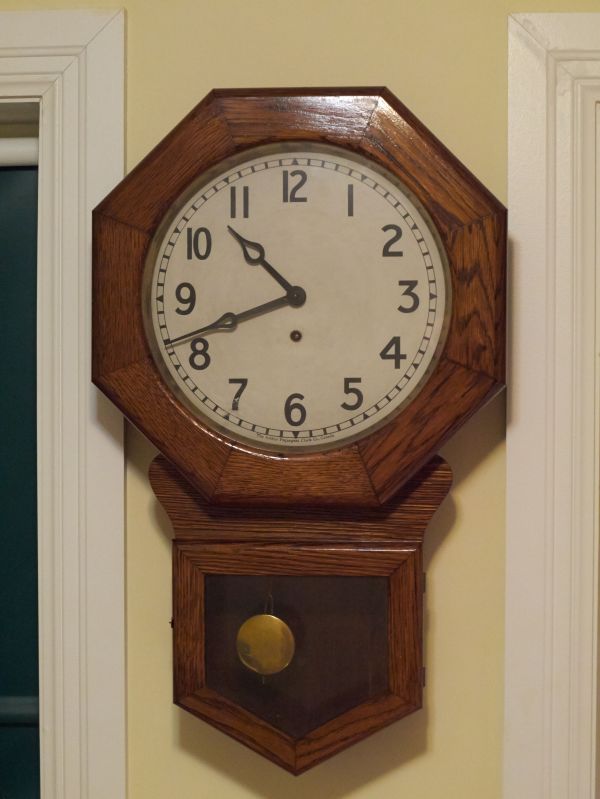
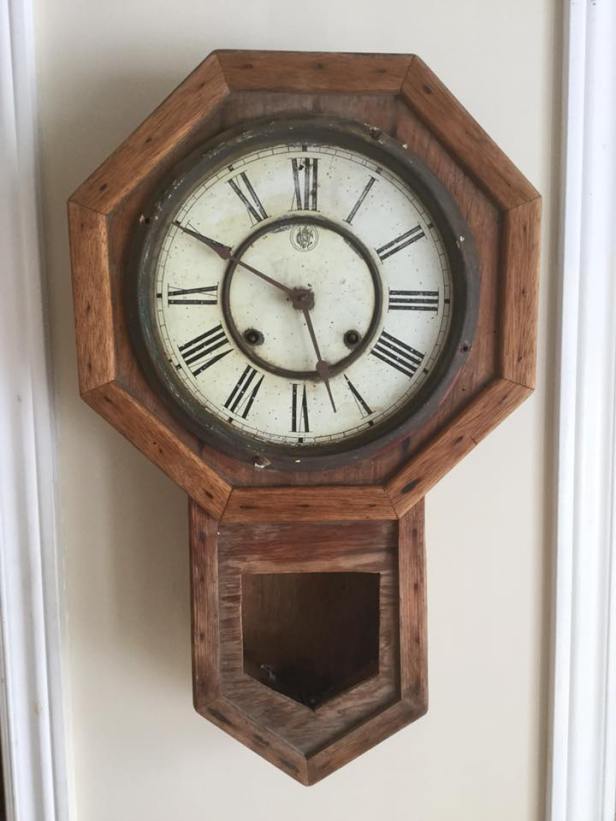
Photo of Waterbury time and strike wall clock sent to me by my cousin
I’ve thought about this clock, dreamt about it, wondered where it was all these years……and now I have it. I was confident that I could do something with this clock since I had just finished a major restoration project.
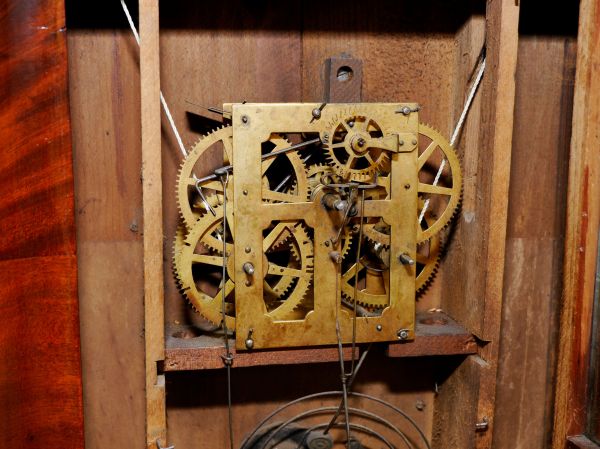
I had no idea that the clock I was getting was a movement in a homemade case
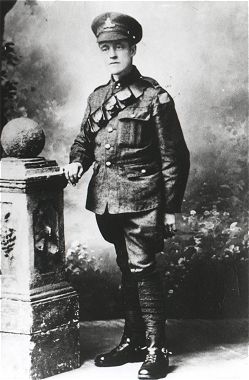
I have a vivid memory of this Waterbury octagon short drop time and strike schoolhouse clock that hung in my grandparent’s kitchen when I was a young boy. After church on Sundays, my father would take (drag?) us kids for a visit; it was a weekly ritual. The house was stone quiet except for the sound of a clock ticking loudly in the kitchen. My grandfather was a veteran of WWI and was bothered by noises, shell shock they called it, but he did not seem to mind the rhythmic sound of a mechanical clock.
When I was a kid in the 1950s it looked impressive.
So, I jumped on this project and have learned a few things along the way.
The following are lessons learned restoring grandfather’s old clock.
When it comes to family, lower your expectations
I made some inquiries within the family and when I first saw a photo of grandfather’s old kitchen clock and discovered that the case was homemade I was very disappointed. I had no idea that the clock I was getting was a movement in a homemade case. The original case, long gone is but a family mystery. Nevertheless, my cousin said, “You can have it”. I wondered what I would do with it. I explored several options but at the end of the day I wanted a working clock no matter which direction I took.
Work with what you have rather than dream of significant changes
I could have radically altered the appearance of the clock completely but would it be the same? It is a philosophical dilemma. If too much is done to restore a clock it is not fundamentally the same and cannot be considered original. The homemade case is crude and made some 30-40 years ago but it is part of the clocks history. The chicken pecks on the clock face tell the story of a clock that likely sat in a barn for many years.
Envision what the final outcome should be before you begin and resolutely stick to your plan
Should I restore the clock or preserve what I have? It was an interesting dilemma.
My options:
Do absolutely nothing.
Take the movement out, find an appropriate period donor case or
Make some minor changes but preserve the provenance
I chose #3 for several reasons:
To preserve the bygone times of a clock passed on through the family, despite its many warts
Labour aside, it was cost effective; my entire monetary outlay was less than $50
Ignoring aesthetics, the case was crude, heavy but very sturdy and should last forever
Be content that the clock tells a story no matter how ugly or homely it might look
It may not be the prettiest clock on the wall but it will be a great conversation piece and after 70 years (??) it is finally functional. I can only imagine my grandfather standing under the clock, comparing the time with his pocket watch and deciding if he should make just one small adjustment.
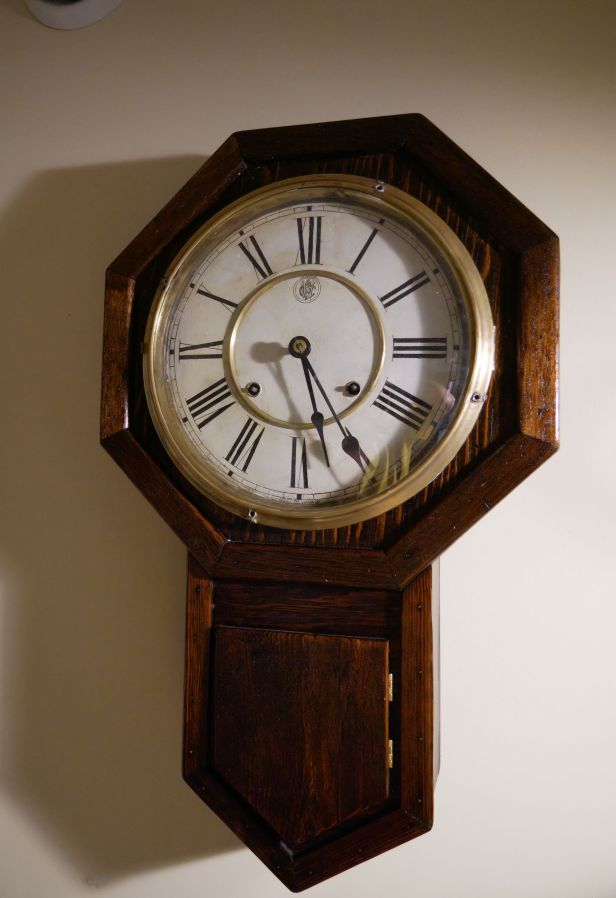
Retouched dial face
Changes I made
Sanded, stained and shellacked the case
Brass bezel was separated from the dial bezel (don’t ask me why the two were screwed together), new bezel hinge installed, and door catch
New convex glass dial installed
Brass was cleaned and polished
New clock hands
New pendulum, pendulum rod, verge and crutch
Movement completely serviced, several bushings installed
New hinged access door made from century old clock case wood
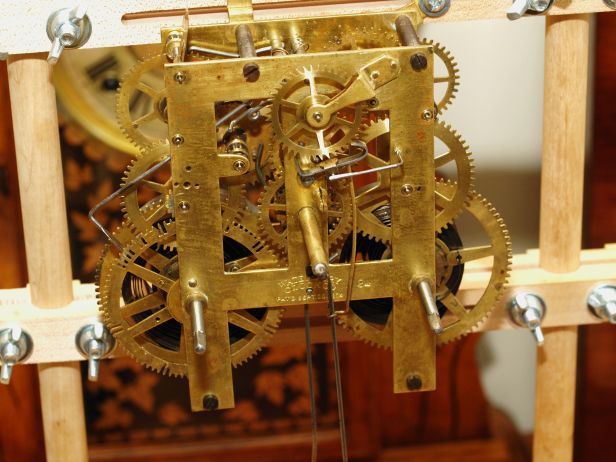
After servicing, a fully functional Waterbury time and strike movement
What I did not change
The overall “character” of the clock
The holes in the brass bezel were left as-is; it is what it is
Dial is original though touched up in some areas; I considered a new paper dial but decided to retain the original and came very close to matching the colour of the dial face
The case is made of thick plywood; it is utilitarian, very solid and will likely outlast the movement
Yes, it is ugly but it works and it tells a story
Final thoughts
I am actually very pleased with the outcome. The changes manage to preserve the provenance but not enough to radically alter the look of the clock such that it is. It is now worthy of being placed on a wall and it will certainly occupy a prominent spot in my home, plus, it tells a fascinating story.
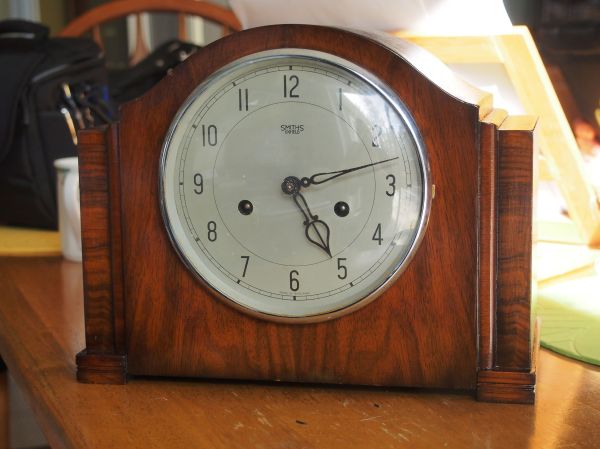
Smiths Enfield mantel clocks are highly regarded by beginning clock collectors due to their popularity, abundance, and durable movements. For amateur clock repairers, they offer relatively few challenges.
I acquired my Smiths Enfield time-and-strike clock in 2013 from a young clock tinkerer in Dartmouth, Nova Scotia, but it was never a reliable runner. It would only run for a few minutes before stopping. Eventually, the clock was set aside and left in a corner of my shop.
Post war English time and strike movement
While not an especially attractive clock it embodies the utilitarian design typical of post-war English clocks from the late 1940s and early 1950s.
After several months and armed with new knowledge of clock repair, it was time to take a second look.
About Smiths Enfield
The Enfield Clock Company (London) Ltd. was established in 1929, with its first clocks sold in 1932.
The company utilized modern assembly line techniques to manufacture and assemble its clock movements, inspired by the American system of automated factories. Initially, clocks were sold wholesale and for export, with the movements supplied to shops that would then assemble the cases themselves. Enfield took pride in producing “British-made” clocks. However, in 1933, facing difficulties competing on price, the company was sold to Smiths Industries, which led to the name change to “Smiths Enfield”.
In 1935-1936, they introduced a striking 14-day clock in a Jacobean Oak case, which helped solidify the company’s position in the market. With the outbreak of war in 1939, the factory shifted to wartime production. While clock production continued, material shortages became a significant challenge.
After the war, American machines were allowed to be kept and production of the 53mm movement re-commenced. Production was later moved to the Smiths factory at Cricklewood and then later to their Welsh factory in about 1955. Under Smith Industries the production line was changed to watches. Ultimately all clock production was phased out and the company closed shortly thereafter.
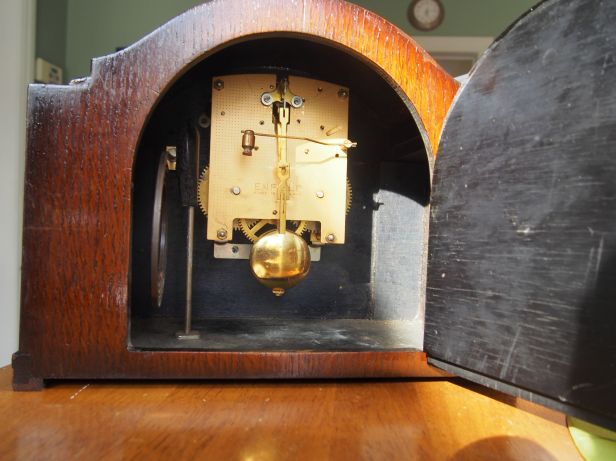
A New Suspension Spring?
I serviced the clock in 2015, and it needed bushing work. Since the wear wasn’t severe, I thought I could delay it for another two years. However, the clock has not been running since then. At the time, I knew little about the purpose and function of a suspension spring, and since I assumed the one that came with the clock was correct, I thought there must be another issue causing the clock to run poorly.
Suspension spring post
It’s time to revisit the suspension spring to determine if that’s the issue.
Suspension spring location
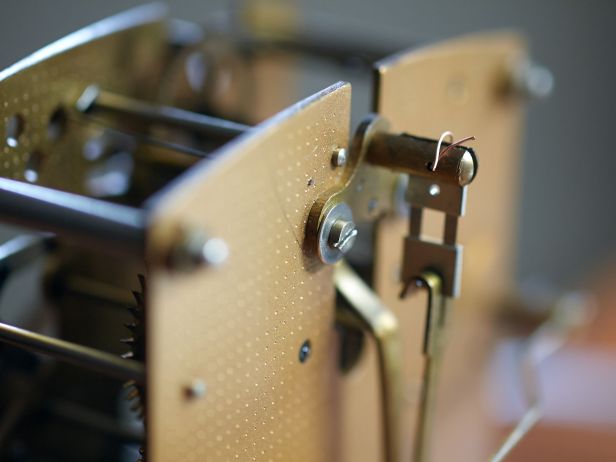
Over the past four years, I have accumulated an assortment of suspension springs and, through trial and error, found one that is either correct for the movement or very close.
The suspension spring has a mounting hole on one end and a small T-bar on the other where the pendulum hangs. I replaced the old spring with a shorter, more flexible one. As a result, the clock started running. In the first week, it lost about five minutes, but after making minor adjustments to the pendulum length, the timekeeping improved with each change.
The takeaway from this is that the correct suspension spring is crucial to whether a clock runs, and it should be considered as one of the potential reasons when a clock is not working.
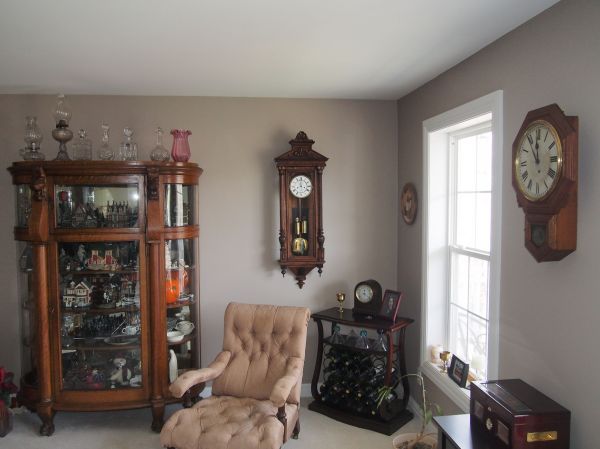
I have been collecting clocks for over 8 years. In that time I have enjoyed my hobby immensely and I am constantly on the lookout for new and interesting acquisitions. It is more like a daily passion.
However, I now realize that as my collection steadily grows I have more than I need or want. I cherish some of my clocks and intend to keep them for years; my Arthur Pequegnats, selected Seth Thomas clocks, clocks made by the Hamilton Clock Co. and the Canada Clock Co., my Vienna regulators and some of my German wall clocks. I don’t mind parting with other clocks now or in the foreseeable future. Some I will miss and others I will not.
A house can only hold so many clocks
My daughter correctly pointed out that I should adopt a one clock comes in another goes out approach. “One-in, one-out”, she says and it makes perfect sense.
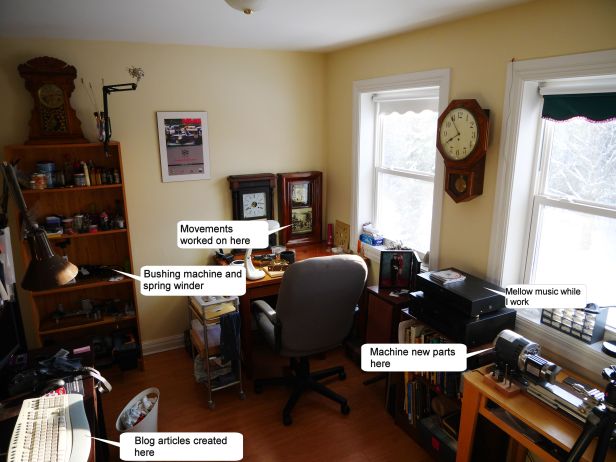
A house can only hold so many clocks. In my small office which is 10X12 I have a total of 15 clocks, 10 of which are running daily and the remainder in various states of repair. Outside my office, at any given time, there are 26 clocks in a number of rooms around the house. I am not one of those persons on YouTube who feel the need to cover their walls with clocks. I prefer to display them in a natural way, as an integral part of the decor of my home. The number is not all that important but I am trying to keep it manageable.
Kienzle World Time clock and Ingraham Huron balloon style shelf clock
I have decided that now is the time to sell some of my clocks. My objective is not to make money but to recover the cost of the original purchase plus my labour on each clock that I sell. These are the clocks that have left my collection recently.
I am making more critical choices when adding pieces to my collection
Mauthe Westminster chime mantel clock, circa 1950Juba Schatz Bim-Bam mantel clock, circa 1948Hermle Westminster chime with moon phase circa 1985
I have also gifted eight clocks over the last 3 years and most have been mantel clocks. Antique and vintage clocks make wonderful gifts to friends and family. It is cool to see them displayed and running in their homes when I visit though I know darn well that they are wound just hours before my arrival.
On a clock forum site recently someone said’ “How many clocks do you need”. The answer, “Just one more”
As my knowledge of the clock world grows and my experience repairing and restoring them expands I am making more critical choices when adding pieces to my collection. However, those critical choices often translate into spending more money. For example, recent acquisitions have been a Seth Thomas Regulator #2 and an Arthur Pequegnat Moncton, both wall clocks.
Seth Thomas Regulator #2, time-only, weight driven clock Circa 1922Arthur Pequegnat Moncton, double spring time only clock, Circa 1930
I believe my new approach is a natural progression and perhaps I have been subconsciously heading down that path for a year or more. Unless a clock has an interesting provenance, is rare, uncommon, unique and/or is a challenge to restore I will now shy away from most of the garden variety clocks one sees on online for-sale sites and yes, I still have a few of those.
On a clock forum site recently someone said’ “How many clocks do you need”. The answer, “Just one more”.
I knew during the course of collecting antique and vintage clocks combined with increased knowledge/experience that my hobby would evolve and continuing my horological journey in a slightly different way is about time,
In the late spring of 2015 I attended a workshop on WordPress blogging at the local community college. I was impressed with the power of blogging. I had already begun collecting antique and vintage clocks and so, it was a good time to begin a blog and share my horological interests and experiences. This was my very first post 3 1/2 years ago.
The first few months were very discouraging. I am sure that those of you who are bloggers know what I mean. It takes time and patience to build an audience and it also takes time to build a ranking on various search engines. I was getting very few page-views, I struggled with the content and tried to envision what my audience would like to see but more importantly what I wanted to convey in my blog articles. I never considered myself a stellar writer but I was enthusiastic and I wanted to give it my best shot. I observed what other bloggers were doing, what made their sites engaging, took some tips from WordPress and other online sources and adopted a style that suits me.
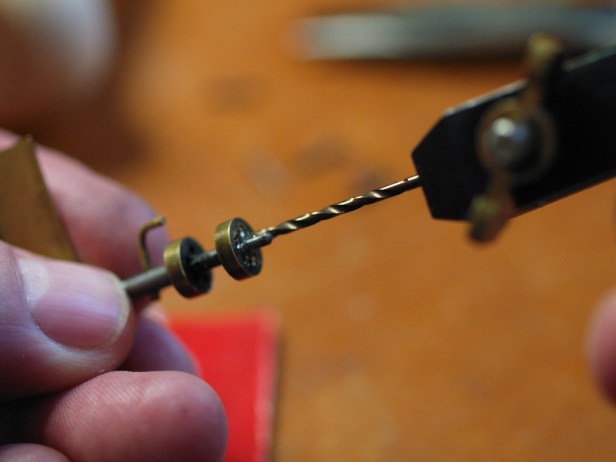
Learning to replace lantern pinions
In the fall of 2015 there was an encouraging uptick in daily page-views. I also began to realize that I had to not only appeal to those with a modest interest in antique clocks but those with a deeper knowledge. My blog was never intended to satisfy expert horologists and those in the clock trade though I don’t mind if they drop by from time to time.
I have received many comments. Some offer suggestions and advice on projects I am working on while others are looking for direction on their particular clock problem. I provide whatever assistance I can.
Installing a new clasp on a Pequegnat Bedford
I graciously accept any criticism because that is an important part of my growth as a clock repair person.
Stats – the lifeblood of a blog
Like it or not, statistics or analytics as Google calls it, are the lifeblood of a blog. The best day was in January 2019 when I hit 267 page-views. However, on average I receive 100 daily page-views and about 800-1000 page-views per week. I have been viewed in 100+ countries and the top 6 viewers are in USA, Canada, United Kingdom, Australia, South Africa and Germany. I am encouraged by the steady rise in interest from mechanical clock fans around the world and share their enthusiasm.
I also discovered that writing articles well in advance and scheduling specific publication dates really helped with planning particularity when I am vacationing and cannot find the time to write.
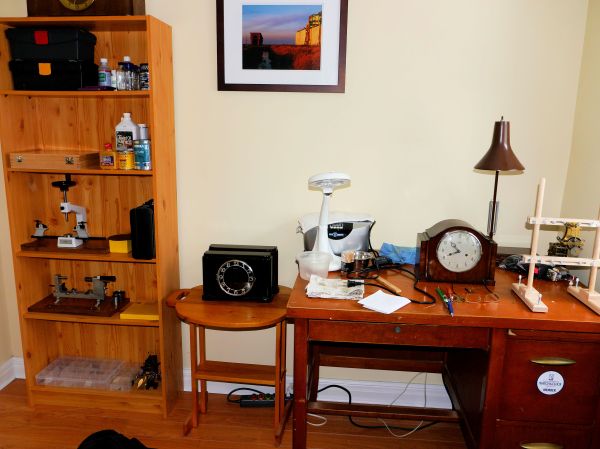
My work area in 2019
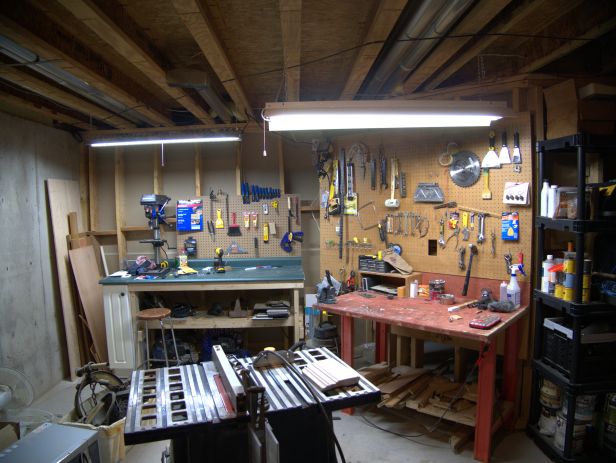
My basement shop where I work on clock case restoration
Yes, there are days and months when the stats dip a bit but that only encourages me to take a second look at article content, learn to explore new areas of interest and make the learning fun. My regular features, Tick Talk Tuesday, Crazy Clock Ads and What Is This Thing Forlook at the lighter side of clock collecting and repair.
If you are new to my blog, welcome. There is plenty to read. If you are a regular viewer please share your views and comments and if you have any ideas for future articles let me know.
Small details added during clock restoration projects can change the appearance of clock in a positive way. In this article I will describe how adding a piece (actually two), that should have there in the first place, will make all the difference.
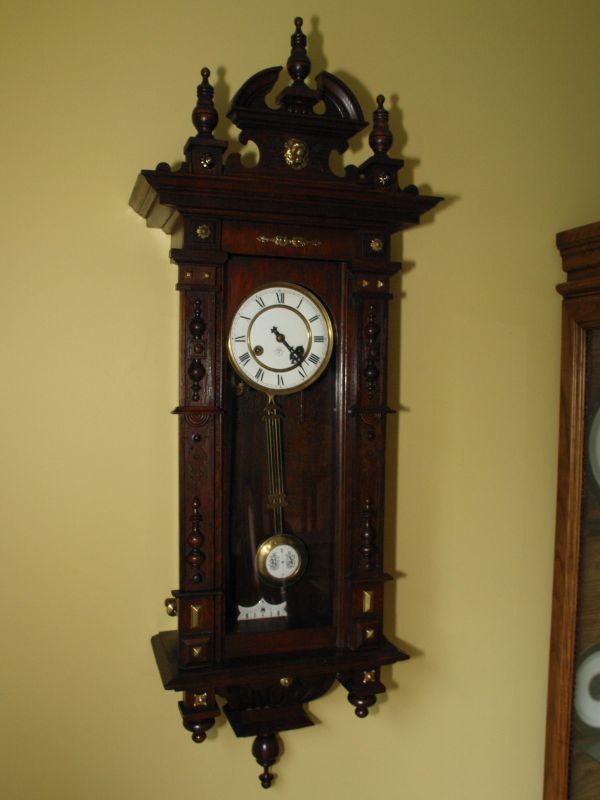
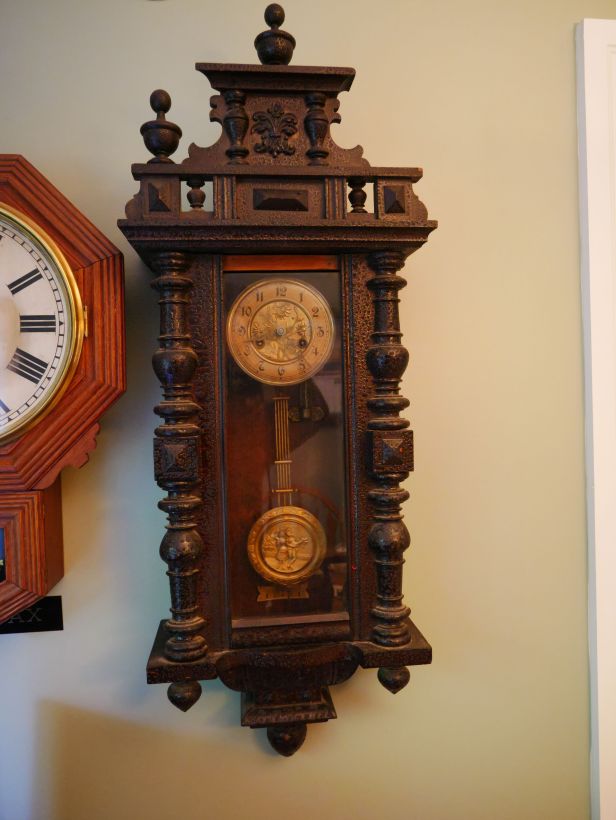
During the fall (2018) I spent a considerable amount of time restoring a Vienna styled time and strike German made FMS Mauthe spring driven wall clock. Restoration involved completely stripping and refinishing the case and fully servicing the movement. My wife commented that the transformation was dramatic and of course, I graciously accepted the compliment.
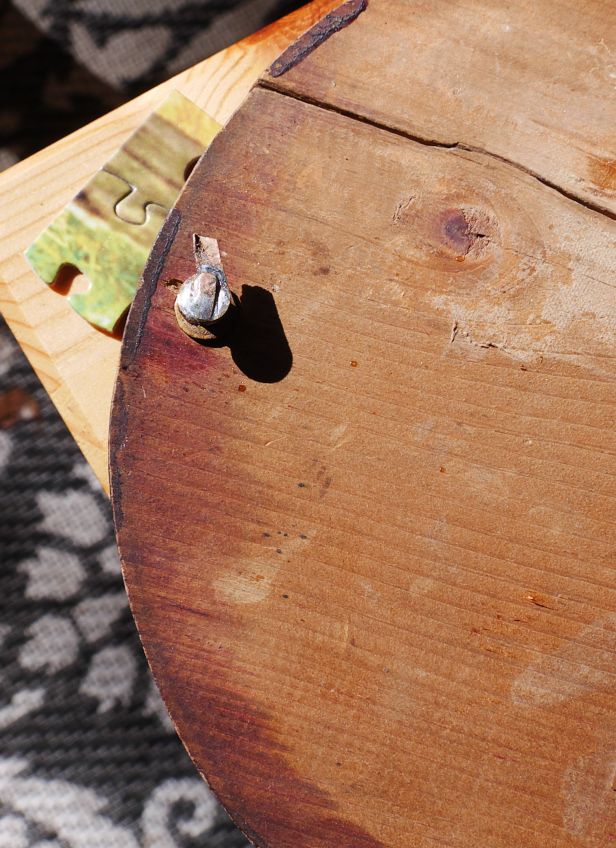
For some reason many wall clocks are missing their side stabilizers
Before
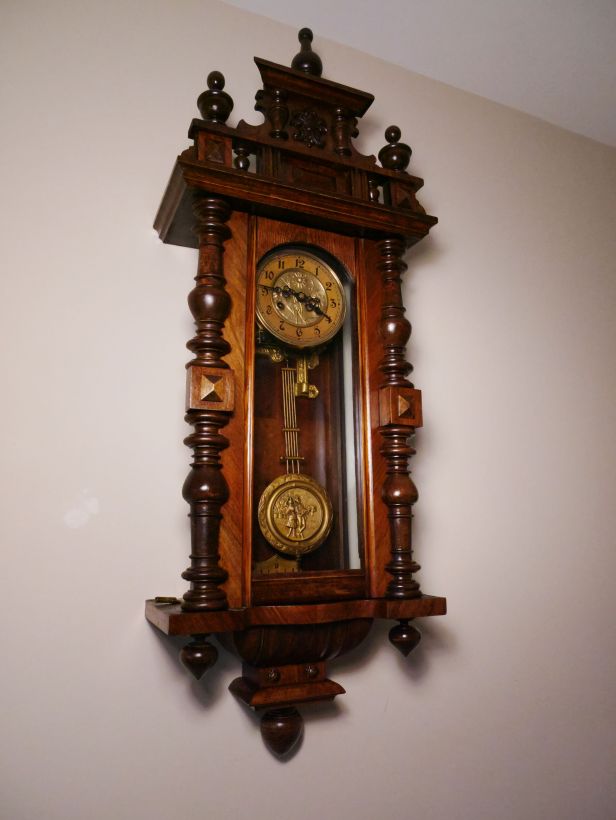
And….
After
Restoration included adding an arched door insert above the dial and a new centre top finial. Otherwise, the clock was complete except for one small item, the 2 wall stabilizers. Why would they be missing? A thumbscrew might go astray during a servicing and rather than find a replacement it is too easy to take both off and discard them.
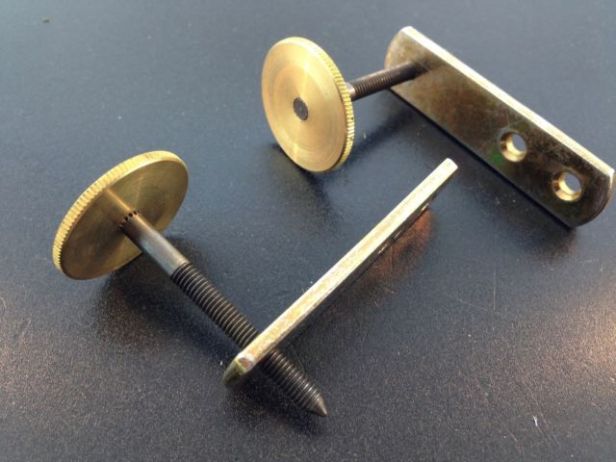
Clock case stabilizers
Many wall clocks are missing their side stabilizers. Check the rear backboard of a wall clock without stabilizers. You might find two small holes on either side of the case near the bottom indicating it once had wall stabilizers. Otherwise if you do not find those holes, the clock was never meant to have them.
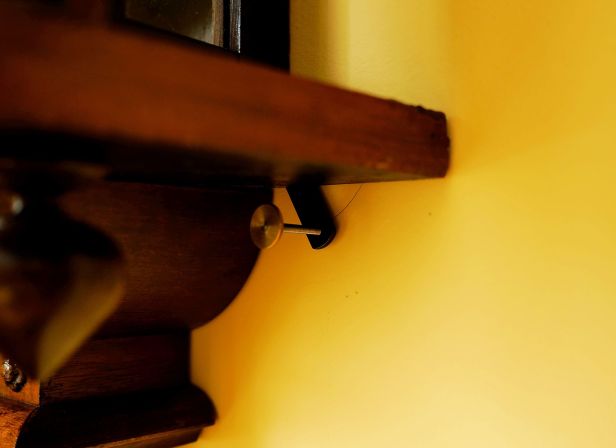
Once the beat is set, level the clock on the wall and set the stabilizers by screwing each one into the wall. The stabilizers will compensate for any wall vibrations and the movement of the case during the weekly winding.
Right side stabilizer
Some stabilizers are unique to brands such as Ansonia and Gustav Becker. This, however, does not mean that they are limited to these movements, they are interchangeable. The stabilizers you see here are advertised as Vienna stabilizers.
Left and right stabilizers are barely seen but preform an important function
All clock suppliers carry stabilizers. I ordered a pair and simply re-used the screw holes on either side on the backboard to attach the stabilizers.
Are they absolutely necessary? No! Can a clock run without them. Yes! Yet, it is an often overlooked detail that might make all the difference.
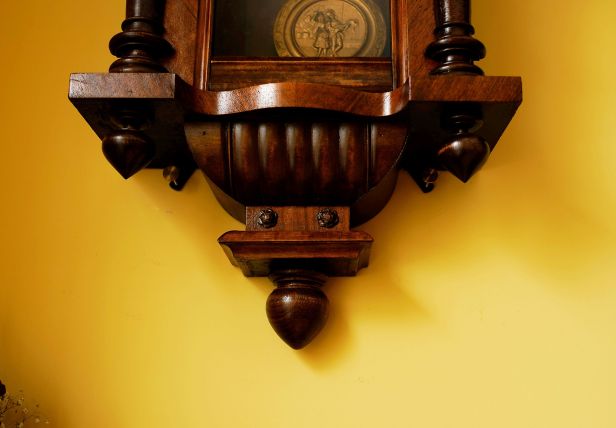
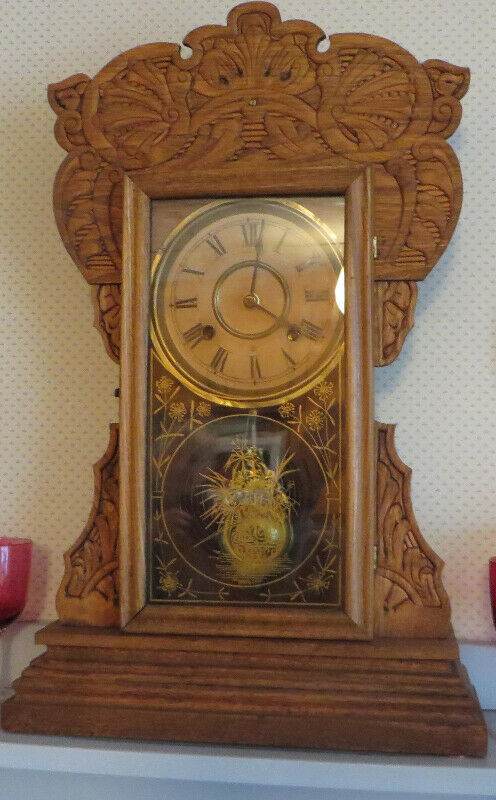
Carved pine antique mantle Grandmother clock circa 1900
“Pine”, “1900” and “antique” might be correct but what style is this clock? It is not a Grandmother clock but commonly known as a kitchen clock or a Gingerbread clock. It is not carved but steam pressed and tens of thousands of these were made.
If you are going to ask $125 you had better know what you are selling, who the maker is, what kind of clock it is, any issues and the overall condition.
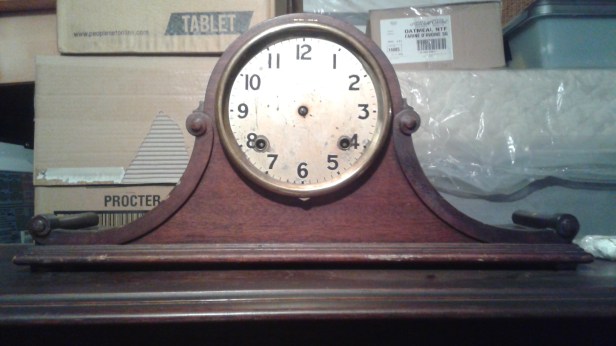
The Classic, made by the Arthur Pequegnat Clock Co.
Tick-Talk Tuesday is about the letters and comments I have received from you, the reader, concerning your clock, issues you might have had, challenges you face or a clock you would like me to profile and my responses to your questions with advice on your particular clock concern. For those comments and questions that stump even me, I consult within my clock circles for the best possible answer
DSfrom New Brunswick, Canada writes, “Good day Mr. Joiner, I have purchased my first Pequegnat clock by accident. It was just a parts buy but I was quite surprised to see it was an Arthur Pequegnat Bedford Classic. Now I’m looking at resurrecting this old girl. My concern is the dial. I’ve found a few few Bedford clock online but they have porcelain dials with a proper side hinged bezel but mine is a metal dial soldered into bezel so it opens upwards? I removed the bezel to try to rotate it but the only screw holes will only mount it as you see it. Would the brushed(?) metal dial have been an option or is this clearly a poor replacement. Any thoughts or opinions would be appreciated. I live just outside of Buctouch and could make the trip if you would like to see it for a closer inspection.
Thanks”
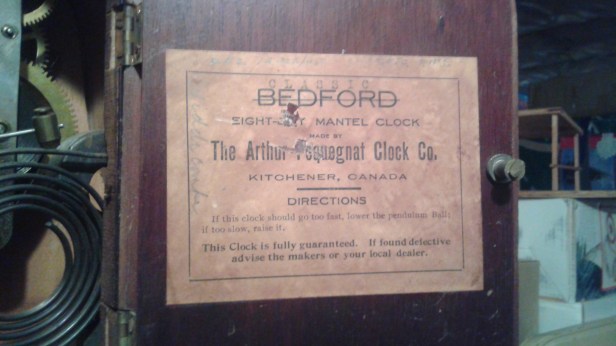
A reused label
My reply,”
Hi and thanks for your email.
Nice find. First of all it is called the Classic. The Bedford label was used and crossed out. Though not common I have seen this before.
I have attached a link to the Classic which is part of Skip Kerr’s extensive Pequegnat collection. You will see that his clock has a smaller (original) dial which is in keeping with the size and style of the case.
It is a Pequegnat dial though not normally for that particular clock and yes, Pequegnat made brushed metal/painted metal dials. I have never seen a Pequegnat clock with the hinge in that location but you never know, it might be a variant.
It might also be a replacement. If so, I would think that the “newer” dial’s hinge would not fit if hinged on either side. Are there any screw holes at all on the left or the right? The dial is soldered to the bezel? That is unusual. I don’t see any glass?
The next is a link to an article I wrote concerning a Bedford clock. You will notice that the case is quite different and yes, the dial on mine is a replacement and larger than the original, just like yours.
Arthur Pequegnat Bedford model, mantel clock
Rather than change it out I would keep it the way it is, after all, it is part of the clock’s provenance.
DS replies,”Thank you sir, it was a $6 online auction purchase. I was fond of the case style and thought I could strip it and update it for our guest room, maybe even paint it (I know I used the “P” word). Once I received and inspected it couldn’t believe it was a Pequegnat. Thinking it was another mass produced import I expected missing parts and poor veneer but other than the missing glass and hands it is complete and in working order. I’m honored to have the opportunity to save this piece and will enjoy it for many years to come. The body has only one set of screw holes for the bezel, I tried to reposition the bezel then I would re-solder the face in the proper position but nothing lines up except the current position so I welcome your idea to leave it as found.
Thanks again for your advice and link I will definitely take a look. I enjoy researching and learning with each new piece I collect.
Happy hunting, DS”
Later DS wrote, “Well sir I’ve cleaned up the original case, installed new hands and replaced the glass. I believe the bezel and face may be original. There are only one set of screw holes in the case and the bezel and when I correct the bezel the wood trim on the case interferes with opening the bezel. So there it is my first Pequegnat. Thanks for the information on my clock. Now on to the next.”
It has taken me 6 years to assemble my collection of antique and vintage clocks. Although I have many clocks, wall clocks are my particular favorites. Check out my collection of antique and vintage wall clocks in this YouTube video I made in January 2019.
You will not see Geneva stops on many clocks but if you do here is an explanation of how they work and how to set up the stops.
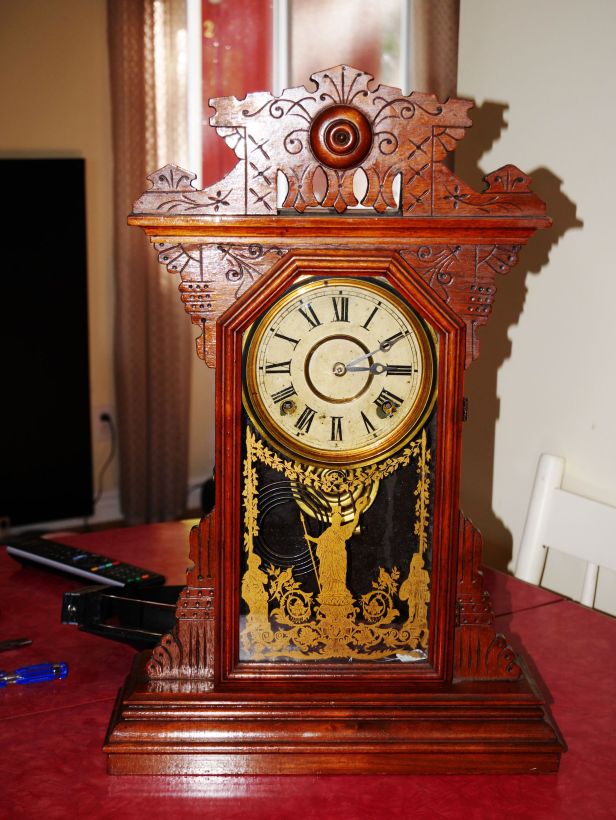
EN Welch Whittier parlour clock circa 1895, time and strike movement with Geneva stops
Most American clock movements do not use the middle portion of a long & powerful spring but use most, if not all of the mainspring. Geneva stops address this power issue. They are found on better quality antique movements made by American manufacturers. They are set so that when winding the mainspring you can only wind so far and then no further. As we know, clocks can’t be “over-wound” and this lets you know where the definite stopping point is.
On weight drive clocks Geneva stops are used to prevent undue force coming on the pendulum by jamming the weight against the seat board.
Stop works are used as a compromise by utilizing only the middle portion of a long and powerful spring, which varies too much in the amount of its power in the fully wound and completely released positions to get a good rate on the clock if all the force of the spring were utilized in driving the movement.
Removing the stops will do no harm to the movement but it will not release power as originally intended
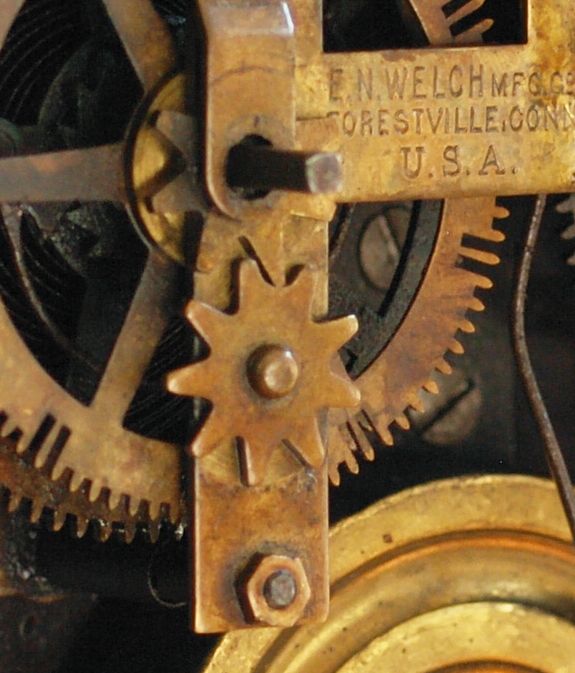
You will notice a long “finger” (long point of upper star) on one of the Geneva stop gears and a wider gap (shallow groove of lower star) on the other. You set these up so that when the proper number of turns are completed the long finger meshes with the wide gap, thus preventing any further turning.
Strike side stop in lock when long point of upper star is engaged in shallow groove of lower star
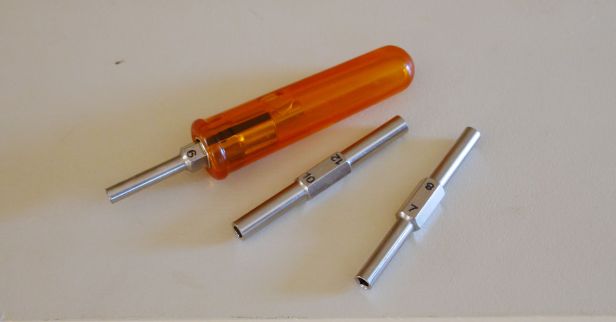
You will need a letdown set to release the springs
Setting up the Geneva stop
Wind up the spring and then let it down slowly until the stop work is locked, counting the number of turns and writing it down. Then, hold the spring with your let down key and remove the stop from the plate; then count the number of turns until the spring is down and also write that down. Alternatively, wind the mainspring until it winds no further, release the mainspring with your letdown key one complete turn and set the stop. It may take more than one try to set it up correctly.
Don’t worry if they have been removed
On many antique clocks these have been removed because the repair person did not know what to do about properly setting them up.
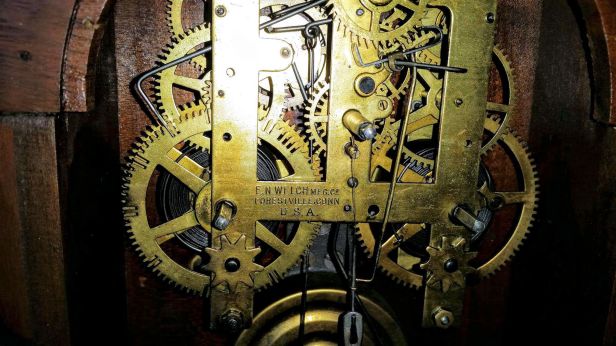
Geneva stops removed
Removing the stops will do no harm to the movement but it will not release power as originally intended.
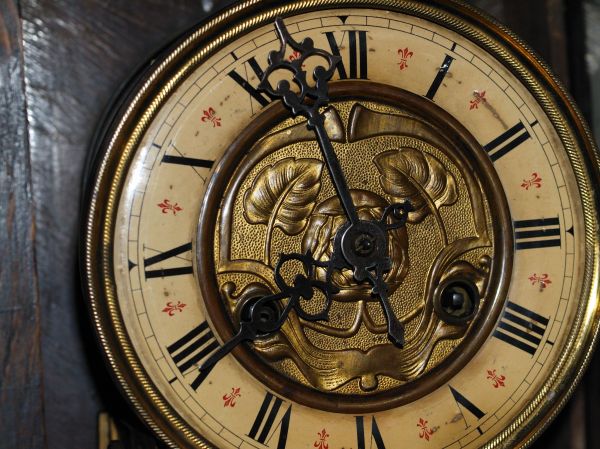
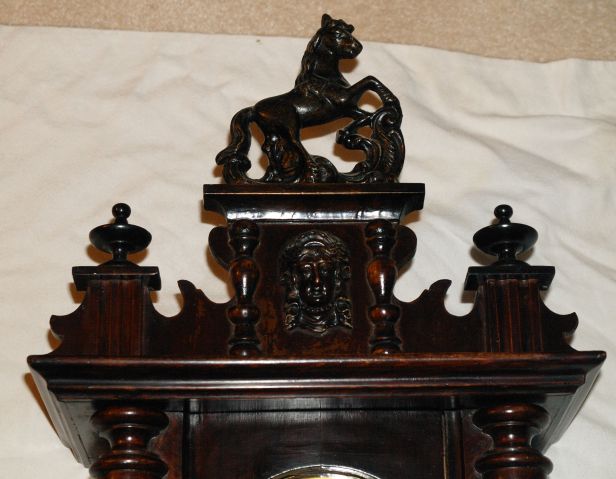
Most refer to the name “Horse Crown” when describing this clock and it is easy to see why. Many would also consider it a Vienna Regulator style of clock. I have been putting off servicing this movement for a while and a long time has passed since it was properly serviced. So, let’s get started. First, some background.
Mauthe “Horse Crown”
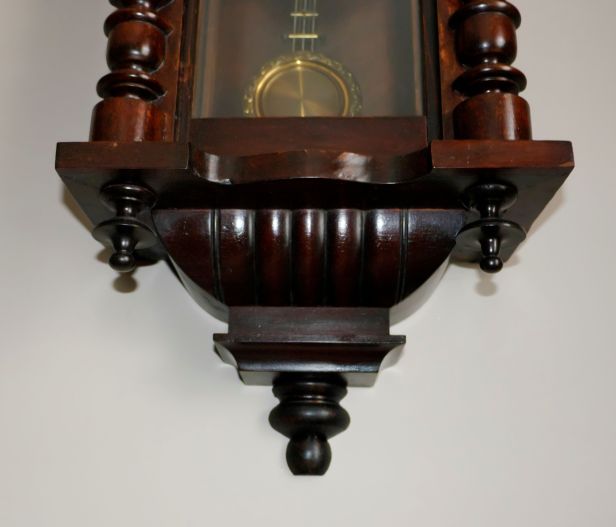
The clcok was complete save for a missing bottom centre finial. I installed a new one shorty after I bought the clock
Clocks such as these are often missing not only a finial or two but the crown and other parts so this clock is in good condition.
Replacement middle finial
Year it was made and a history of the company
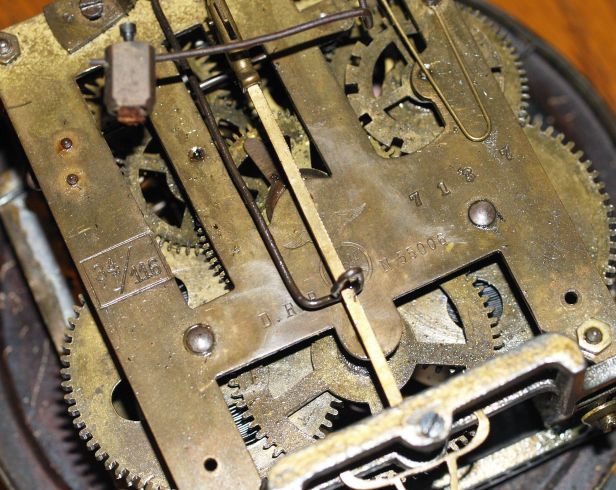
From my research, the trademark on the front plate tells me that the movement was made between 1895 and 1914 though the exact year of manufacture is unknown. Mauthe trademarks are very distinctive and from the trademark design, one can place the clock within a specific period of time. Unfortunately, the production number on the movement is a mystery as there is no known database for Mauthe clocks.
Trademark, production number, length of the pendulum (34cm), BPM (116) & patent number
Mauthe clocks have had a long and illustrious German history. In 1844 Friedrich Mauthe and his wife Marie founded the company in Schwenningen to produce watch parts. They were very successful through the years and diversified in several areas but after 1946 following the production of wrist watches the company gradually fell into decline.
This clock reminds me of what Forest Gump once said, “life is like a box of chocolates, you never know what you are going to get”
Now let’s open it up
The clock hung on my living room wall for three years. When I bought it I knew that it would eventually require servicing but there were so many other projects on the go, it could wait. The clock ran for several months at a stretch and there were months that the clock did not run at all. So, now that other projects have been completed the time is right for a thorough servicing.
Mauthe wall clock with new bottom centre finial
Forest Gump once said, “life is like a box of chocolates, you never know what you are going to get”. When inspecting any antique clock movement for the first time I have learned to expect just about anything.
As I move through any project my intent is not necessarily to correct mistakes of the past since they are an important part of the clock’s history but to ensure that past repairs do not cause me grief in the future. If it is a crude but functional and sturdy repair, I will generally leave it alone. I have learned that past repairs are part of the history of the clock.
When I took the movement out of the case I discovered something quite interesting. The dial is not original. Yes, it is a Mauthe dial but not for this clock. Two brass strips are fastened to each side of the front plate to accommodate a replacement dial. The added holes drilled into the side braces tell me that it once has a slightly smaller dial.
I am sure that those of you who are collectors have experienced the dilemma of identity
I am sure that those of you who are collectors have experienced the dilemma of identity. When I bought my first Vienna Regulator I began to realize that many parts were replaced over the years and it made me wonder what is original and what is not. It as an unwinnable argument and I have learned to accept the notion that it may not matter to me or to a casual observer who would not think of questioning whether a clock and its parts are original.
Two extensions, soldered to the sides to accommodate a replacement movement
But, let’s move on. A repair was made to the strike hammer which appears to have broken off at one point. Again, a rough but solid repair.
Hammer repair, you can see a pool of oil on the pivot to the left
The clock was coated in oil which was dripping down the plates. However, in terms of its general condition, there is surprisingly little wear. Perhaps the liberal application of oil had a hand in preserving the movement but I suspect that it did not run much over its life.
Mainspring servicing using the Olie Baker spring winder
The mainsprings are enclosed in barrels. I opened up the spring barrels to service the mainsprings. The mainsprings are in good shape with no evidence of rust. They cleaned up nicely. Broken mainsprings in German clocks can be problematic. Severe damage can result in missing mainspring barrel teeth and broken lantern pinions when the mainsprings let go, a challenge for any clock-maker.
Top plate removed
Strike side levers, escapement
The movement was disassembled and the parts were cleaned in my L&R ultrasonic cleaner. The springs and barrels were cleaned separately. All parts were washed in warm water and dried. Finally, the pivots were inspected and polished. Although this movement has a count wheel between the plates with levers much like an American time and strike there are no annoying helper springs to frustrate the re-assembly process.
After lubricating the mainsprings with Keystone Mainspring Lubricant, I put the movement together without the levers to check end-shake, meshing and the condition of the pivot holes. Two lantern pinions had some flat-spot wear but not enough to warrant replacement. Two pivot holes are slightly enlarged on the third and fourth wheel strike side but not so bad that they need immediate attention. If I were in the business of repairing clocks for a living I would bush those two and repair the lantern pinions.
Parts are cleaned & positioned, ready for the front plate
To reassemble the movement I secured the bottom front plate nuts to the back plate and then positioned the pivots into their holes working upwards. Once the pivots are in place on the strike side I attach the third nut loosely and continue guiding the pivots and the two lever assemblies in place. Unlike American movement which have larger pivots, care must be taken not to force the relatively small pivots into their holes.
Much like an American time and strike movement, the cam lever must be in the deep part of the cam while at the same time the count hook is in the deep slot on the count wheel. I made a note of the position of the stop wheel beforehand and in so doing managed to correctly position it on my first attempt.
I generally run a movement for an hour or so without lubricant to determine if everything is functioning properly. No point in oiling the movement repeatedly if it has the be dis-assembled to correct an issue. Once I am satisfied that the movement is running as it should, I apply oil to the pivot holes.
Having the movement out gave me an opportunity to clean up the case, paint the gong mount and movement rail and give the entire case two coats of shellac (traditional 1 lb cut). The movement is now reinstalled in the case.
With respect to my comments concerning the pivot holes and lantern pinions, putting the movement on a shorter 2-year cycle will enable me to monitor wear.


You must be logged in to post a comment.