Collecting, Repairing and Restoring Antique/Vintage Clocks
Author: rjoiner2021
I reside in a small community just outside Truro, Nova Scotia. I am a retired community college criminal justice professor. My interests include clock collecting & repair, photography, and international travel. The world of horology has opened up interesting opportunities for me. As I build my collection of clocks, repair and restoration have become an integral part of my hobby.
Please leave a comment on my blog or email me privately about any question(s) you might have on this post or others.
Ridgeway Hamilton Country, now owned by the Howard Miller group of companies
You’ve decided on a new location for your grandfather clock. Now it is time to set it up.
Before you do anything ensure that the clock is level and preferably on a hard surface. Wood floors are great but carpeted floors are not optimal. There are 4 leveling wheels or points on the bottom of the clock. Using a spirit level spin the leveling wheels or points counterclockwise or clockwise to achieve a perfectly levelled clock. If you wish to screw the case to the wall to stabilize it, this can now be done as long as it is standing straight up and not leaning backwards. Stabilizing the case also reduces sympathetic vibration.
Steps for setting up your clock
Release the chains or cables that were bundled during transport.
Hook the weights. If you had marked them or if they have location direction on the bottom (L, C, R; “L” for left, “C” for centre and “R” for right) ensure that the correct weight goes where it should. The weights are not the same although they may look identical. On most modern grandfather clocks each weight provides the motive power necessary to operate the time, chime and strike trains of your grandfather clock. The manufacturer has determined that a weight powered by an exact number of lbs will affect how the clock will run. For example, the chime train requires a specific weight. If the weight is too light the chimes will run slowly or not at all. Generally speaking, the heaviest weight goes on the far right side chime train, as it needs more power to run the chime hammers.
Pull the weights up if your clock has chains or use a winding crank to bring the weights up if equipped with cables. For a properly striking and chiming grandfather clock the weights will more or less descend at the same time. Check through the side vents that the cables are not tangled. A tangled cable will stop the clock.
For cables: not only check to make sure that the weight is hooked but the cable is also in the cable pulley.
Release the chiming rods by carefully pulling off the protective Styrofoam or cardboard.
Return the side vents or access panels that slot in from the inside. They will drop into their channels.
While holding the pendulum guide with one hand (using cotton gloves), slip the pendulum in through the front door with your other hand an place the pendulum hook over the pin or through the slot on the pendulum guide, and lower the pendulum until it is hanging securely on the pendulum guide.
The pendulum rod hooks onto the suspension springLyre pendulum
Let the Grandfather Clock operate for ten minutes until the pendulum settles into an even swinging motion. An even swinging motion means that there is an equal time between the tick and the tock. In clock terms, it means that the clock is in beat.
Reinstall any decorative ornaments such as finials that friction fit into their respective holes.
If your clock has a moon phase dial: To set the moon dial, apply slight pressure with your fingers to the front of the moon dial. Rotate the moon dial clockwise until the moon is positioned according to the current moon phase. Never force it, it should move easily. If the moon dial will not rotate wait 6 hours and try again. As long as the grandfather clock operates it will display the correct moon phase. If the clock stops for more than a day the moon dial will have to be reset.
Moon phase dial is adjustable by carefully moving it clockwise
Although some grandfather clock instructions say that you can move the hands backwards, it is not a method I would advocate. Never move the hour hand. The hour hand will move with the minute hand. The hour hand is a friction fit and moving it will knock the hourly strike out of sequence. By moving the minute hand Clockwise it is not necessary to wait for the Grandfather Clock to chime as the minute hand passes each quarter-hour. The movement has a self-correcting feature that synchronizes the chimes with the time. If the clock does not synchronize, give the clock an hour or so before making any further adjustments.
If the clock does not strike or chime, make sure that the silencer lever switch is in the “chime” position.
Allow the clock to acclimatize to the new environment before regulating the movement. A clock that is regulated keeps the correct time. Regulation is achieved by turning a screw on the bottom of the pendulum bob. Turning the screw clockwise will make the clock go faster and turning the screw counterclockwise will make it run slower.
Close and lock the front access door.
Ridgeway cabinet key
Consult your owner’s manual for setting special features not covered above.
Tick-Talk Tuesday is about the letters and comments I have received from you, the reader, concerning your clocks, issues you might have had and challenges you face and my responses to your questions with advice on your particular clock concern(s). For those comments and questions that stump even me, I consult within my clock circles for the best possible answer.
D writes
“Hi there. I came across your posts while searching for a repair manual for my clock.
I have a Daniel Dakota 15 day clock which runs about 15 minutes fast each day. I long ago lost the instructions/manual but thought you may be able to give me a tip or two to slow down the movement.
Let me know!”
D’s clock is similar to this Daniel Dakota wall clock
My reply.
“Thanks D,
First, I assume that it is a mechanical clock with winding arbours. Here is an excerpt from one of my blog articles posted earlier this year.
Regulating your mechanical clock – its easier than you think
Regulating your clock is the process of making repeated, precise adjustments to its mechanism with the goal of enhancing its accuracy and ensuring it functions as a reliable timekeeper over an extended period.
The running of your mechanical clock is influenced by three key factors: neglect, friction, and the environment. These elements will determine whether your clock can maintain accurate timekeeping. The article ends with tips on regulating your clock and the effects of mainspring power on timekeeping.
Let’s look at each factor.
Neglect
Neglect is easy to understand: without proper care, a clock will lose its reliability as a timekeeper. Placing a clock in a sunny spot, especially in a hot window, can cause the case to age prematurely and dry out the movement. Setting a clock near a heat source, like a heating vent, can affect its performance. Transporting a weight-driven clock without securing the weights can result in broken case parts and shattered glass. Moving a pendulum clock without removing the pendulum can cause internal damage.
Additionally, turning the hands backward should be avoided unless the manufacturer specifically permits it in the clock’s instructions.
Using a winding crank
Friction
Each moving part of a clock must be in optimal condition. The gear train should move freely, but excess friction will negatively impact the clock’s performance. Regular lubrication is crucial to prevent this. Friction causes wear, and over time, wear can lead to costly and time-consuming repairs. As bushing wear accelerates, the clock’s functionality will deteriorate, eventually causing it to stop.
Close-up of bushing wear; the pivot hole is oval when it should be circular
It’s good practice to inspect your clock’s movement every year or two and add oil if the pivots are dry. If you notice a buildup of thick, dirty oil around the pivot holes during your inspection, it’s time to service the clock’s movement. This can be done either by you, if you have the necessary skills, or by a clock specialist.
Six bushings installed on the back plate of a Sessions Westminster A mantel clock movement
Once the lubricating oil is used up or dries out the clock continues to run but the wheels are running without lubrication in their pivots holes. Once the pivot holes are enlarged (see above) the gears begin to run too deep into each other and the clock eventually stops. In clock circles the proper function of one gear operating with another, smoothly is referred to as “meshing”. Once wear becomes a factor, winding the springs no longer helps, as the springs lack sufficient power, or the gears fail to mesh properly, preventing them from overcoming friction in the gear train.
This leads some owners to think the clock is stopping due to being “over-wound,” when in reality, it’s simply worn out, or there is so much debris and dried oil in the mainspring that it sticks and refuses to unwind.
Preventative maintenance can help avoid costly repairs.
Servicing a clock is a separate topic altogether but black or green oil around or in the pivot holes is an indication that re-oiling will be ineffective; dis-assembly and cleaning of the movement is necessary.
Mixing old, dirty clock oil with new oil will speed up wear, and adding more oil won’t improve its performance.
Environment
Changes in the ambient temperature of your environment will affect it’s timekeeping rate. It is quite common to make seasonal adjustments to your clock. If you are in a temperate climate such as my part of the world, humidity, and temperature changes have a noticeable effect on the rate-keeping of any clock. Increasing the ambient temperature will slow it down, from the expansion and lengthening of the pendulum rod (unless it has a compensating type pendulum).
Clocks perform better in the more controlled environment of a home, but damp basements, window sills, bathrooms, areas above heating elements or vents, garages, and other humid spaces are unsuitable for mechanical clocks. Harsh environments can damage both the movement and the case, leading to issues like cracks, fading, and detached veneer in addition to a myriad of problems with the movement.
Pendulum bob with regulating adjustment
Regulating your Mechanical Clock
Regulating a clock often means making incremental changes to the length of the pendulum by means of a rate adjustment screw located at the end of the pendulum, or as in the case of a French clock pendulum (above) a rating screw inside the bob. Turning the rating screw clockwise shortens the pendulum (faster) and counterclockwise lengthens (slower) it.
Usually, one full turn of the screw means adding or subtracting a minute per week. To simplify the process some clocks have a rate adjustment arbour on the dial, typically at the 12 o’clock position. That way you do not have to open the access door at the back of the clock to adjust the rating nut on the pendulum.
Rate adjustment arbor
If you have a double-ended key, the smaller end is used for the rate adjustment arbour. The “S” (slow) and “F” (fast) settings correspond to adjusting the clock’s speed—slowing it down or speeding it up. Clocks may have either one of these adjustments, but sometimes both (adjustable pendulum and rate adjustment arbor), as on this French shelf clock.
French mantel clock
Rate adjustment is a trial-and-error process and typically takes a week or longer. If you can adjust your mechanical clock within a minute or two per week you are doing well. You will gradually gain a feel for the kind of adjustment required to regulate your particular clock.
Clocks without pendulums are those that have lever escapements, floating balance escapements, or balance wheel escapements. Regulation is achieved by moving a lever from slow to fast (as indicated on a wheel for instance) or adjusting weights in one direction or another on the escape wheel. There are specific directions on how to this and it is best to consult the instruction manual on your clock or search for resources online.
Mainspring Power and Regulation
When winding a spring-driven clock you are winding a sturdy coiled metal spring. The mainspring is an energy storage system or a power source. When you turn the key the winding gets tighter until you cannot turn the key any further. This stored energy (or potential energy) is now ready to be released but because a clock has reduction gears and an escapement (method for energy to escape) the energy is designed to be released at a steady and controlled rate. The purpose of the gear train is to convert the slow rotation of the main wheel into the faster rotation needed to tell the time. Each wheel in the train turns faster than the previous one.
A spring-driven clock tends to release most of its energy at the beginning of a cycle and releases less energy towards the end of it’s winding cycle which is typically an 8-day period. Most clocks will run longer than eight days but will lose more time as the spring supplies less power.
Regulating some spring-driven clocks can be challenging due to the way they release their power, though this can vary depending on the clockmaker. If your vintage or antique spring-driven mantel or wall clock is accurate to within 1-2 minutes per week, it’s performing quite well.
Sessions Beveled No 2 tambour style clock and French carriage clock
My Sessions time and strike tambour-style clock typically runs about one minute fast at the start of the week and around one minute slow by the end of the week. This is normal.
This one-weight Vienna wall clock is accurate to within 30 seconds a week
On the other hand, weight-driven clocks are more accurate since they release power at a constant rate through the winding cycle. Weight-driven clocks are generally more reliable timekeepers and are easier to regulate.
Junghans Crispi wall clock with compensating pendulum
Neglect, friction, and environmental factors play a significant role in a clock’s ability to keep accurate time. By ensuring proper maintenance, placing your clock in a location free from heat and humidity, and regularly checking for adequate lubrication, you can extend its lifespan, maintain its value, and enjoy dependable performance for years to come.
Regulating a clock often means making incremental changes to the length of the pendulum by means of a rate adjustment screw located at the end of the pendulum. Turning the rating screw clockwise shortens the pendulum (faster) and counter clockwise lengthens it (slower). Usually one full turn of the screw means adding or subtracting a minute per week.
In your case I would make several counter clockwise turns of the rating screw at the bottom of the pendulum to begin with and see how it does over the course of a day or two. Make sure that the pendulum bob actually drops when turning the screw counter clockwise.
If you can get your clock within 2-3 minutes a week you are doing well.”
My hope was that it would be a relatively straight forward exercise
This is Part 1 of servicing this 30 hour Waterbury time and strike movement. I honestly thought it would be relatively straight forward exercise. Dis-assemble, clean the parts, polish the pivots, do a little bushing work and voila! Not so.
I have worked on many clock movements but I have never seen quite the extent of wear that I found on this movement. 150 years certainly takes its toll.
Ogee clock showing replacement pendulum bob
Some time ago I profiled this Ogee clock. To reiterate, in 1839 the first prototype movement was produced for Chauncey Jerome by his brother Noble in Connecticut, USA. Jerome thought that a simple one-day clock could be produced far more cheaply than those with wooden movements at the time. Brass movements were more robust, could be transported easily and were unaffected by humidity. The simple case added to the movement was the Ogee named for its “S” shaped moldings. The success of the Ogee clock convinced other makers that there was money to be made in clock production.
This particular 30 hour time and strike Waterbury Ogee clock was produced at the height of Ogee clock production (1870s) and many thousands were sold. This is a very fine example. Absolutely nothing needs to be done to the case; it is in exceptional condition. The movement, well, that’s another story. This was not a working clock when I got it.
Waterbury clock movement
After disassembling the movement I discovered two things. One, there was evidence that it had been worked on before – as expected. There were punch and stake marks on the movement plates to close pivot holes and there was considerable wear in the lantern pinions.
Front plate has been removed
Four of the wheels have lantern pinions, with 5 trundles apiece. Trundles are the loose wires within the 2 shrouds. Dust and dirt as well as misalignment of wheel and pinion due to worn pivot holes can exacerbate the wear issue. The trundles on all 4 lantern pinions are very worn as you can see in the next two photos. I discovered why this clock does not run. When the gear teeth hits two worn trundles at precisely the right angle it locks the gear and stops the clock.
Worn trundles within lantern pinion
Another wheel with worn trundles within the lantern pinion
Professional clock-makers encounter these issues fairly regularly. Indeed, one of the most common operations in clock repair is replacing bent, broken or worn trundles. There are different methods of performing this service and the method I will employ is to drill into the shroud, extract the worn trundles, cut new ones out of pivot wire, insert them and re-knurl the shroud.
In the meantime bushing work was performed; 10 bushings were installed, 5 on the back plate and 5 on the front, including one on the escape wheel bridge. I re-assembled the movement knowing that the trundles had to be replaced, but despite new bushings the movement ran only marginally better.
Part II (Jan 2nd) details the procedure I followed to replace the trundles in the lantern pinions. Stay tuned.
Halifax (Nova Scotia, Canada) was devastated on 6 December 1917 when two ships collided in the city’s harbour.
Taken from the Dartmouth side
Results of the deadly blast
Today marks the 100th anniversary of the Halifax Explosion.
On Dec. 6, 1917, the Belgian relief ship Imo rammed into the French munitions vessel Mont-Blanc, which was carrying TNT through the narrowest part of Halifax harbour. A fire on board the French ship ignited her cargo, causing a devastating explosion. The Mont-Blancexploded at 9:04:35 a.m., sending out a shock wave in all directions, followed by a tsunami that washed violently over the Halifax and Dartmouth shores. More than 2.5 square km of Richmond were totally levelled, either by the blast, the tsunami, or the structure fires caused when buildings collapsed inward on lanterns, stoves and furnaces.
Two thousand people were killed in the Halifax Explosion and another 9,000 were injured. The explosion is the worst man-made disaster in Canadian history.
Seconds later a Junghans Crispi wall clock fell off a wall in a house on Princess court, North End Halifax. The following is the story of that clock.
I bought the remains of the clock from a gentleman in Halifax who related the story of how this clock was passed down to him through his wife’s family. It was important to him that someone who had a love and an appreciation of old clocks should continue with the restoration after he had rebuilt the frame some 30 years ago.
Thus began the six month journey of restoring the clock to its former glory. During the restoration I was able to obtain an old catalog image (supplied by a member of NAWCC) to guide me through the rebuilding process. Some of the smaller trim pieces were missing and because they are impossible to locate they had to be either purchased from a clock supply house or handcrafted.
How the clock came to me
Four Junghans clocks, the Cripi is second from the left
Junghans Crispi wall clock
It is now a wonderful tribute to that terrible tragedy on December 6, 1917.
Having moved modern grandfather clocks these are some useful some tips when transporting your clock. If you are unsure, a professional will certainly perform the service but consider the cost before you decide since you will pay travel time plus disassembly/set-up time, shop supplies and tax.
A call to a professional is unnecessary if you follow these simple steps.
Ridgeway Hamilton Country circa 1996, Hermle movement, cabinet by Pulaski Furniture Co.
Never lift up or carry your grandfather clock without first partially disassembling it. This is very important as you risk damage to your valuable clock. Moving your clock just a few inches from one area of a room to another requires that you do it carefully and correctly.
To preserve its finish, use cotton gloves to handle the weights, pendulum and other brass clock parts.
The weights are not all the same although they may look identical
Follow these steps:
Raise the weights to half wound for chains. Cables will need to be hooked separately by string to the bottom of the case.
Unhook the weights. If not already marked, add tape and pencil to mark the weights L, C, R; “L” for left, “C” for centre and “R” for right. This is to ensure that the correct weight goes back where it should. The weights are not all the same although they may look identical. On most modern grandfather clocks each weight provides the motive power necessary to operate the time, chime and strike trains of your grandfather clock. The manufacturer has determined that a weight powered by an exact number of lbs will affect how the clock runs. For example, the chime train requires a specific weight. If the weight is too light the chimes will run slowly or not at all. Generally speaking, the heaviest weight goes on the far right side chime train, as it needs more power to run all of the independent chime hammers.
Take the side vents out of the case or tape them from the inside. They lift out of their channels from the inside.
Remove the pendulum by holding it (with cotton gloves) from the middle and slightly move it up. It should unhook easily.
Lyre pendulum
Secure the chains or cables by bunching them from bottom to top and wrapping them in newspaper and place a rubber band around the package so that they do not move around. Pipe cleaners or twist ties are also great for securing the chains/cables.
Put each weight in a sock or in bubble wrap.
Place the pendulum in a folded blanket.
Punch holes in a strip of an egg carton to hold the chiming rods or use Styrofoam.
Weights should be separated from the clock during transport.
Lie the case down for transport ensuring that there is sufficient protection for the glass.
Lock the access door. Use a large blanket to surround the clock and place cardboard between the blanket and the front glass.
Ridgeway cabinet key
Some movements can be taken out for transport but for modern grandfather clocks, this is seldom required. Nonetheless, ensure that the movement is secure in its case.
Hermle movement
If you have decorative ornaments such as finials that friction fits into their respective holes they can be lifted out.
You should now safely transport your grandfather clock.
Why are these clocks so cheap? Discounting the wild prices some seem to be asking on online for-sale sites, a good example can be had for almost nothing. Why? Allow me to explain.
This 30 hour time and strike Waterbury Ogee clock was discovered at an antique store an hour’s drive away. The store has a well-deserved reputation for pricing items for a quick sale and each time we visit there is always a new selection of interesting clocks as well as plenty of other fascinating antiques.
30-hour Ogee clock by Waterbury
Ogee clock, clock design that originated in the United States in the 1830s, distinguished by a case (usually pine) the front outer edges of which are curved into an S-shape (ogee). This shape is formed by the union of a convex and a concave line. A mass-produced variant of the shelf clock, the ogee clock stands about 30 inches (75 cm) high and is usually weight-driven. The movements were usually made of brass and were made to run for 30 hours or eight days. (Brittanica.com)
The Ogee clock – the beginning
In 1839 the first prototype movement was produced for Chauncey Jerome by his brother Noble in Connecticut, USA. Jerome thought that a simple one-day clock could be produced far more cheaply than those with wooden movements at the time. Brass movements were more robust, could be transported easily and were unaffected by humidity. The simple case added to the movement was the Ogee named for its “S” shaped moldings. The success of the Ogee clock convinced other makers that there was a lot of money to be made in clock production.
My new acquisition
The seller knew nothing about clocks and his only interest was to move the item. The proprietor said it was not working. Just as well, I bought the clock for almost nothing. In my opinion these clocks are terribly undervalued.
It came with a winding crank and both weights but no pendulum. A 2.2oz pendulum bob was later fitted to the movement.
The dimensions are 4 1/4 deep X 15 1/4 wide X 25 3/4 inches high. The clock strikes on the hour to conserve the weight drop. The coiled gong on the Waterbury stamped base is loud, and the striking is frantic.
The movement will run and stay in beat (relatively!) but stops after about 15 minutes. That is to be expected and a thorough servicing is in order. Stake and punch marks throughout the movement tell me that the movement has been worked on more than once.
Ogee clock label shown with a 2.7 oz pendulum, also testing with a 1.7 oz pendulum
The Rosewood veneer is in remarkably good condition though the outside four corners have been compromised. The label is in very good condition with two small pieces missing at the bottom edge and water staining on the right side. The painted zinc dial with Roman Numerals has some flaking and the numbers are somewhat faded but it otherwise looks very good for the age of the clock. Both spade hands and Ogee hands are on similar dials I have seen so I do not know if these are correct/original. The lower reverse painted tablet is silk screened, looks to be marred around the centre area and the entire scene has minor crackling but it is vivid and largely intact.
Veneer in excellent condition
This is a Type 2.411 movement introduced by the Waterbury Clock Co. when Chauncey Jerome worked for them briefly in 1856-1857 after he went bankrupt. Found in Chauncey Jerome-labeled clocks with movement stamped, “C JEROME.” and also stamped “Waterbury Clock Co. CT” in later (1870) Waterbury clocks. This movement has the Waterbury stamp.
Waterbury clock movement
There is a Canadian connection to this movement. The Canada Clock Co. of Whitby, Ontario 1872-76 made 30 hour weight driven, time and strike movements based on an American design. Research indicates that the Collins Brothers (there were three: William, John, and Edward Collins) made a close copy of the OG movement used by the Waterbury Clock Company in Connecticut, a testament to the excellent design of this movement.
Ogee clock top showing cable pulleys
Why are these clocks so undervalued?
The economic collapse of 2008-09 prompted many to sell their clocks and glut the market.
The generation of folks who cherished these clocks are dying off.
The newer generation consider them irrelevant and are not interested in them.
30 hour clocks are a tough sell because of the hassle of winding them daily.
Winding them daily means that most have considerable wear and the cost of repair exceeds the value of the clock
Lastly, many tens of thousands were made so they are not especially rare.
Ten years ago an Ogee in good condition would easily sell for $200 to $300. Today I see prices all over the map but none close to the prices they once commanded.
Expect a report on the servicing of this 30 hour Waterbury Ogee in the weeks to come.
tools are essential for clock repair because they enable precision and accuracy, which are critical when working with delicate mechanisms and intricate components. Let’s identify the key reasons.
Antique and vintage clocks can lose significant value if repaired improperly. Using the right tools minimizes the risk of damage, preserving their historical and monetary worth. The right allows you to handle small parts without causing damage. Specialized tools ensure components are handled carefully and correctly.
Proper tools make the repair process faster and more straightforward. Having the right tools helps build confidence and competence. They allow you to focus on understanding clock mechanisms without being hindered by improper equipment.
This article will describe some of the more advanced tools required to tackle the repair and/or cleaning of mechanical clocks.
Based on years of clock repair experience, I recommend the following tools for those ready to advance their skills in clock restoration and repair. Most specialty items will need to be ordered from clock supply companies such as Timesavers (USA), Perrin (Canada), or Meadows and Passmore (UK). Other items such as an ultrasonic cleaner can be ordered through online merchants.
Part I of this two-part series describes the basic tools for those just starting out. The tools/equipment described here are for the more advanced hobbyist/amateur horologist.
A Suggested List of Items
Ultrasonic Cleaner: This Harbor Freight special will do for now but it is so low-powered that a newer, more powerful machine is on the horizon. It does not perform as well as better quality machines and it has a limited load capacity. An eight-minute limit for each cycle means that several cycles are required to properly clean clock parts. It is a start.
Ultrasonic cleaner
Spring winder: An essential tool. Disassembling clock movement also includes servicing the mainsprings. Mainsprings must be inspected for breaks, cracks and splits, cleaned of old oil and rust (as long as there is not too much rust) and lubricated prior to re-installing them into the movement. Too much rust and they should be discarded. I generally do not replace springs in a movement unless they are quite set, or have breaks or cracks. I have found that the steel in the original movement is better quality than can be found today. Mounting the spring winder on a piece of hardwood provides a stable tool and allows it to be clamped to a work-desk.
Although there are other types of spring winders, the Olie Baker winder is one of the better choices in my view. It is well made and should last for years. If you can find a used one you will save a little.
Mainspring contained in a clampMainspring servicing; taking the clamp off to inspect and service the mainspringMainspring barrels require collars supplied with the Olie Baker spring winder
Bergeon 6200 Bushing Machine: Some bush by hand and they are to be applauded for their patience and skill. I chose a bushing machine for the delicate work of installing bushings. This is the Bergeon 6200 which is made in Switzerland. It is exceptionally well made and relatively simple to use.
Chucks and reamers
The machine can be bought separately or with a set of cutters and other hardware (above). The cutters can last 15 years or more. Of course, you must also have an assortment of correctly sized brass bushings that are purchased separately from any clock supply house.
To operate, a correct size cutter is placed in the bottom end of the steel shaft, holes are cut after which the new bushings are punched in place with a hammer head fitted to the shaft.
Bergeon Bushing MachinePressing a brass bushing into the drilled pivot holeSix new bushings on the back plate of a mantel clock
Lathe: Good quality mini lathe are available from Sherline, Taig and others. A cost effective option is the Taig Miniature Lathe for metal. The Taig lathe was originally designed for precision machining of watch and clock parts; ideal for clock repair applications. The small office space in my home means that its compactness, portability and relative simplicity are attractive features.
Taig lathe with 1/4 hp Marathon motor
Reference/Reading material: I recommend the Steven Conover series of repair manuals. The manuals are well-written, and detailed and are great resources for the beginner or the advanced amateur.
Steven G. Conover; Clock Repair Basics
Steven G. Conover; Striking Clock Repair Guide
Steven G. Conover; Chime Clock Repair
The acquisition of clock supplies and equipment has been a personal journey for me. I started with a few basic tools for disassembling movements, gradually learning what additional tools were necessary and steadily expanding my collection over time.
Several years ago, my first major purchase was the Olie Baker spring winder. A few months later, I added a Bergeon bushing machine, complete with cutters and a supply of bushings. Most recently, I acquired a Taig mini lathe with accessories. This mini lathe will enable me to advance my clock repair skills by allowing me to polish and burnish pivots properly, replace worn or damaged pivots, and perform other specialized repairs. As new challenges arise, I plan to seek out additional specialized tools and equipment to further enhance my capabilities.
And finally
Set a specific goal, research your requirements, and build your collection of tools and equipment gradually while sticking to a reasonable budget. Clock repair can be more affordable than you might expect, especially when costs are spread out over time and some tools can be sourced from the used market.
I hope you found this helpful! If there’s a tool or piece of equipment you consider absolutely indispensable, I’d love to hear about it.
Clock collecting and repair allows me to combine my other hobby, photography with the world of horology.
I have seen so many poor photos of clocks that I thought I would cover one small aspect of photography, macro photography. The following is a generalist approach to macro photography that is intended to allow the hobbyist to take more interesting photos of their clocks. You can make macro photography as basic or as complex as you wish it to be. Here we are talking about normal macro as opposed to true macro when you are creating an extreme close-up image of an insect, for example. Normal macro is a sharp image of a tiny object requiring the lens to be positioned much closer to the object. You do not have to be a studio pro to take macro images but you should have a macro capable lens.
Most photos on my blog are taken with an 8 megapixel Olympus E330 SLR which I have had for about 10 years. It is coupled to a 50mm F2 lens macro lens purchased around the same time (equivalent 35mm focal distance of 100mm). For photo enthusiasts the lens has has 11 elements in 10 groups with a minimum focusing distance of 0.2m. In 2008 DPReview called the 50mm a “Superb image quality (lens) even wide open – sharp, distortion-free with no lateral Chromatic Aberration”.
I do not use a cellphone when taking clock pictures. Simply put, it is NOT the resolution, it is the lens
The 50mm lens is a true macro and it permits shots that would be otherwise impossible to take on a typical cellphone camera. I do not use a cellphone when taking clock pictures. It is NOT the resolution, it is the lens. There are occasions when I will use a more up-to-date camera such as my Panasonic G85 when taking some clock shots and all videos as the E330 is not video capable.
8 megapixel E330 with 50mm F2 lens, introduced in 2006; first DSLR with “Liveview”
In some of the shots you will notice a purposely blurred out background. This is known as Bokeh. The degree of blurriness or Bokeh is an indicator of the quality of the lens but more importantly Bokeh allows the viewer to concentrate on the object in question without the distraction of a background. The decrease in sharpness is gradual on each side of the focused distance. This is accomplished by setting your camera lens to the widest possible setting (lower F stop, F2 for instance) and then focusing on one particular part of the frame. The contrast between in and out of focus portions of the frame concentrating around the subject and relative distance to other things in the frame creates a deeply enriched image.
E330 back view
A flash attachment like the Olympus FL-36 allows you to tailor the light for the scene. Make sure your camera has a hot-shoe for an external flash. Invest in an external flash unit with a 90 degree swivel (bounce) head. Buy the flash that is correct for your camera. You don’t need to spend a lot of money, external flash attachments can be very inexpensive.
When taking a flash picture indoors, turn off the camera’s built-in flash. Point the bounce flash head at the ceiling (rather than at the object) and take the picture. This will provide a soft, diffused light and it will cut down on reflections. Bouncing light creates a more natural effect rather a direct flash on an object which can be harsh and unattractive. Bouncing also works best with light coloured ceilings, white being the preferred colour. When there is no light to bounce off, a diffuser works well. The photo below shows the FL-35 with a diffuser (white rectangular shaped plastic top) attached.
E330 with Olympus flash
The top photo (Westclox LaSalle alarm clock) was shot with a white cloth background and a bounce flash.
Use auto white balance (AWB) in your camera settings. Shooting in JPEG is perfectly fine but for more control over the final result, shoot in RAW to correct colour temperature and exposure in post processing.
Rather than explain each shot I will allow the photos speak for themselves.
Floating balance from a Dugena mantel clock
Company name stamped on an Arthur Pequegnat Brandon wall clock movement
Pendulum lock on a type 89 Seth Thomas Cottage clock movement
Brocot patented speed adjustment on French table clock
Centre shaft cam, Sessions Westminster A mantel clock
Close-up showing extent of bushing wear on an American time and strike
Centre wheel on a German time and strike mantel clock
Patent date of 1877 on back of an Ingraham Huron pendulum
Centre canon teeth repair on an Ingersoll Waterbury mantel clock
Reverse side of factory pressed bushing oil sinks
Bad trundles on a 30 hour Ogee lantern pinion
Star wheel on a Gustav Becker Vienna weight drive regulator
Worn click on Sessions Beveled No. 2 time and strike movement; narrow focus range. Only the centre is in focus.
Having a capable camera with a high quality macro lens is essential to clock repair.
In a future article I will explore lighting, exposure and other techniques to enhance your clock photos. If you have any questions please leave a comment.
Here is an ad for a clock recently offered on an online for-sale site. Here is the description.
The clocks dose not work it needs some work 80 dollars or best offer
And here is the image that is attached. There is only one image.
Blurred image of a mantel clock for sale. Photo not rotated, as seen on ad
Would you as the buyer even ask more questions about this clock?
Wouldn’t the seller put just a little extra effort into a good description and decent resolution images if they wanted to charge a fair price for their clock? I would be surprised if the seller gets any response from this ad.
EN Welch time and strike parlour clock displayed in an antique shop
In a previous article I described some of the challenges I had with this E.N. Welch clock movement.
The clock ran for about 48 hours and suddenly stopped. It seems that every time I think everything is going well, something else crops up. I dis-assembled the movement (again) and installed three more bushings, one of which is on the escape wheel bridge which I noticed had a fair amount of play. Perhaps the vertical motion of the EW was causing the clock to stop. The other two bushings were installed on the third wheel, back and front. I have decided to hold off addressing the EW teeth if the bushing work I have done has solved the stoppage issue.
I was hoping to wrap the servicing up fairly quickly but unanticipated problems continued to crop up. Having completed the work mentioned above I could see that things were beginning to change for the better.
Shortly after taken from the case. A very dirty movement with many issues
The time side ran strongly for eight days after which I reinstalled the strike train. Here is the movement running on a test stand.
Cleaned and free of rust, bushings installed and tested
Setting up the strike side required manipulating some of the lever wires which were moved out of position by the previous owner, for whatever reason. A previous repair/adjustment resulted in the lifting levers bent back into the case and the count lever pushed in an upwards orientation. As a result I had to bend the levers back into their original positions.
From left; hammer lever, count lever, lifting lever
Here is the movement installed back into its case.
E. N. Welsh Whittier model
It should now run reliably for years to come. A frustrating project with a satisfying ending.
If your country uses Daylight Saving Time (DST), you have to change your clocks twice a year.
Set your clocks forward 1 hour in the spring at the start of DST (Daylight Saving Time), and 1 hour back in the fall when DST ends. In North America the word “fall” is used to denote the season, while other English-speaking countries usually call it autumn. “Spring Forward – Fall Back” is therefore a phrase most often heard in the USA and Canada.
Records show that the phrase “spring forward, fall back” has been in use at least as far back as the early 20th century. It is the practice of advancing clocks during summer months so that evening daylight lasts longer, while sacrificing normal sunrise times.
The Westclox Clock Company is better known for various versions of Big Ben and Baby Ben windup alarm clocks produced from 1900 to the mid 1980s. But there were other windup models one of which is the Art Deco styled LaSalle series. This is the model 61-C (401) otherwise known as a Dura clock because they have nickel-plated, die-cast zinc cases made by The Dura Casting Corporation in the United States. There are 6 models in the LaSalle series and all use the Westclox type 61 Baby Ben, one day movement.
Westclox LaSalle alarm clock
Gee that old LaSalle ran great….those were the days! (a line borrowed from the theme song to All in the Family)
I have a modest collection of alarm clocks and if something interests me I will buy it. My wife found this Westclox Alarm clock at an antique store in Halifax (Nova Scotia, Canada). At $20 the price was right. It is solid, well made, attractive and partially assembled in Canada.
There is no information on which clock parts were made in Canada and which parts were manufactured in the Peterborough plant through the years
Westclox alarm back of clock showing winding mechanism; oftentimes knobs are missing on these old clocks
The LaSalle 400 series ran from 1930 to 1934. This is model 61C. The clock measures 3 1/8 inches high. The base is 3 1/4 inches and the depth is 1 3/4 inches.
Bottom of clock showing Patent dates & “Case made in USA by Dura”
Inside is a Baby Ben movement. The Baby Ben movement was first marketed in 1910 and first nationally advertised in 1915. The 5-year delay occurred because the company was going through organizational changes and it took 3 years to improve the reliability of the Baby Ben. The patent date on this clock is 1914.
In 1912 Westclox opened a sales office in Toronto, Canada as part of its policy to establish world markets. Somewhere between 1920 and 1922 production began at the plant in Peterborough, Canada. At that time parts were shipped from the LaSalle-Peru plant for final assembly in Canada. Unfortunately, there is no information on which clock parts were made in Canada and which parts were manufactured in the Peterborough plant through the years. Thousands of Big Ben and Baby Ben alarm clocks were manufactured and sold through the 1920s to the 1970s. In the early 1980s production in Canada stopped.
I avoid clocks with radium dials. Since radium has a half-life of hundreds of years even old radium dials are very hazardous. If working on a clock with a radium dial care should be taken to prevent the inhalation or ingestion of flakes or dust which may contain radioactive materials. In the past several years radium dials have largely been replaced by phosphorescent – or occasionally tritium-based light sources.
Side view of alarm clock
I took the back cover off and found an inscription indicating that it was last serviced in 1955. The markings are unusual because alarm clocks rarely see servicing and once they stop they are simply discarded or used as paper weights.
That LaSalle may have run great at one time but not now. I can hear it ticking but once set down it abruptly stops. A thorough cleaning is required.
It is a nice piece of Canadian Horological history.
Halloween is a contraction of All Hallows Eve. It is a celebration which is observed in a number of countries and begins the 3 day observance of Allhallotide, a time to remember the dead and the faithfully departed.
Halloween includes trick or treating, going home to home in a guise or costume dressed up as ghosts, witches, skeletons or other characters, attending Halloween parties, carving pumpkins, lighting bonfires, visiting haunted attractions and watching horror films.
Halloween occurs a single night of the year and is spooky fun for both kids and adults alike.
A display of pumpkins
Having no clocks that would represent Halloween I did find a Steampunk clock here that I found quite fascinating.
Tools are essential for clock repair because they enable precision and accuracy, which are critical when working with delicate mechanisms and intricate components. Let’s identify the key reasons.
Antique and vintage clocks can lose significant value if repaired improperly. Using the right tools minimizes the risk of damage, preserving their historical and monetary worth. The right tools, such as screwdrivers, pliers, and tweezers, allow you to handle small parts without causing damage. Specialized tools ensure components are handled carefully and correctly.
Proper tools make the repair process faster and more straightforward. For beginners, having the right tools helps build confidence and competence. They allow you to focus on understanding clock mechanisms without being hindered by improper equipment.
This article will describe some of the tools required to tackle the repair and/or cleaning of mechanical clocks.
Based on years of clock repair experience, I recommend the following essential tools for any beginner’s toolkit. While some of these tools can be sourced from your local hardware store, specialty items will need to be ordered from clock supply companies such as Timesavers (USA), Perrin (Canada), or Meadows and Passmore (UK).
Whenever possible, avoid purchasing tools from craft shops, as their prices are often significantly higher. They are ideal for paint and quality paintbrushes but they tend to charge much higher prices for general-purpose tools. A ball peen hammer bought at a hardware store, for instance, costs half as much as one found in a craft shop.
A suggested list of items
Keys: clock keys come in many different sizes. You must use the correct key for the winding arbours of your clock. The pronged keys in the photo below will fit a multitude of arbours.
4 and 5 prong keys and singles
Magnifier: They are available in various strengths and allow a much closer view of your work.
Magnifier
Work light: Illuminates your work, this one articulates and has a magnifier. I have since replaced this light with an LED one. The lamp burnt out and the cost of the fluorescent lamp was more than the entire lamp. Plus the new LED lamp has light temperature and intensity controls.
Work-light
Pliers: A variety of pliers to hold onto your work, release taper pins, tighten nuts, and cut wires. The green handle pliers are non-serrated (flat-nose).
Assorted pliers
Hammers: A ball peen hammer is very useful (not pictured). The craft clip holder is useful for steadying items that are to be soldered.
Hammers and craft clip
Files: Variety of sizes to help shape or file down anything on a movement. Avoid inexpensive Chinses files and spend a little more on quality ones.
Files
Tweezers: Getting into tight situations, grabbing small parts, and positioning parts into place are typical uses for tweezers
Tweezers
Level: To find the correct beat the movement (clock) must be level.
Level
Spring clamps: To restrain the power of the mainspring. The flat clamp (upper right) is for those mainsprings which do not leave a lot of working room. Otherwise, the other round clamps are good for most applications. I prefer the flat clamps.
Assorted clamps
Screwdrivers: Always handy to remove movements from cases, loosen bolts, and pry parts.
Screwdrivers and box wrench
Letdown set: Before working on a movement the mainsprings must be let down or restrained in their clamps. The letdown key is the safest method of letting down the mainsprings. Inserts cover most arbour sizes.
4-piece letdown set, #5-6, #7-8, #10, #12
Hand reamers and broaches (cutting and smoothing): For bushing clocks when you cannot afford the luxury of a bushing machine. Cutting and smoothing broaches are useful for enlarging a new bushing when tight tolerances are required. They come in assorted sizes.
cutting and smoothing broaches
Cotton swabs: A variety of cleaning uses.
Cotton swabs
Clock oil: Once the movement is apart and cleaned it must be re-assembled and then oiled before use. The oil, whether it is conventional or synthetic, must be specifically designed for a clock movement.
Clock pivot oil
Toothpicks: For cleaning and “pegging out” bushings on a movement
Toothpicks
Clock stand: Once the movement has been re-assembled it is tested outside the case for a short period. Gene’s movement stand is a fully adjustable test stand.
Gene’s clock movement stand
For those handy with a hammer and saw a stand can be made at home with whatever lumber is at hand.
Testing a movement on a home-built test stand
Camera: At every part of the process a digital camera can record critical stages in assembling and disassembling a movement. I use a 50mm macro lens for close work. A cellphone is a perfectly acceptable alternative but one with good macro capabilities is preferred.
Digital Camera
Electronic Caliper: Indispensable for measuring the thickness of anything be it springs, pivots, plates, and so on. Available at a clock supply house or save a little money and buy the same tool from a retail outlet such as Canadian Tire in Canada.
Using a micrometer to check pivot diameter
Pivot locator: It is an excellent tool for aligning pivots with their holes during assembly.
Build your set of tools little by little to spread the cost. You may already have some of the items I’ve mentioned but buy what you need when you need it. As for those specialized tools, broaches for example, it pays to spend a little extra for better quality.
These are the tools you require to start your journey into clock repair. If you have a tool (or tools) you feel is indispensable for the beginning clock-maker please let me know.
In Part II I will describe tools for those who would wish to advance their skills in clock repair.
This is perhaps the dirtiest movement I have ever worked on
This is perhaps the dirtiest movement I have ever worked on. The case, tablet and dial face are in beautiful condition and nicely preserved requiring little or no work at all to restore to its former glory but the movement is another story. A past owner either sprayed oil on the movement or dipped it in some kind of lubricant on more than one occasion. The oil was gooey, sticky and seemingly baked on. It required several washings, vigorous scrubbing with a brass brush, ultrasonic cleaning and even #0000 steel wool. I finally got most of the grime, dirt and rust off the movement.
Having so much solder on a movement is a little discouraging and I often wonder what problems lie beneath. There was solder on the centre plate nut, solder on the front and back plate, 4th wheel on the strike side and solder around the hour cannon. I decided to leave the solder on the hour cannon for now. However unsightly, I may not remove it.
Solder around fourth wheel
More solder
Soldered washer around centre cannon
The solder was removed with a butane torch. Expecting bad bushing repairs and/or punch marks I found nothing! I also removed the solder around the centre nut and found that the nut was not stripped as I initially suspected. I am puzzled.
Solder removed front plate
Solder removed back plate
Here is a video describing my plan to address bushing work.
In the video I mentioned the installation of eight bushings. I installed seven bushings initially but installed more later on as I discovered other power issues. One is always tempted to bush everything in a movement. Some clock-makers tend to bush everything because the one thing they do not want is the clock coming back. I understand that but I decided to take a cautious approach for this movement and bush what I felt was absolutely required.
Tapping the bushing home
After cleaning the movement the pivots were polished and pivot holes pegged. Next is assembly. I have mentioned this before that I do not have much luck getting the strike side to function on the first go-around. It usually takes me two or three attempts.
Day 2
Although I was unable to set up the strike setup correctly the principle problem was the poorly running time train. After 5-10 minutes it would stop. Suspecting a power issue I looked for bent arbours, troublesome trundles or worn gear teeth and found nothing.
However, I found considerable play in the centre arbour. Suspecting poor meshing of the main wheel with the centre arbour gear I installed the 8th bushing (back plate) then removed the strike side entirely to focus on the time train issue. The movement immediately ran but the beat was inconsistent.
A “drifting” beat (in beat and then drifts out of beat, then in-beat) usually indicates an issue with the escape wheel teeth or the escape wheel arbour. Some of the EW (escape wheel) teeth have slightly bent tips but before I straighten them I wanted to determine if there were other reasons for the stoppage.
Day 3
The clock ran for about 48 hours and suddenly stopped. I dis-assembled the movement (again) and installed three more bushings, one on the escape wheel bridge which I noticed had a fair amount of pivot wear, the other two on the third wheel, back and front mostly for insurance. I surmised that vertical motion of the EW might be causing the inconsistent beat leading to the eventual stoppage. Addressing the bent tips on the EW teeth may come later if these measures do not cure the problem.
Day 4
The time side is settling down and I am now able to get several days running without a stoppage. The beat is now consistent.
Day 5
I am going to let this clock run for a week or so before I reinstall the strike train just to be sure that there are no other power issues. I was hoping to wrap this service up fairly quickly but unanticipated problems are slowing me down.
I’ll give my final thoughts in a post in Part IV, two weeks time.
I have never paid more that 30CDN for one but I see these clocks selling on EBay and other online for-sale sites at twice and three times what I typically pay
This a is Part II of a two part series on repairing a 400 day clock. Part I can be found here.
Attractive dial face, free of cracks and blemishes
I have four anniversary clocks (otherwise known as torsion clocks). I have never paid more that 30CDN for one but I see these clocks selling on EBay and other online for-sale sites at twice and three times what I typically pay. In fact, I saw one on EBay this morning (Oct 3, 2017) for 119US plus 39US shipping. The description is amusing:
When I tested it, I spun the balls about a full turn and it continued to spin back and forth for several minutes. From my understanding these things are supposed to go for a whole day without being spun again. I think it might need to be cleaned for it to do that.
The string still looks good; the cover is cracked a little where it connects to the clock but isn’t falling off.
Numerous dents, the pendulum locking guard is there for a reason! Not using it results in a snapped suspension spring and dents
The Horolovar suspension spring arrived today and now to install it in on the movement. 400 day clocks are easy to disassemble/clean and re-assemble but getting it to work correctly can be frustrating. Setting the beat can be a challenge.
To perform servicing on a 400 day clock you must have the Horolovar 400 day Repair Guide as a reference. The guide takes the guesswork out completely.
The old spring was snapped off just above the bottom block and unfortunately it was not re-usable
Horolovar 400 Day Clock Repair Guide
Horolovar templates
I received my guide as a Christmas gift last year. For my first Kundo miniature (bought and serviced in 2015) I did not have the guide and after a lot of guessing and cursing I managed to get the suspension spring installed correctly but it was more luck than skill.
Unfortunately, I required a new suspension spring for this clock. The old spring was snapped off just above the bottom block and not re-usable.
The guide tells me that this 400 clock is a Kundo Standard 53 that uses a .0032″ or .o81mm Horolovar spring. If you do not have the time to assemble suspension units, Horolovar will gladly sell you completely assembled units but you pay much more. In Section 10 of the guide there are templates for a number of clocks. Having a template at hand allows one to follow a pattern when screwing the fork and the upper and lower blocks to the suspension wire. This clock was template 3A.
The screws on the suspension assembly are very small and it pays to have good quality precision screwdrivers. It was not all joy, however. All went well until I got to the bottom block. The bottom block was seized and it took an extra effort to release the two block screws. However, once I overcame that little issue the completed assembly looked exactly like the template. The spring is longer than necessary and must be trimmed to fit. Now to install it on the movement.
Arrow indicates insertion point for top block
The suspension spring assembly slipped into the top and bottom easily. There is a threaded thumbscrew on the top base that slips into the top block (arrow in photo above). The bottom block has two hanger pins that the pendulum rests on. Next is the back spring cover and the locking guard. The locking guard is an earlier design and looks a somewhat flimsy but should work.
Once installed on the movement it is time to test the beat. The beat should be 8 beats per minute.
Next few days
There is nothing fancy about the beat adjustment. The top block fits into a friction fit base that is moved left or right to find the best beat. Moving the base allows one to position the fork that rocks the pallets back and forth so that the beat can be set.
As of this writing the clock has been running for 48 hours but there is a slight variance in the over-swing on each side after the click (I use toothpicks to check the over-swing – see photo below) which means that while the clock is running and keeping reasonable time the clock is very, very slightly out-of-beat. Minute changes in the next few days will address that.
I rotated the speed adjustment dial just above the pendulum several times as the clock was losing 10 minutes per day and am now discovering that a previous owner or a child perhaps gave that dial a few spins to see what would happen. Setting the time is a slow process and it will take a week or more to set the time correctly.
Using toothpicks to set the beat by observing the position of the over-swing
Working on anniversary clocks is always very satisfying for me and this is why I love them:
Anniversary clocks are time-only with few gears,
Relatively inexpensive to buy (though some Schatz and Gustav Beckers are less common, more desirable and more expensive),
Very quiet (this is a clock to have if a ticking clock drives you crazy),
Easy to dis-assemble/clean and re-assemble,
Operate so slowly that there is seldom any pivot wear and therefore, easy to service,
A great conversation piece,
They run for 400 days or more on a single wind though do not depend on them for accuracy.
Final note: this clock will be gifted to my daughter in Victoria who has always been fascinated with anniversary clocks.
Yoo may chooz clock 3 for ohnly 135$ or 2 for ohnly $185 or 3 for ohnly 235$ or all for jist 350$. Theze 400-day Clocs are in ecselent condishn and reecwire NOH electrisitee and thus NOH batreez, , jist wiinding wunts each year, for constant, dependable time-keeping, noh mater how oftn thu hydro wahz off. Doo note that this kind uv cloc haz at leest a 250 yeerz, air-loom liif-span and sellz for hundredz uv dollarz noo; thu numbr-3 cloc wahz $495 noo; thu numbr-2 wahz $695 and thu fanseer, numbr-1 wahz $795, back when quarts clocs wer beeing introdoosd. I don’t recahl thee exact aje uv them but I can ashoor yoo that thay ahl hav been in mii pohzseshn for les than fiftee yearz, and nun hav any vizible signz uv wear in thair gearz, becuz uv thoze geerz mooving a fraction uv an inch ohnlee 4-timez eech minit, insted uv 60 timez az iz comon with ahl uthr kindz. Ahl-soh, ahl 3 uv theez are thu real thing, NOT thu =FAKE= kind that require batereez and ohnly APEAR too bee authentic, with an electric motor driving thu pendulum and a quartz movement that’s noh mohr reliable than any uthr batery-driven clock. Yoo’re welcum too make uh vyooiing apt. for any time uv any day, sunday throo thurzday.
The clock described in the ad are similar to these in my collection. The prices he or she is quoting are much too high.
Kundo miniature
Kern 400 day clock
Is the seller cleverly deliberate or sadly illiterate? You decide!
The 400-day anniversary clock, also known as long-duration clocks, is a fascinating category of clock known for its ability to run continuously for a full year without needing to be wound. These clocks, often featuring intricate designs and beautifully crafted mechanisms, were first introduced in the late 19th century and have since become a beloved collectible.
Kundo standard size 400 day clock
In this article, we’ll explore the history, mechanics, and appeal of these interesting clocks. This is a two-part series. The first part describes my most recent purchase, a 400-day Kundo anniversary clock. Part II involves the installation of the suspension spring, cleaning, testing, and post adjustments.
400-day clocks are known for their inaccuracy, although they are undeniably beautiful and fascinating to observe. A minute lost each day adds up over the course of a year, potentially totaling many minutes—or even hours—by the end. Despite this, I still find great joy in owning and appreciating them.
A brief history
400 day clocks have been with us since about 1900. There were torsion clocks produced before 1900 but in limited numbers from about 1894 onward but the real push was after 1900. The Kundo model you see here was made in the late 1950s or early 1960s, probably the peak and subsequent decline of the anniversary clock era.
Dial face Kundo Clock
Once quartz clocks were introduced mechanical versions declined precipitously. Kundo is one of many companies making anniversary clocks in the 1950s and 60s. Kundo is a combined form of Kieninger and Obergfell. The company exists to this day as Kieninger, a subsidiary of Howard Miller which is part of a larger company.
This particular clock is a good example of a typical anniversary clock of the period. There are signs of wear as one might expect, dents on the base where an unrestrained pendulum did its damage and a snapped suspension spring but all the parts are there, complete with its dome.
Dents from weights bouncing around during transit
The clock was purchased at a local antique store. It is not in running condition. These clocks typically sell for around $50 to $100 or more on online marketplaces. Domes are often chipped or missing entirely. The glass dome on this one is free of chips.
I have ordered a Horolovar spring (.0032″) and will report on the installation, cleaning, and testing of this 400-day clock. Look for the second part of this series.
Case is in fair condition, dial face has some flaking, piece broken on left side of base
We have a couple of antique stores in our small town. Calling them antique stores is a bit of a stretch because there is usually more junk inside than actual antiques. We were shopping in the area of one of those “antique” stores and my wife turned to me and said, “Let’s go in”. I replied, “You know, all they have is junk”.
I thought, I might have found something important
I acquiesced. While she continued her shopping I went on ahead to look around the store and in the very back I saw a very sad looking clock that at I took for an old Sessions or a Waterbury. As I neared the clock it piqued my interest and I began to see that it was quite old. I picked it up, looked for any markings on the dial face, found none then checked the back of the clock and discovered most of an intact label revealing a what I consider to be a significant find.
Back label in good condition for the age of the clock
It is a clock from the Canada Clock Company. The Hamilton Cottage Extra was one of a range of clocks in their Metropolitan line.
This is an important discovery. The owner of the store knew nothing about clocks. He was asking $99 but after a bit of haggling, we settled on $40. I knew that it was worth much more.
Here is an excerpt on the Canada Clock Co. found at the Canadian Clock Museum in Deep River Ontario (Canada).
This company was the last of three sequential attempts to produce clocks by factory methods in Canada during the 1872 – 1884 period. The original effort by the Canada Clock Company in Whitby, Ontario was basically unsuccessful and only limited production was achieved.
In 1876, the equipment was relocated to Hamilton, Ontario to begin a second attempt as the Hamilton Clock Company, with new investors. This attempt was more successful and a fairly wide range of clocks was produced. However, sales were not very large and some of the investors left the company by 1879. At that point the president, James Simpson, ended production and proceeded with a major reorganization.
The company subsequently became the Canada Clock Company using the old Hamilton Clock Company factory and resumed production in 1880 but as a result of poor sales closed its doors in 1884.
Clocks from the Canada Clock Co.are sought after by collectors. For international readers this represents a rare find because the 1870s to the mid 1880s was a very important period for clock production in Canada. Apart from several independent clock-makers in Quebec and eastern Canada two notable companies made wholly Canadian clocks, The Arthur Pequegnat Clock Co. of Kitchener Ontario made clocks up to 1941 and Martin Cheney of Montreal made finely crafted clocks in the early 1820s. This clock was made at the Hamilton, Ontario factory which produced clocks from 1880 to 1884.
Original count wheel time and strike 30 hour movement
The 30-hour time and (bell) strike movement is in remarkably good condition and fairly clean. The back label in good condition for the age of the clock and there is a stamp on the top of the label which says, “…A Hill &Co.”. If any Hamiltonians are reading this I would be grateful if you could make inquires about this small retailer.
My preliminary examination reveals that this clock has had very few repairs over the years. I have not taken the movement out of its case to check bushing/gear wear and other issues but I am initially encouraged. The case reflects the age of the clock but I would judge the clock to be in just fair condition. There is a wooden piece that needs to be re-attached on the right side of the base. Fortunately that piece was tucked inside the clock case.
Right side needs work
Left side looks good
100+ years of grime came off easily; etched glass on the bottom part of the tablet is distinctive
The crudely made case is not overly decorative and reflects a muted Victorian style of the times. The lower part of the tablet has an etched glass floral design typically found in Canada Clock Company clocks. The door clasp is original. The dial face is flaked in places and not in the best of condition though the 2 floral designs on each bottom corner are nicely preserved. The hands are original. The case is not heavy and made of pine with a deep walnut stained finish. It was grimy and dirty as expected. It cleaned it up nicely with Murphy’s soap and a sharp hobby knife was used to remove the numerous paint drops on the clock. Why folks do not put something over the clock when painting a room amazes me.
I will put the clock aside until I can determine my next steps. Do I pursue a full restoration including renewing the dial face or leave the clock largely in as-found condition? In the meantime I will re-attach the wood piece on the left side of the base.
Tick-Talk Tuesday is about the letters and comments I have received from you, the reader, concerning your clock, issues you might have had and challenges you face and my responses to your questions with advice on your particular clock concern and of course, my general comments. For those comments and questions that stump even me, I consult within my clock circle for the best possible answer.
NV writes about her Arthur Pequegnat Nelson hall (tall-case) clock.
“I have an antique, oak ‘hall’ clock that’s been handed down in my family. I read in an article you wrote that you collect them.
This clock was in my home growing up and my grandmother, now 96, reminds me of its history and knows whose home it was originally from in our family.(my grandfather’s grandparents, I believe). I’ve started to look into the history of these clocks. I’m interested to know what your thoughts are if you are interested in sharing them.
I can tell you that it’s in beautiful condition, however although it had always worked and sounded well (still sounds beautiful) when it was shipped here to BC in the 90s, it was never restarted and the finial became dislodged, but it is not cracked or broken. So it’d since been stored at my grandmother’s but she never got it going after it arrived and needs to ‘be started’ as the weights are still off (or possibly a repair?) Also the key was lost.
I’ve just recently brought it to my apartment (Gramma wanted the space!) And she supports me in whether I decide to keep it or not.Please contact me if you are interested as I am considering selling but regardless I will need to determine value/appraisal if I do keep it, at least for insurance. ”
My reply.
“You have a real Canadian treasure. Though it is called a hall clock it’s actual name is the “Nelson”. There is one on display at the Canadian Clock Museum in Deep River Ontario. Unlike many tall case clocks that decline in value yours is actually increasing since it is continually sought after by collectors. If it says Berlin on the lower part of the dial it was made before 1917. Clocks made after that simply said, “The Arthur Pequegnat Clock Company of Canada”. The Arthur Pequegnat Clock Company closed its doors in 1941.
The Nelson is in the middle
You can easily find a replacement key. Perrins would have the key although off hand I do not know the correct size. The finial on top is a friction fit.
It would be in the neighbourhood of $2000. You should keep it not only because it has strong sentimental value but it is an important part of Canadian history. It would also be worth repairing.
NV cannot keep the clock and has plans to sell it.
Is clock collecting (and repair) part of the counter-technology revolution?
Many years ago, social scientists predicted with the onset of modern technology it would sap us of our knowledge. Our brains would simply melt away. Concentration and initiative would be sucked out of us. Why would you need to know anything if it is readily available at your fingertips? How often do you hear the phrase, “just google it”. Sadly, it has become an integral part of our lexicon.
People are embracing old technology and returning to the fulfillment of doing things for themselves
The term counter-technology is not a term I invented. I found it mentioned in a car magazine article some time ago. Many people are collecting and repairing antique cars more than ever. Why? Reliving past memories? Getting your hands dirty. Rejecting the modern world?
Has the analogue world returned? Yes and no. Wine and beer making has become a huge industry and there seem to be mom and pop microbreweries everywhere, antique furniture purchases have increased dramatically, backyard chicken coops are popping up everywhere, fountain pen collecting is a “new” thing, vinyl records are spinning back and stamp collecting is returning with renewed vigor.
Retro is in. But is is not just that! It is a statement. People are embracing old technology and returning to the fulfillment of doing things for themselves. We all know the value and satisfaction of pursuing a simpler way of life but at the same time we still want to feel connected to our busy modern world. We want both. This is our inevitable response to the new digital world. We are pushing back but just enough to satisfy our needs by remaining connected with the past but we still feel the need to be plugged in.
However, every now and then we feel the need to dis-engage. Digital detoxification. It’s a thing. Somehow we want to wash the digital world from our lives, however briefly. I spend summers at our family cottage in Quebec (Canada). There is no Internet and I am totally fine with that. But what’s the first thing I do when I return home? You got it!
You too can be saved
Simplicity breeds complexity
To truly embrace the analogue world the mechanical clock is my personal statement. Not only do I collect antique and vintage clocks I repair them as well. As readers know I am not a trained horologist but I love the challenge of repairing a clock and I love accumulating knowledge in the pursuit of my hobby. Needless to say I am not always successful and my office has a few notable failures. I am fine with that. Failure breeds learning. It is my response to the increasing pressures of the digital world. It is my response to our increasingly complicated world. Simplicity breeds complexity.
Like the juggler who can keep all the balls in the air at once
It took 2 years to learn the skills necessary to repair this Sessions Westminster A chime clock
Analogue verses digital. It is a question of balance, like the juggler who can keep all the balls in the air at once. I admire people who have “analogue” hobbies but I especially admire those who remain connected to our modern world by maintaining a delicate balance between both.
This is the Whittier model from Welch’s Authors series. Tran’s 2d ed. shows it from the 1893 catalogue. It is a half-hour strike clock. Though an alarm could be ordered this clock came without one.
It is solid walnut in construction, deep brown in colour and darkened by age. It stands 22 inches tall by 14 ½ inches wide and 5 inches deep. The crown is an ornate machine-cut design with a single bulls-eye. The Roman numeral dial face with inner brass ring is original but has been covered with a clear varnish.
Clock face in good condition
The spade hands with circular cut-outs also appear to be original. The tablet is in remarkable condition and features an embossed gold colored scene of two female child warriors on each side presumably guarding an older female warrior (laurel and spear), reminiscent of Greek or Roman mythology.
Barely readable label
Bottom label with running instructions
There are two labels on the back panel, the top designates the model name which is barely readable; the bottom label has generic operating instructions for several types of clock models. Both labels appear to have been varnished over at some point. The upper area of the back panel has a hook for hanging the clock, added by a previous owner. However, this is a shelf or mantel clock, not meant to be hung on a wall. I doubt that the pendulum bob was this colour originally.
Though incorrectly termed a kitchen or gingerbread clock it is commonly referred to as a parlor or hall clock. Since the company last produced clocks in 1902 I would comfortably date this clock at between 1893-96 or perhaps a little later, 1901-02. The E. N. Welch Clock Company has a fascinating history (detailed in Part I of this series) and unfortunately not many of these well-made American clocks are still around.
Time and strike movement
In Part III I will describe the challenges of servicing the clock movement.
This weeks profile is about the cuckoo clock. I do not have one in my collection but I am always open to new additions. I know almost nothing about them so I have to rely on knowledgeable people like Megan to fill in the blanks. Earlier this summer (2017) I received an email from Megan. Megan runs a site that specializes in Cuckoo clock products for sale. She asked me to profile her site and I said I would be happy to do so.
“I came across your clock blog and have really been enjoying it. I myself run a Black Forest cuckoo clock blog and I have an article about the history of the cuckoo clock that I think your audience might find useful. I have posted it below and should you find it useful, I would love to have it featured on your blog. If you want to check out my site, visit www.designedintime.com
Perhaps one of the greatest contributions to the Black Forest’s fame is the cuckoo clock. While it is easy to appreciate their charismatic beauty and charm, few realize how deeply rooted these clocks are in Black Forest history. It has been a long journey that has involved several hundred years and thousands of people in one small town.
The story of these incredible clocks starts several hundred years ago in Germany’s royal family. The first description of a cuckoo clock was in 1629 and made by a German nobleman, Philipp Hainhofer. He described a curious little clock that belonged to Prince Elector August von Sachsen. It was said to contain a bird that resembled a cuckoo and it was therefore called a cuckoo clock. Though these clocks were very primitive they did not make any noise.
Enter Franz Anton Ketterer! Ketterer was a clock maker from the Black Forest and is often credited with the invention of the cuckoo clock. It was one day in the 1730s, after pondering the mechanism of a church organ’s bellows that he was inspired to recreate the mechanism inside a clock that contained a cuckoo bird. Thus, the first cuckoo-calling mechanism was born.
Word spread of these fascinating little clocks and it wasn’t long before the cuckoo clock was on the rise in the Black Forest. Most of the villagers in the Black Forest were farmers, but as the eldest sons of the family often inherited the farm, it left the others with a need for supplemental income. Cuckoo clock making was, therefore, a wonderful opportunity for villagers to support their families. During the deep snowy winters, the villagers would toil away at their clock making skills and when the snow melted in the spring they would take their clocks to display in the town. These people, the early cuckoo clock makers from the Black Forest were given the name “Häuslers”.
At the time, hourglasses were the most commonly used timekeepers and the clocks became not only a much more accurate replacement but were also much more artistic. Germany, always a leader in the arts, once again did not disappoint. It wasn’t long before the villagers would have contests to see who could make the most unique and artistic cuckoo clock. People far and wide caught wind of these incredible timekeepers and it wasn’t long before there was an international demand for cuckoo clocks.
Therefore, in 1850, the Duke of Baden founded a clock-making school that offered classes in standard subjects such as math and writing, but also advanced clock-making.
As clock-making flourished a grand contest was offered by Robert Gerwig, the director of a Clock-making School in Furtwangen. It was open to any clockmakers who would compete for the best contemporary clock design. The winner would be funded to complete their design and the winning design was created by Friedrich Eisenlohr. Eisenlohr was an architect whose then-current project was building a new railway through the Black Forest and it was no surprise that the winning design was a cuckoo clock. This clock, however, resembled the rail houses and the design soon became a popular idea that would take over the early designs of the shield clocks. The box and roof style of the rail house design was the precursor to the modern day chalet clock that we see all over the world. Ironically though, there was only one difference between Eisenlohr’s design and the final product. This change would be that Eisenlohr’s design included a cuckoo, however, when the design was put into action, there was not sufficient funding to complete the cuckoo mechanism. Despite this, other Black Forest clockmakers soon figured how to merge both the cuckoo mechanism and the rail house design. Therefore Eisenlohr is still credited with the modern style.
Today, the Black Forest cuckoo clock is a world renowned treasure that has made the small, but beautiful Black Forest villages famous. It comes in a variety of sizes and styles including chalet and carved. While a true Black Forest cuckoo clock is mechanically operated, there are also battery operated clocks called quartz clocks. These can be made in the Black Forest and are often more affordable as they are not authentic like mechanically operated cuckoo clocks.
While visiting the Black Forest I strongly recommend stopping by some of the world-renowned clock makers, such as Hones, Rombach and Haas and Schneider. There are also a number of museums that contain some of the original shield and rail road clocks that are definitely worth checking out. Perhaps my favorite is the German Clock Museum in Furtenwagon as they contain some of the oldest cuckoo clock histories to date.
Next time you see a cuckoo clock, you can appreciate not only the skilled craftsmanship but also the hundreds of years of history that stand behind it!
Photos reproduced with permission. For more information on cuckoo clocks, visit Designed in Time, www.designedintime.com
Among the most common parlor clocks, E.N. Welch clocks are relatively scarce. A key reason is that the company was absorbed by Sessions in 1903. The history of Welch is intriguing, as Welch, Spring & Co. initially focused on producing high-end clocks but eventually shifted to manufacturing cheaper, heavily discounted mass-market clocks—a move that likely contributed to its decline.
E. N. Welsh Whittier model
This time-and-trike American clock with a count wheel strike is an antique store find. I found it at what I would call a higher-end antique store in a small village in Quebec during one of our day travels from our summer cottage. I liked it so much I bought it. Because the strike side did not function there was a slight reduction in price.
The clock ran for several days and kept good time, but it was in desperate need of a cleaning. I was unable to get the strike side to run, though I hoped to fix it eventually. All the strike-side parts appeared to be present, but someone had clearly tampered with the levers, bending them significantly. It’s impossible to fully assess the situation until I take the movement apart.
Barely readable label and someone determined that this clock should be hung on a wall
History of E N Welch
The E. N. Welch Mfg. Co. was formed on July 6, 1864 to succeed an older private firm making clocks under the name of E. N. Welch. Elisha N. Welch (1809 to 1887) had been making clocks at a factory site on East Main Street at Forestville, Conn. since taking over the bankrupt business of J. C. Brown in about 1856.
A movement shop was established in 1869, adding to the two factories already in use by the firm. Between 1868 and 1884, a subsidiary firm called Welch, Spring & Company was formed to produce a more expensive line of clocks. The company was formed by three clock enthusiasts; Welch, Solomon Crosby Spring and Benjamin Bennet Lewis. The Welch firm was well known for its handsome rosewood cases, though in 1885, with changing styles in furniture, the surviving firm began to introduce new models with solid walnut cases and discontinued some of the older rosewood veneered cases.
Elisha Welch was enamored of a lovely (but very liberal-thinking) diva of the day from Spain by the name of Adelina Patti. He named his best quality movement after her, called the “Patti” movement. Clocks with this movement are highly sought after by serious collectors. However, Examples of “Patti” clocks at any of the international auction sites are rare.
After the death of Elisha Welch in 1887, the firm steadily declined, selling off some of its assets and issuing new stock to raise much needed capital. A new line of clocks was introduced for 1893, which were cheaper in quality than their already discounted line. In May of that year the factory was closed down and a receiver was appointed The receiver spent nearly two years selling off stock and settling the debts of the firm. It was not until 1896 that the firm resumed production.
In 1899, two fires, one in March and a second in December reduced most of the Welch manufacturing complex to ashes. Despite the completion of a new brick factory in 1900, the company could not meet its liabilities. Meanwhile, members of the wealthy Sessions family were buying out former stockholders and eventually took control of the firm in 1902. They changed the name to the Sessions Clock Company on January 9, 1903.
E. N. Welch clocks made before 1880 are considerably more desirable as these represent the height of the company’s clock-making. Clocks made before 1880 generally command higher auction prices. Compared to companies like Seth Thomas and Waterbury instances of E. N. Welsh clocks coming up on auction sites are becoming quite uncommon.
Stay tuned for more! In Part II, I will describe the Whittier and highlight some of its interesting features. In Part III, I will share my progress and discuss any challenges I encounter while servicing the movement.
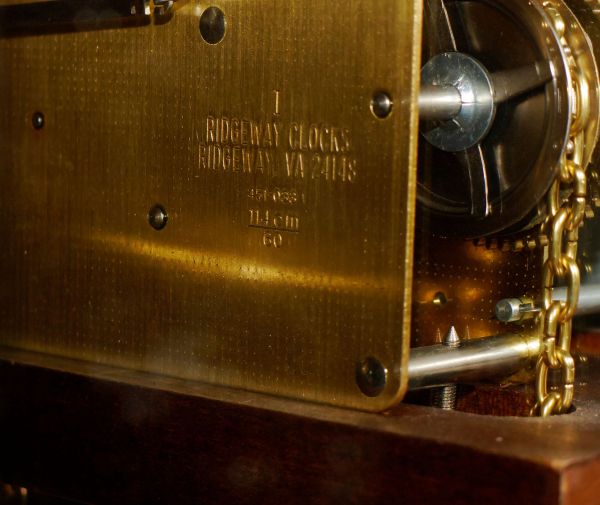
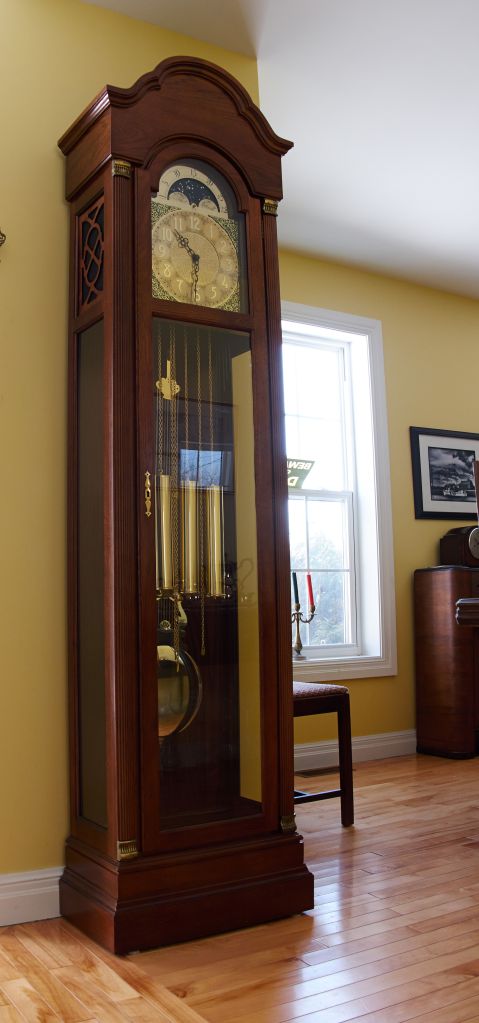


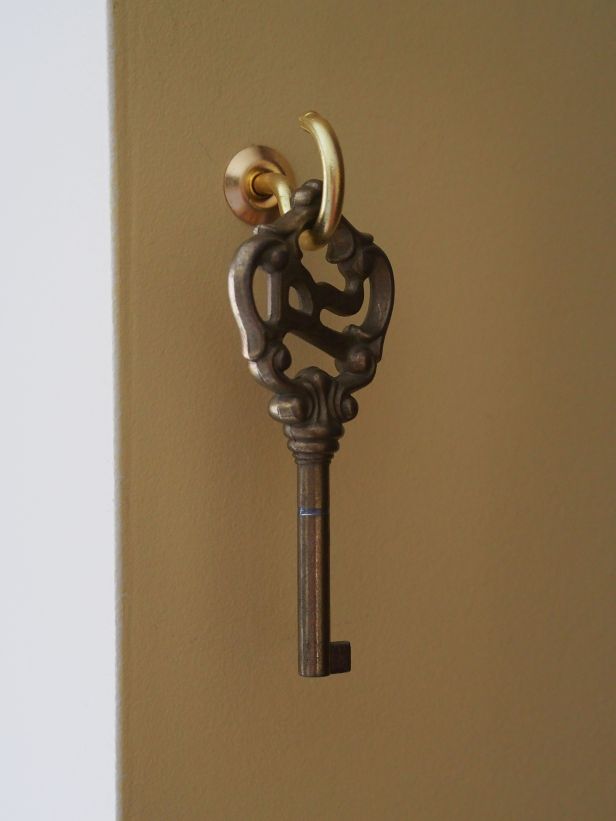

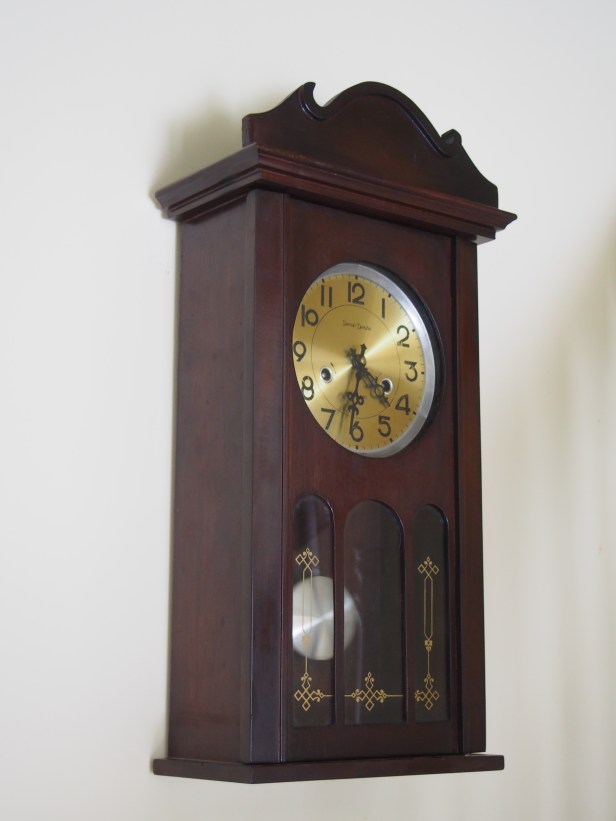
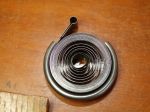
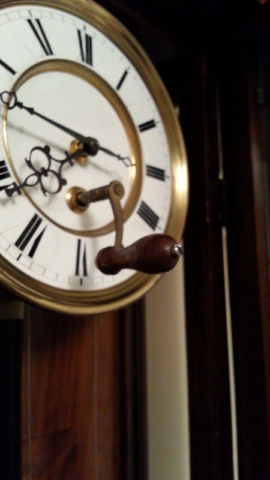
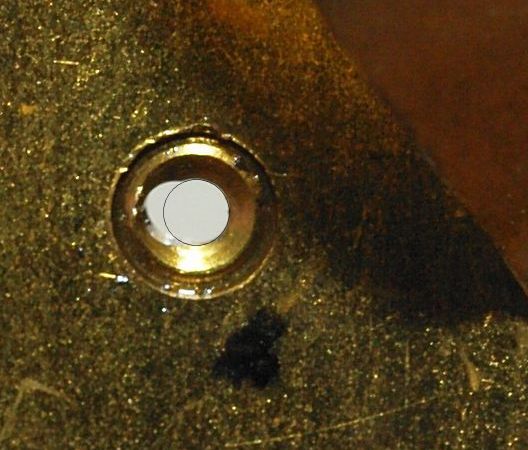
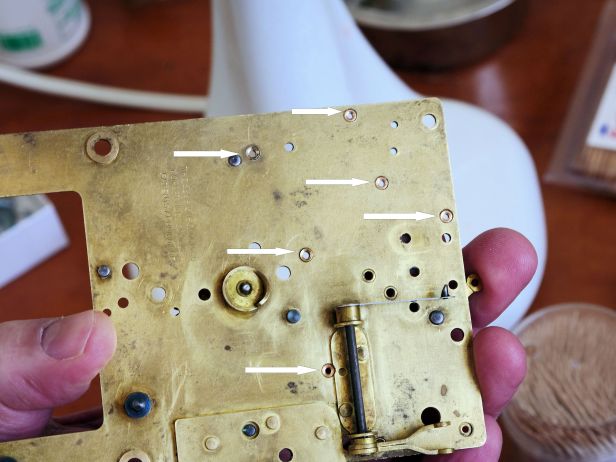
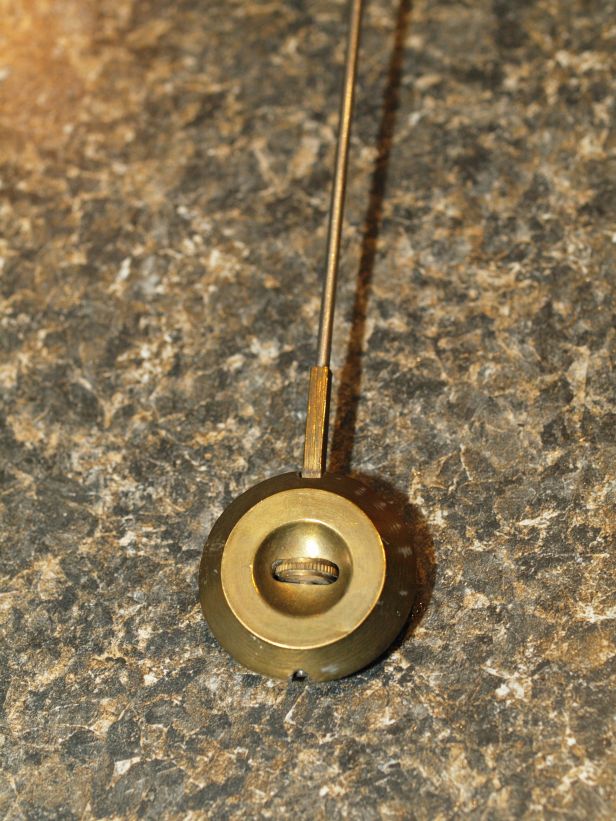
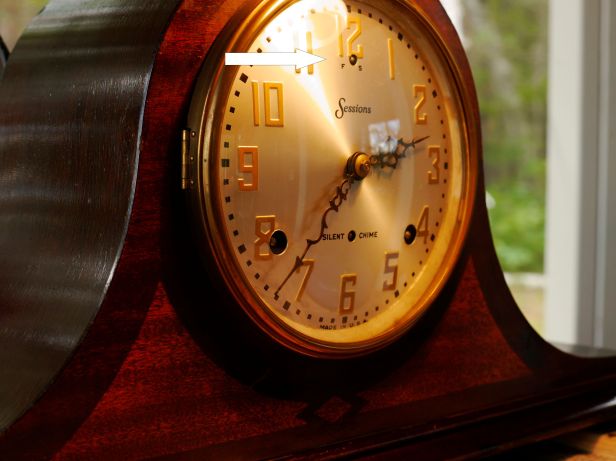

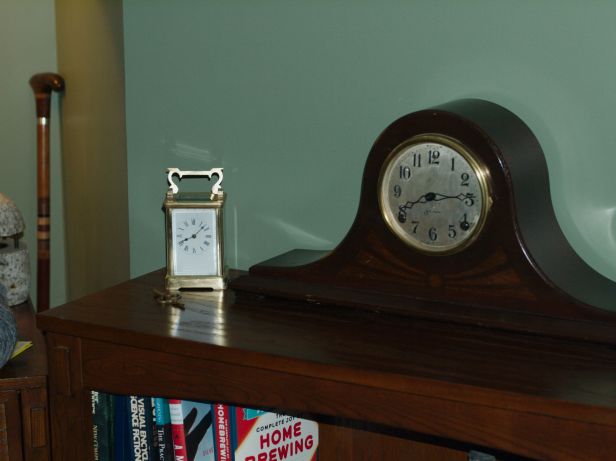
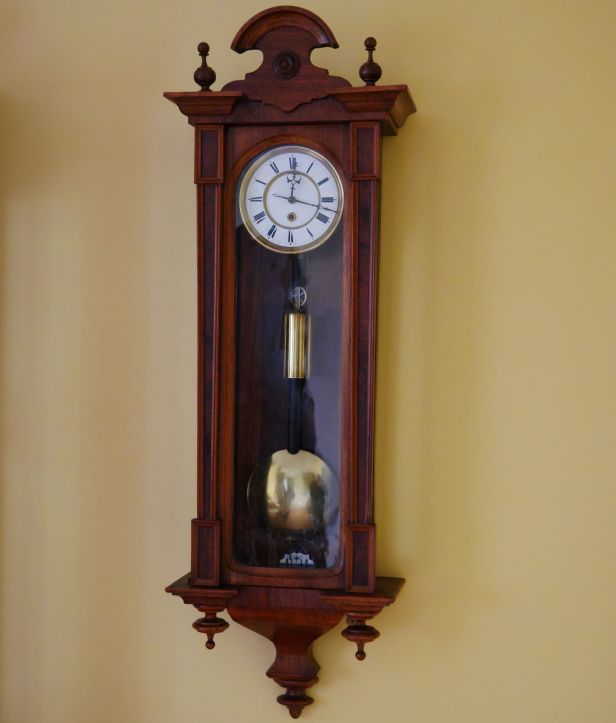
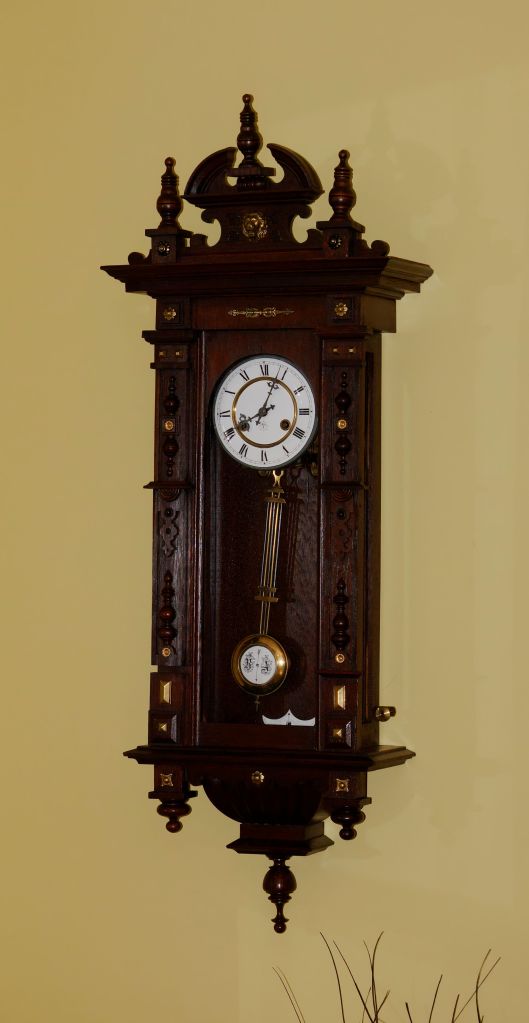

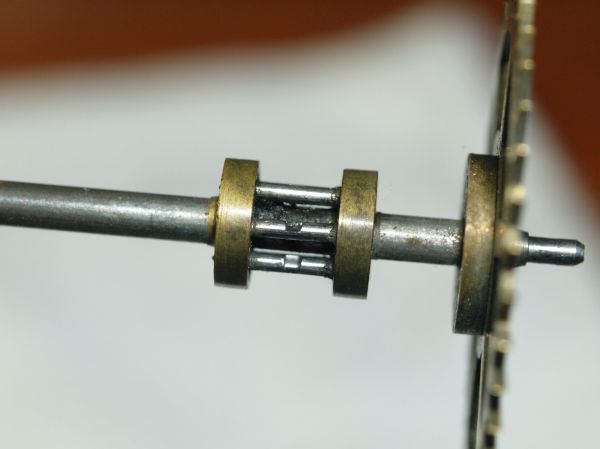
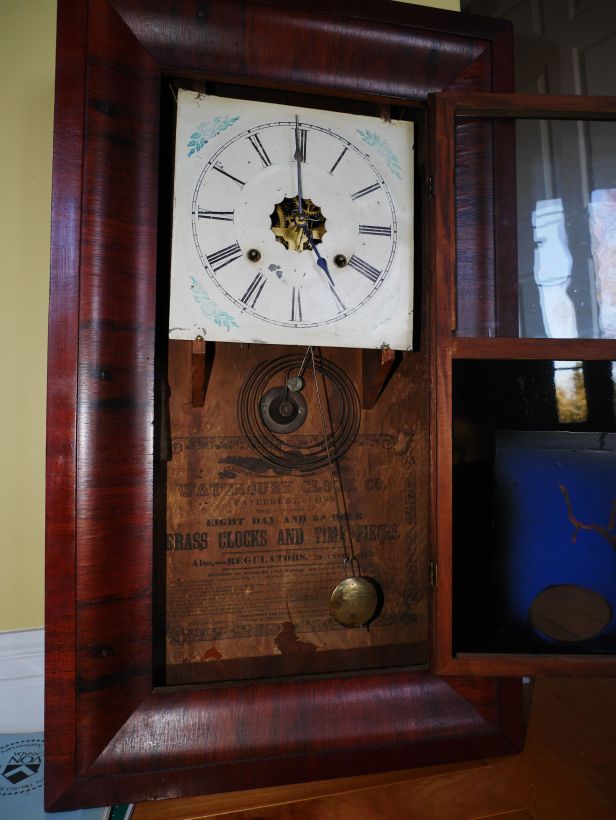
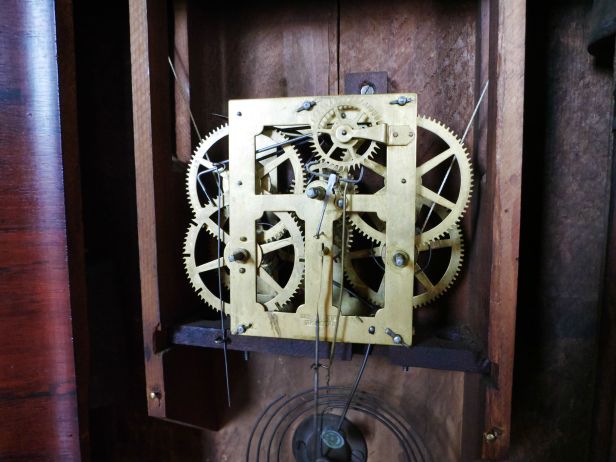
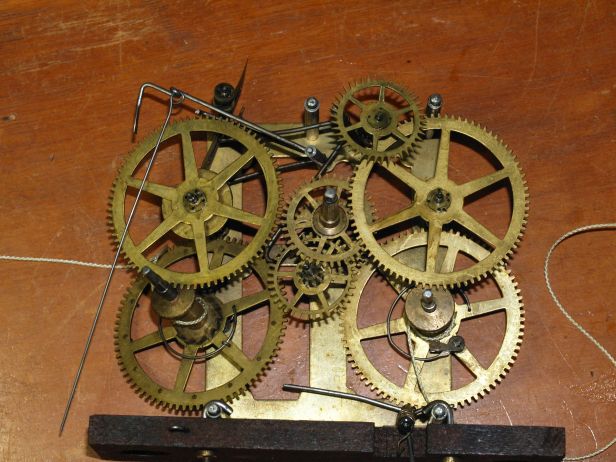
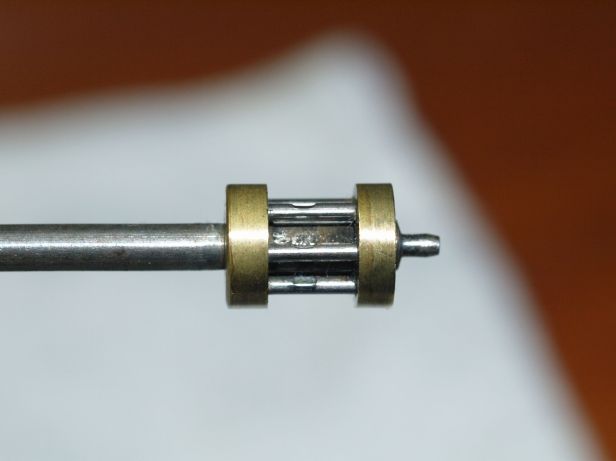

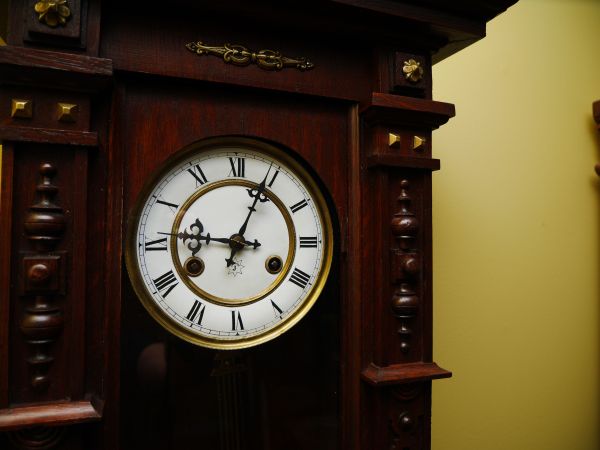


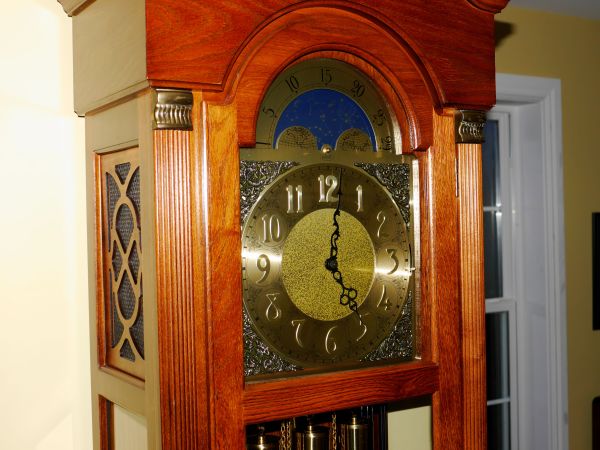


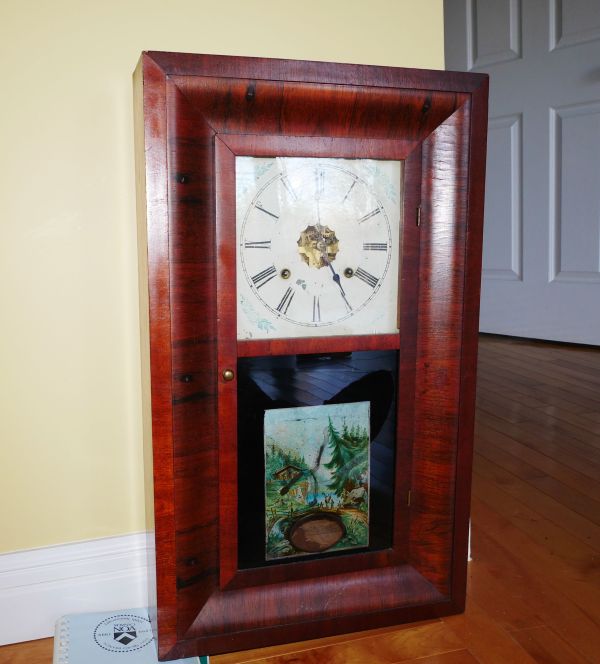
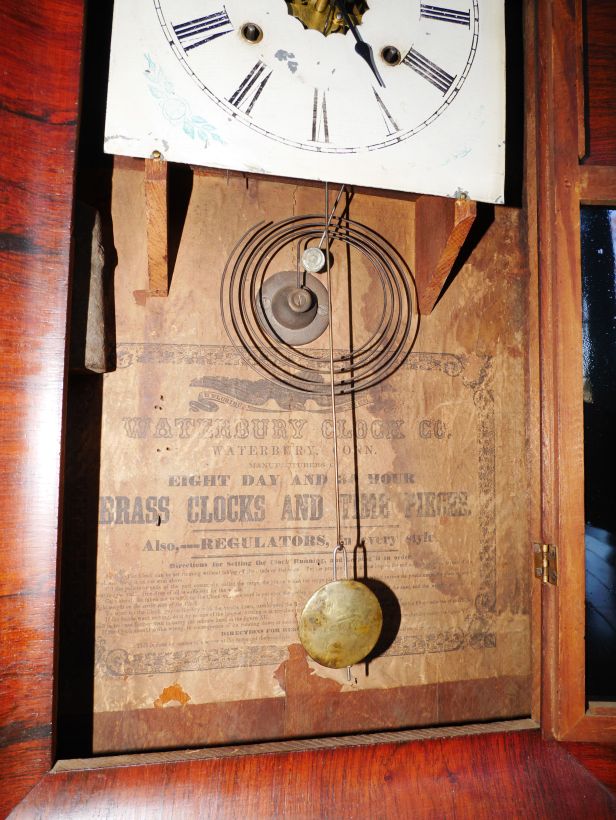
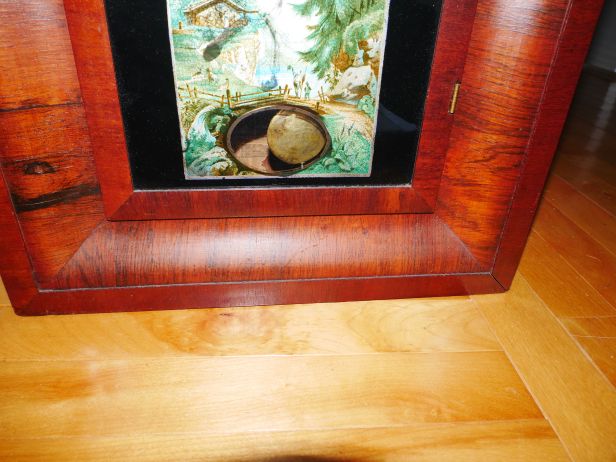
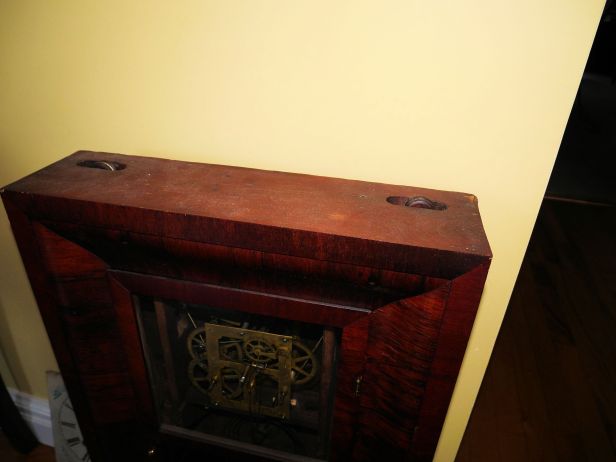
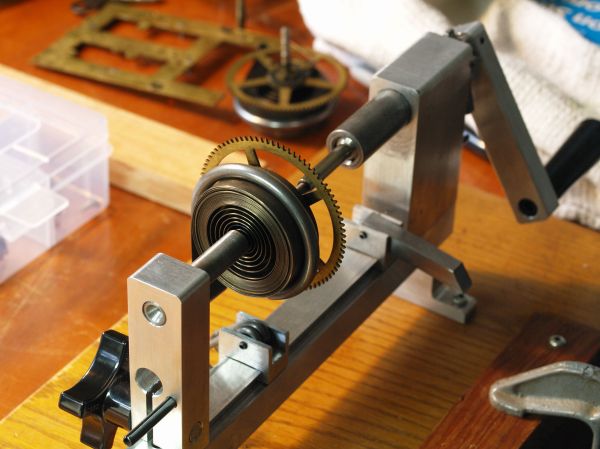
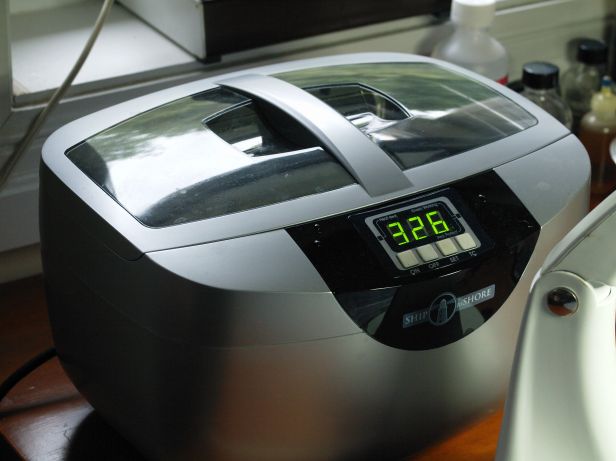
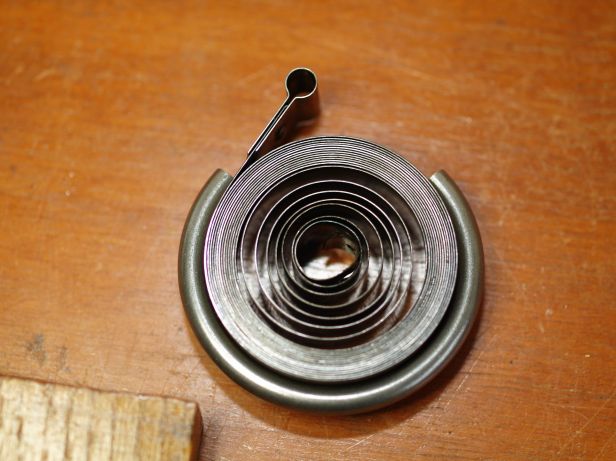
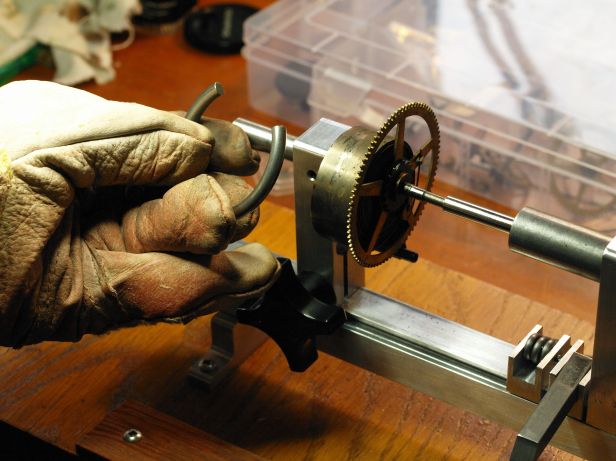
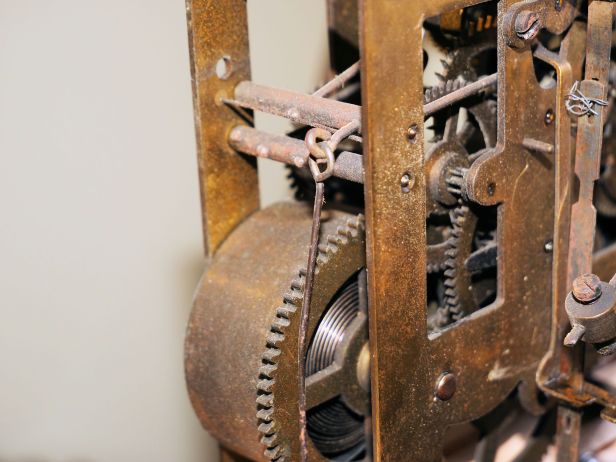
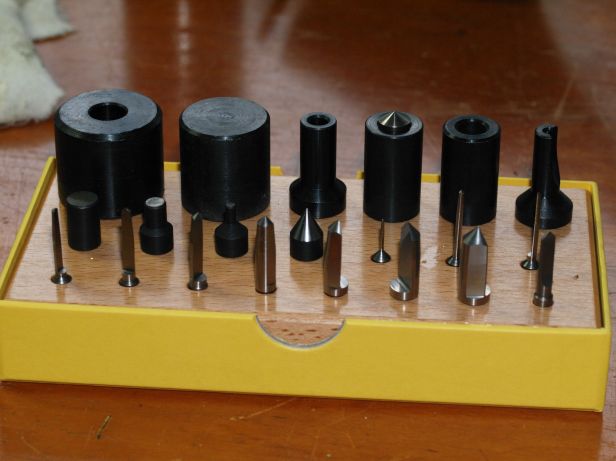
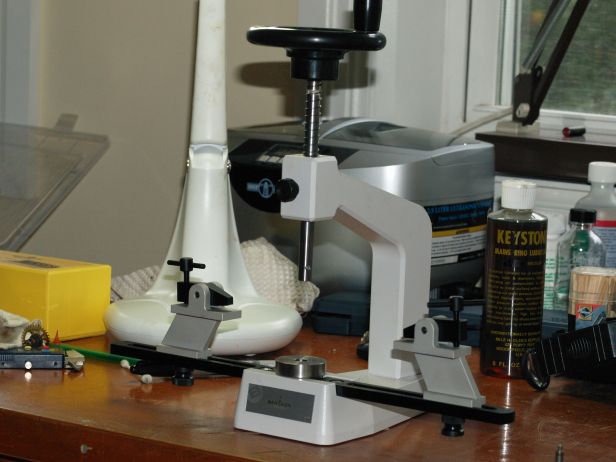
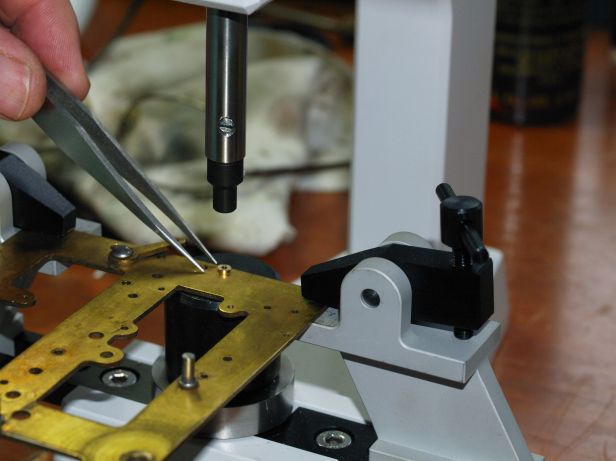
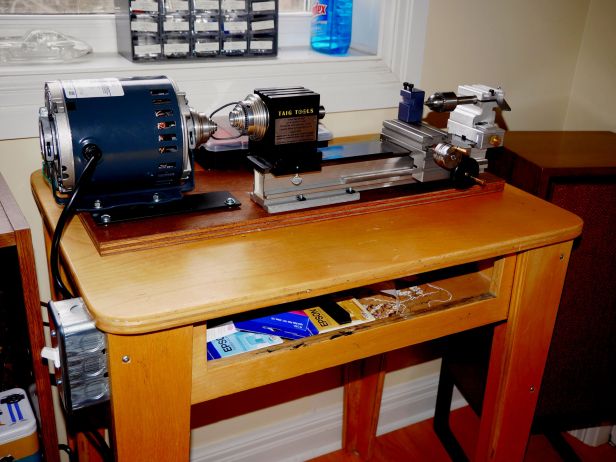


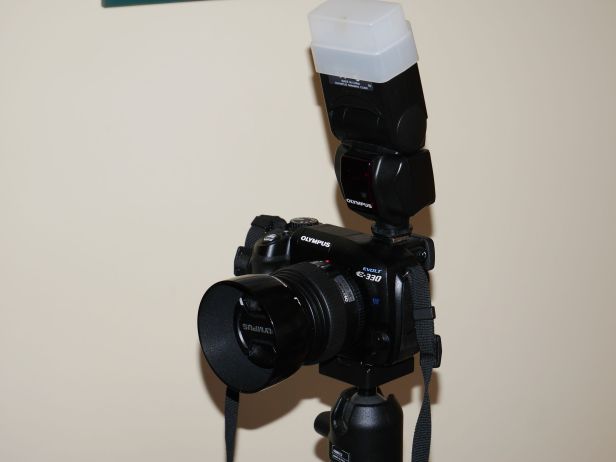
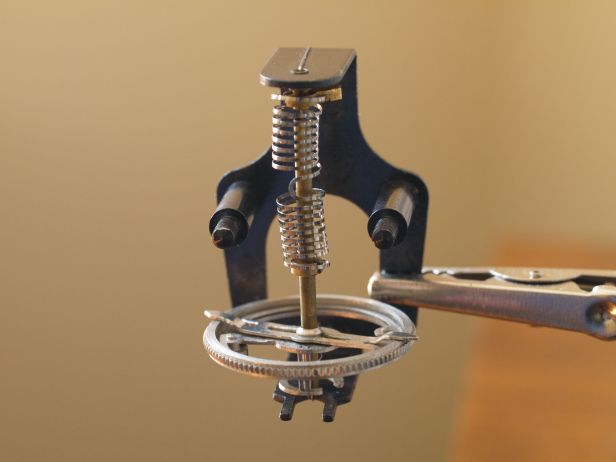
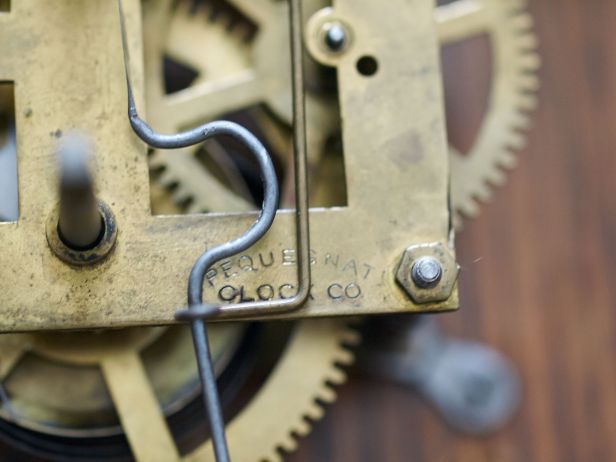
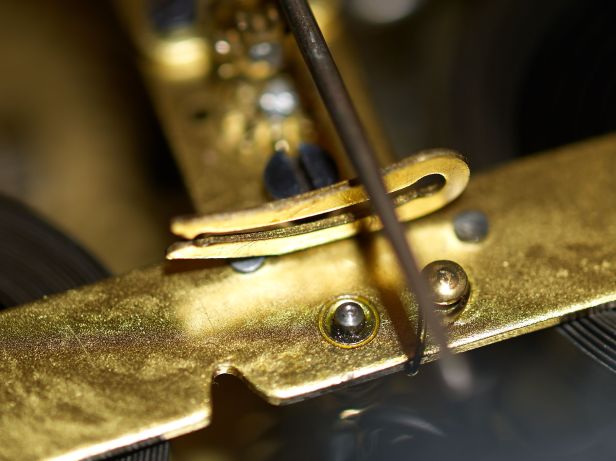
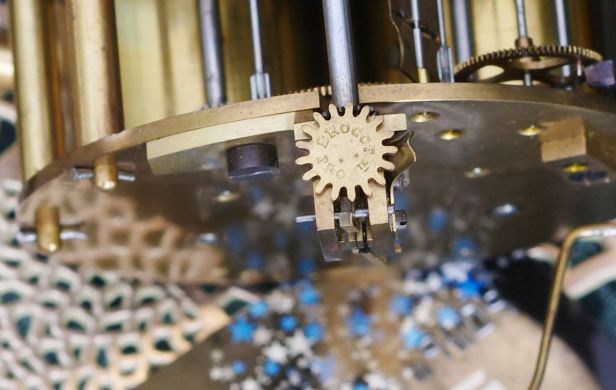
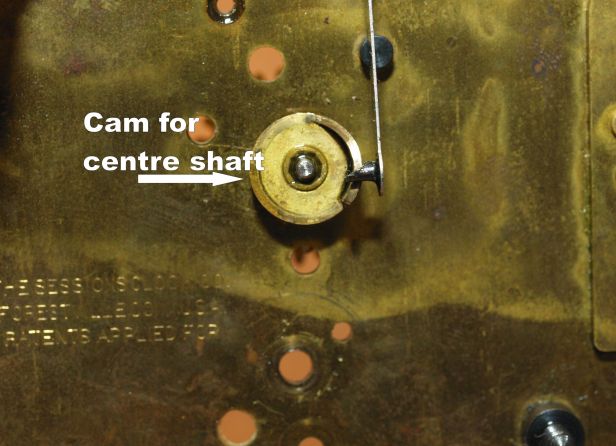
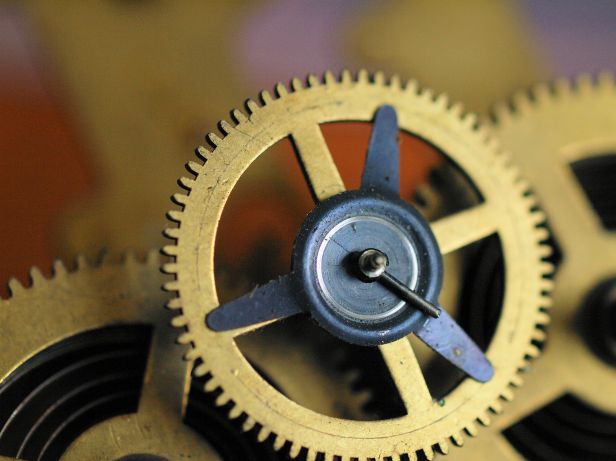
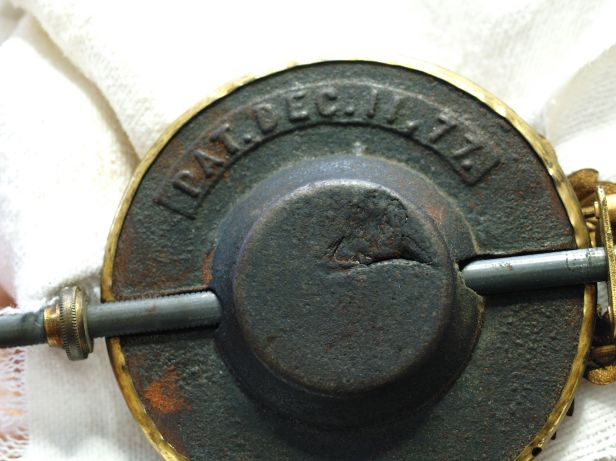
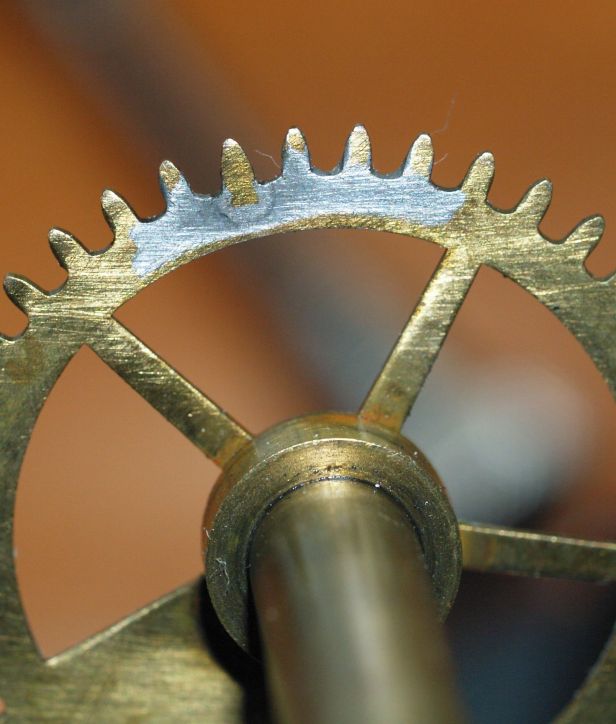
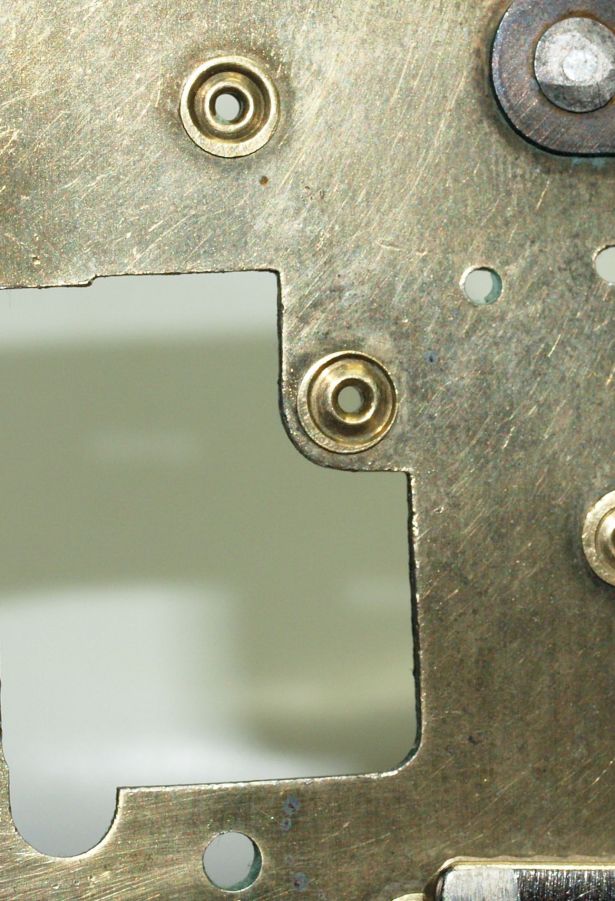

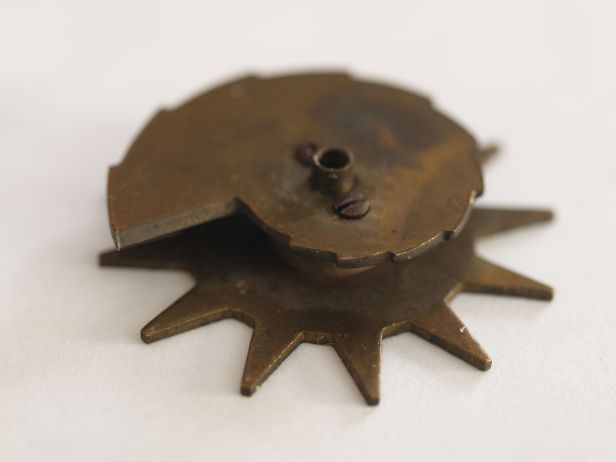
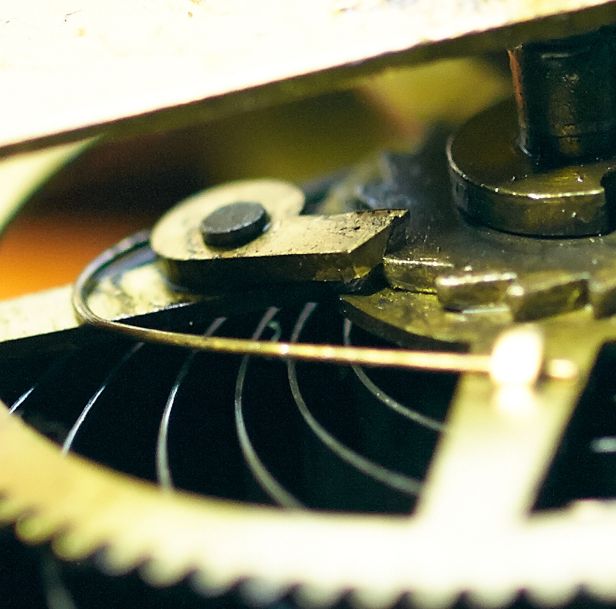
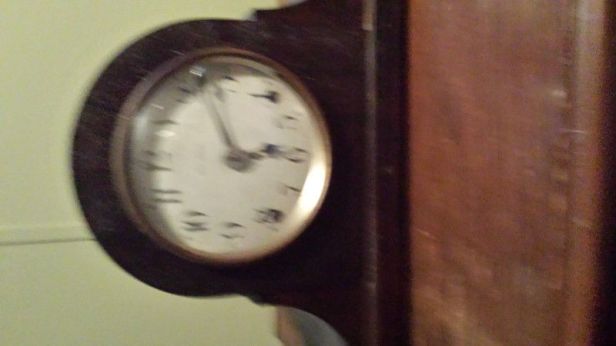

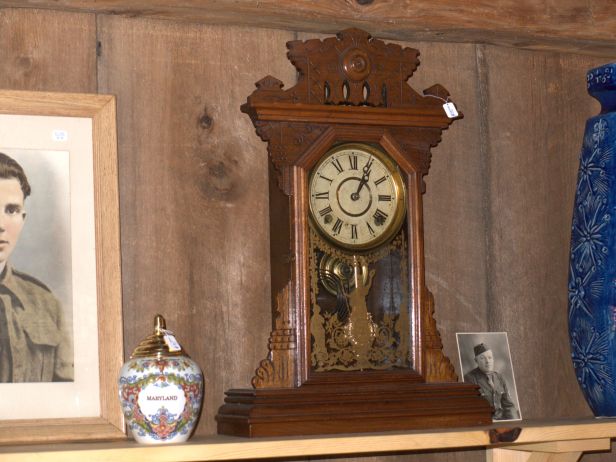
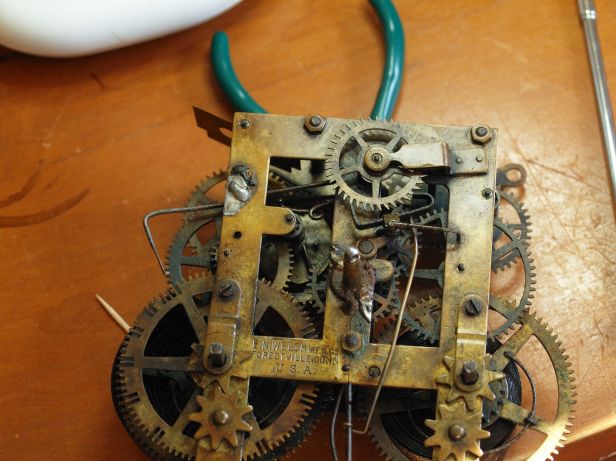
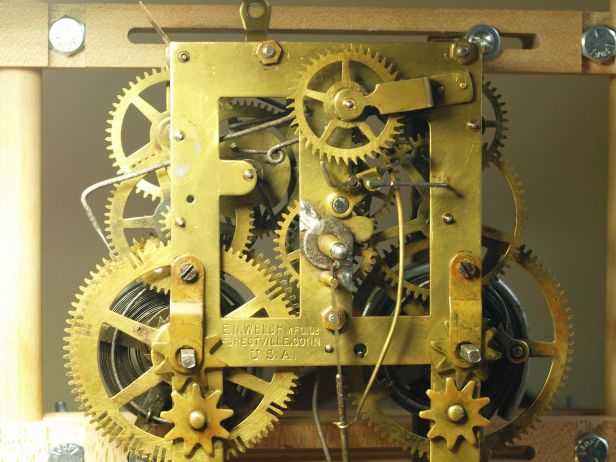
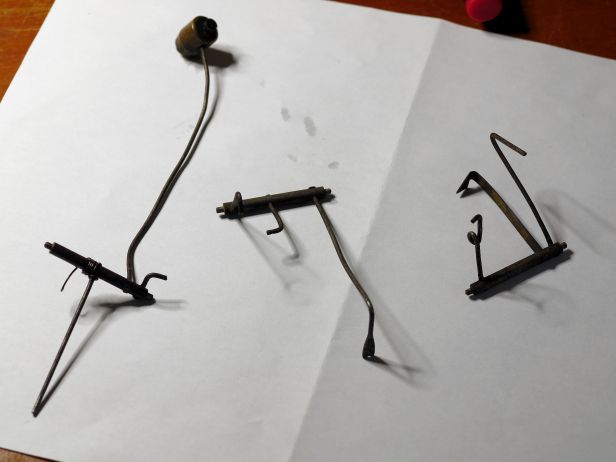
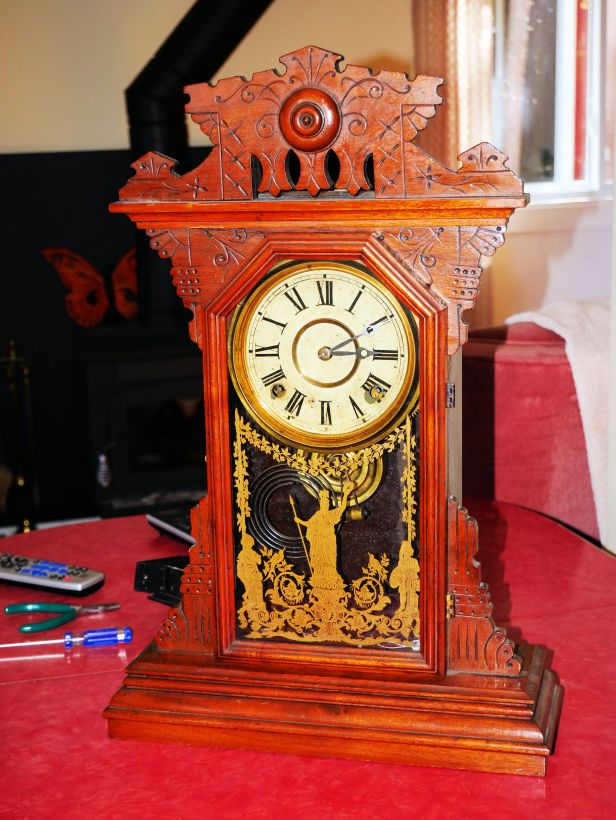

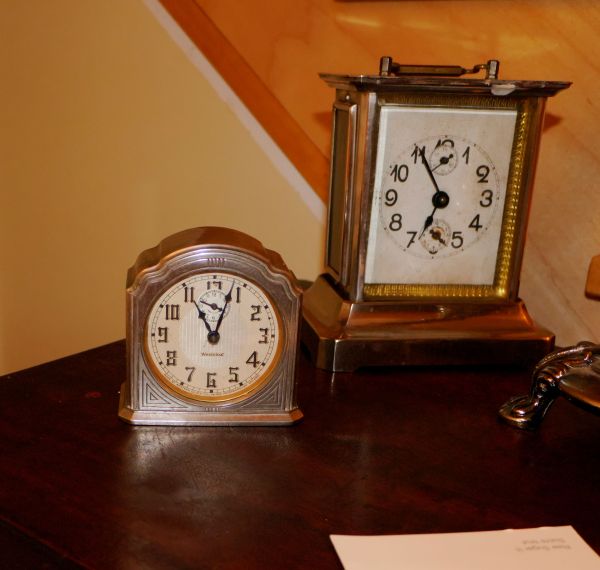
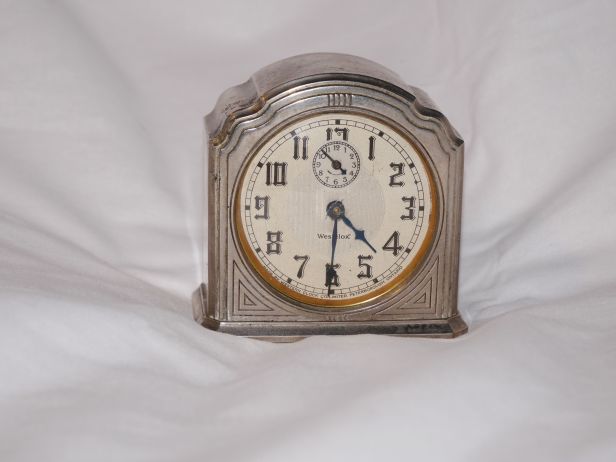
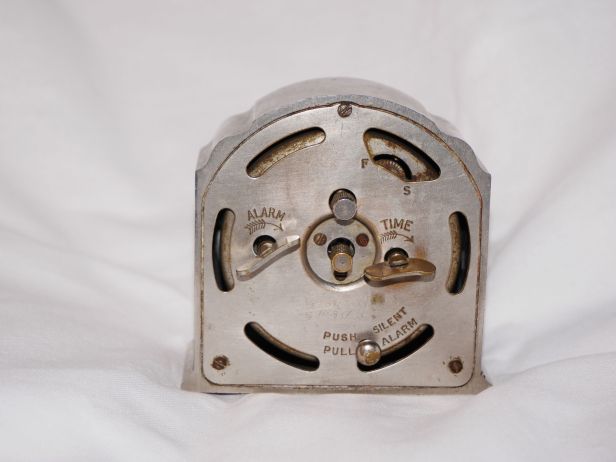
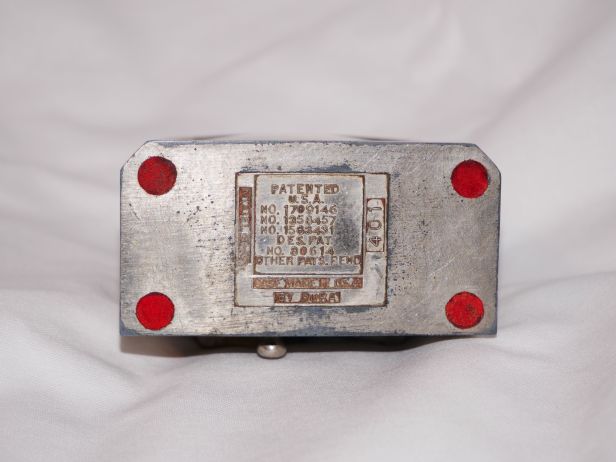
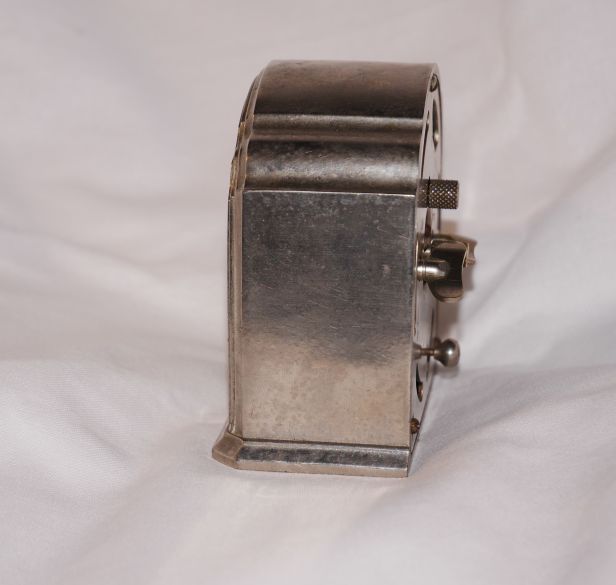


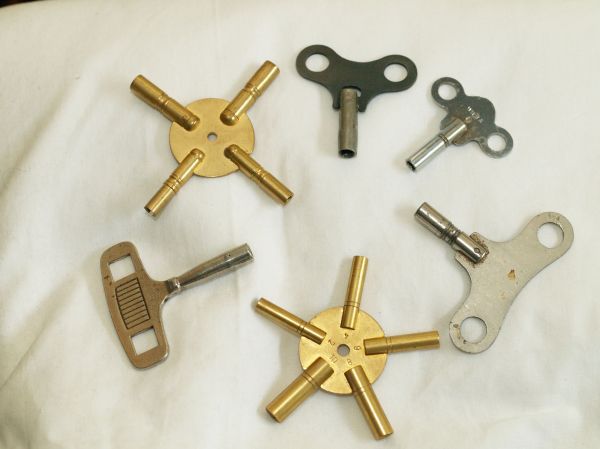

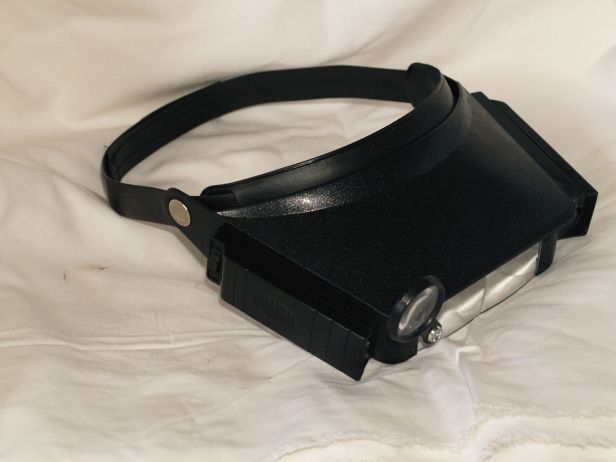
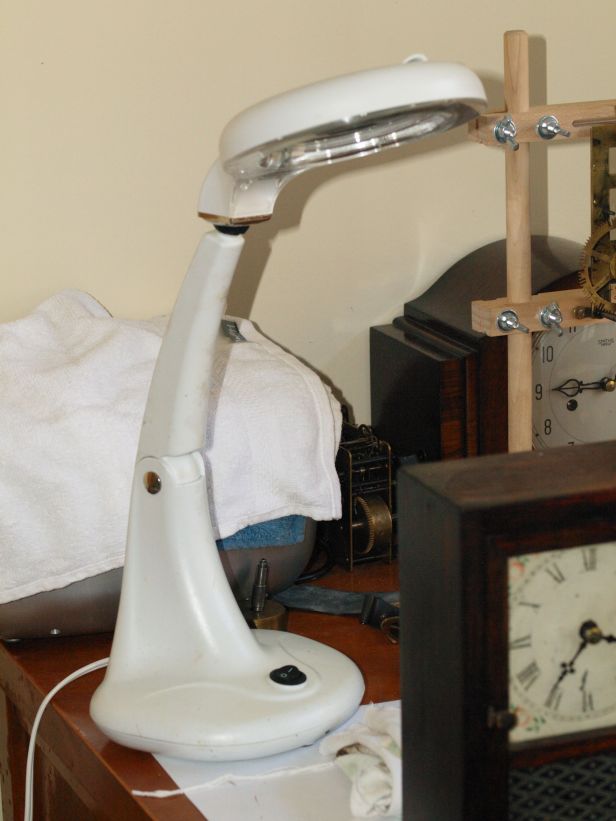
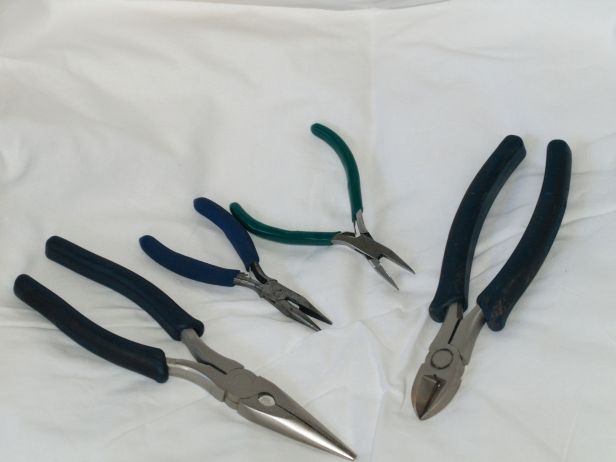

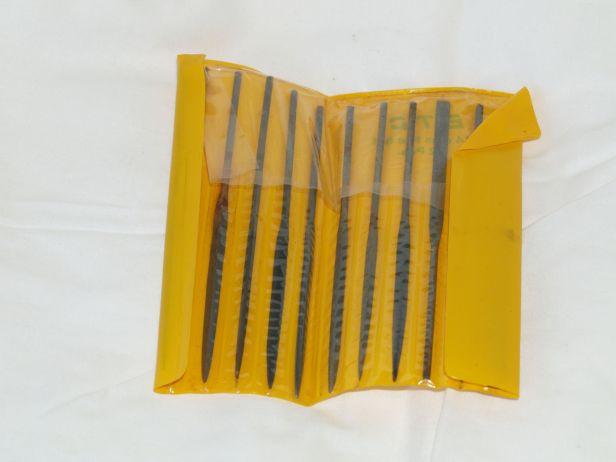
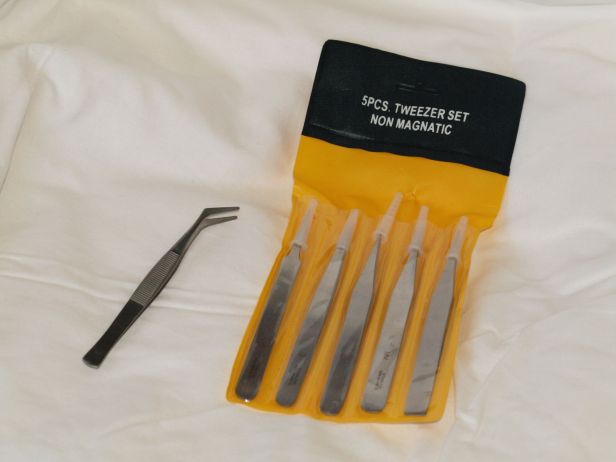
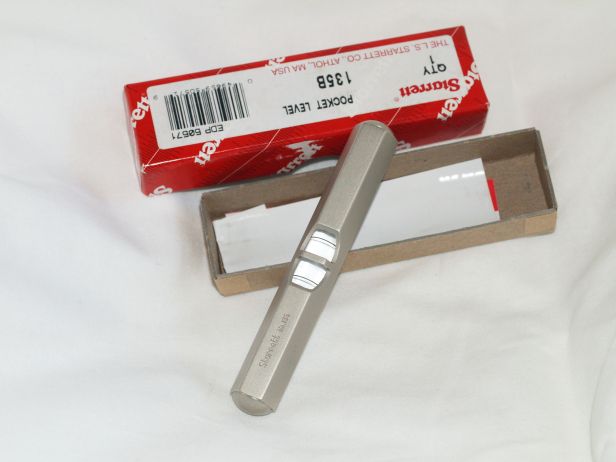
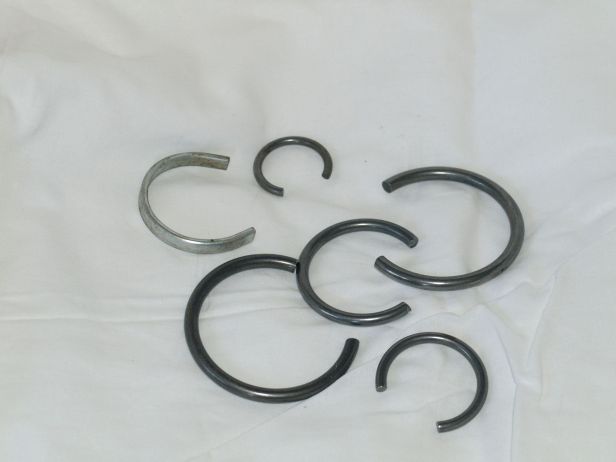
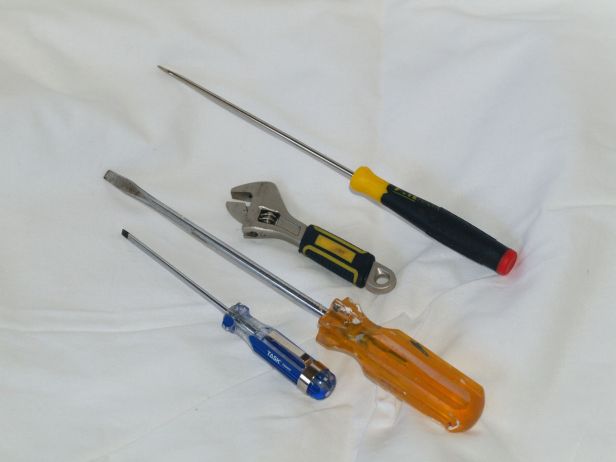
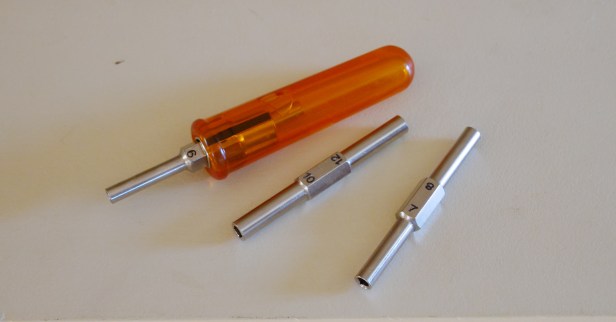
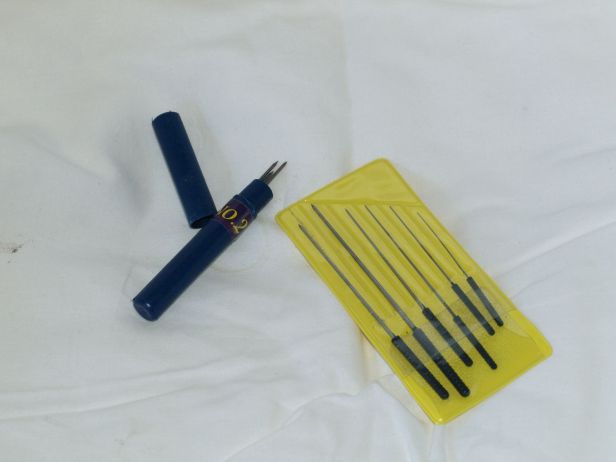


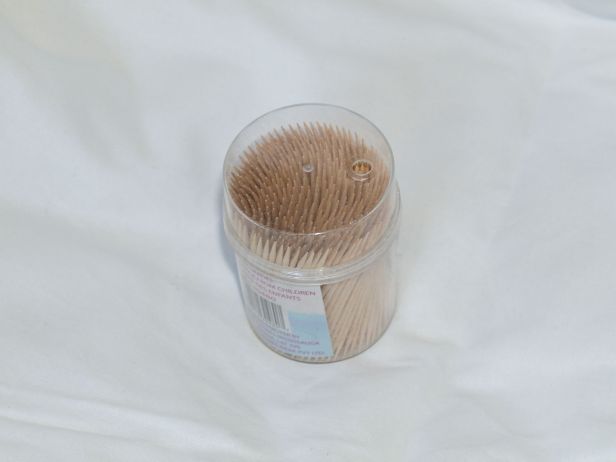
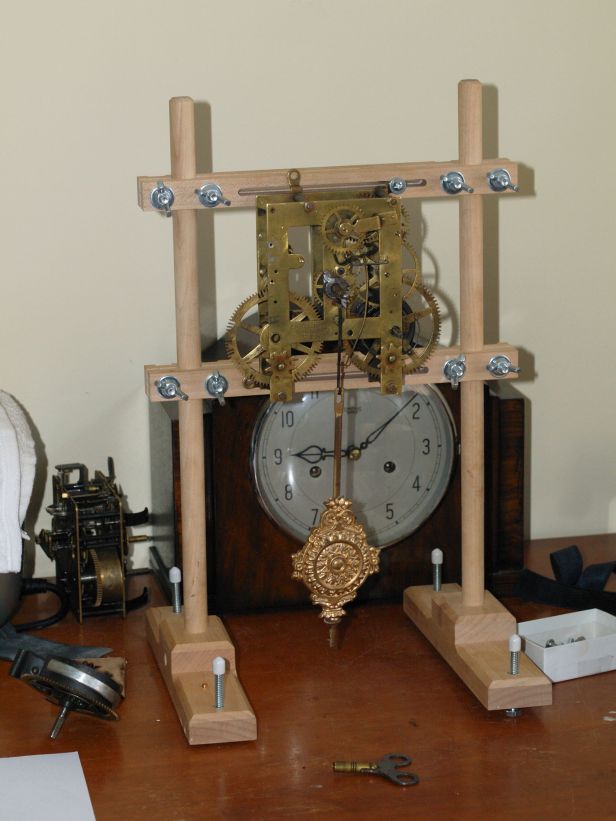

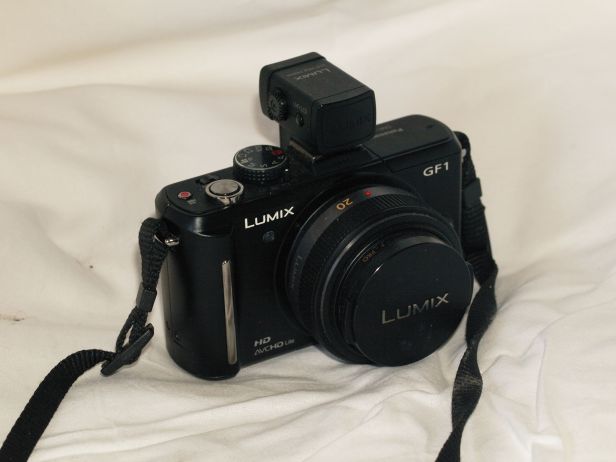

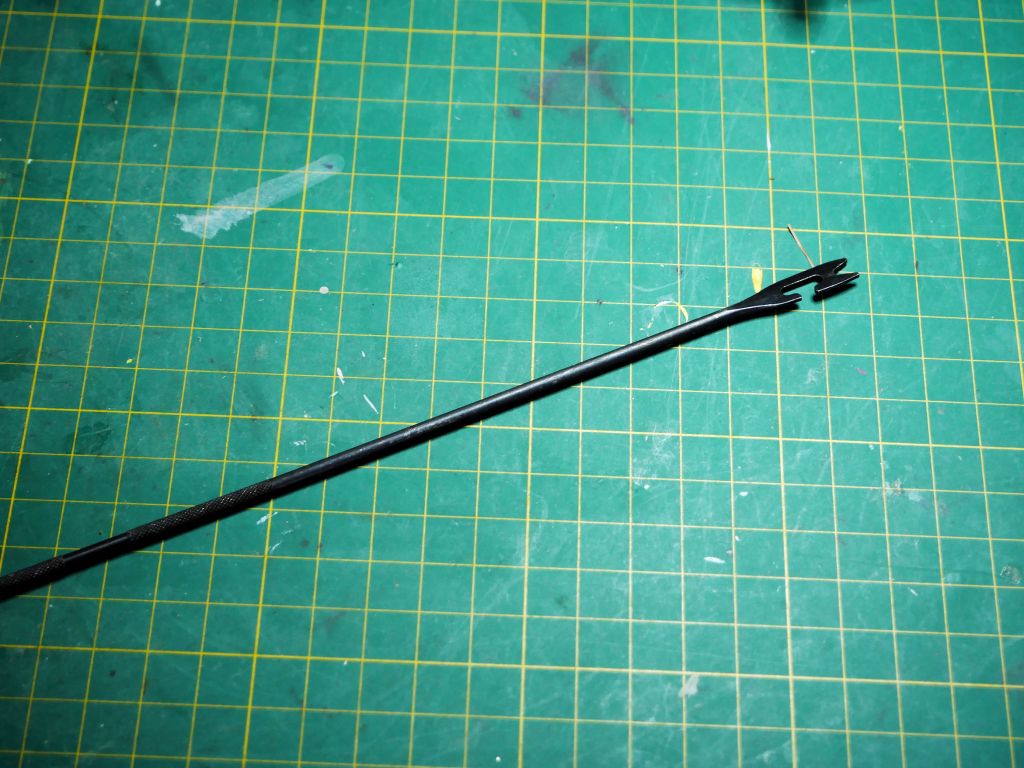
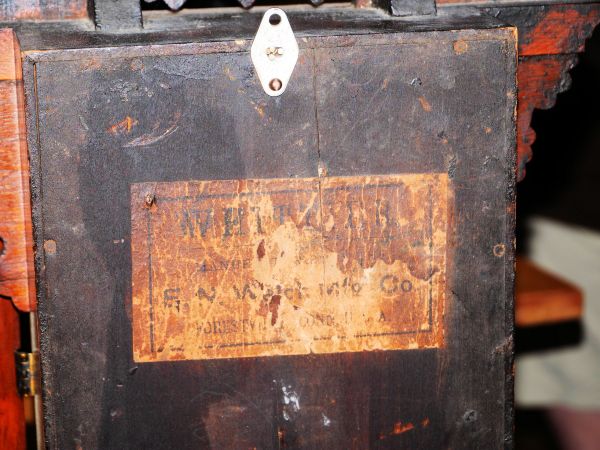
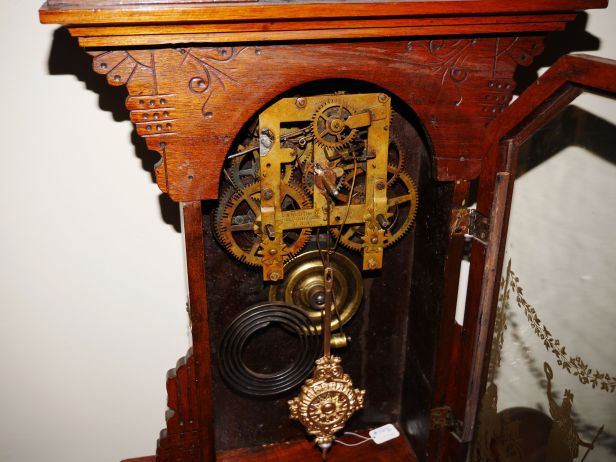
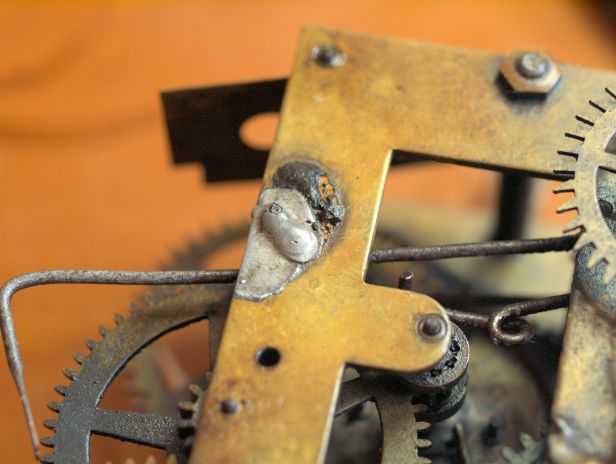
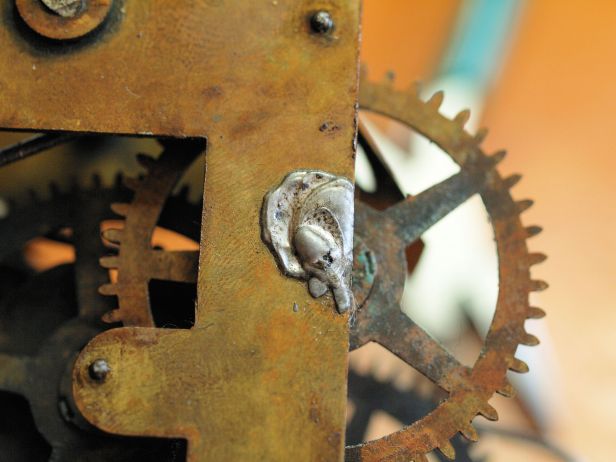

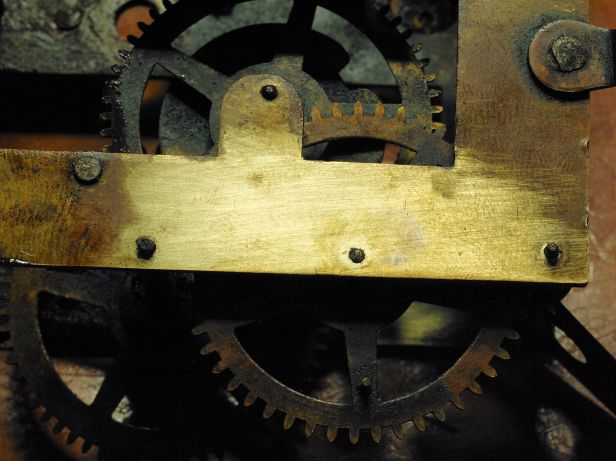


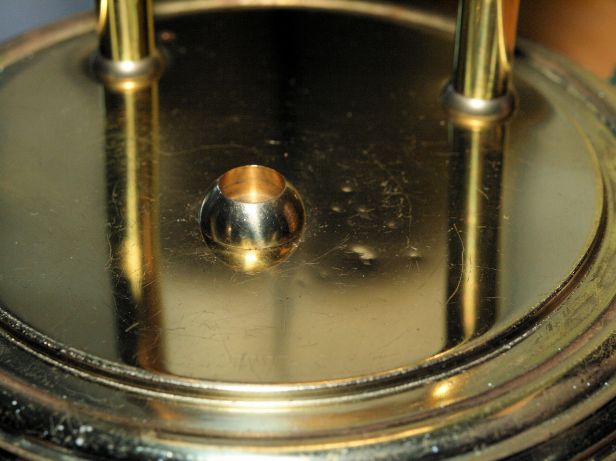
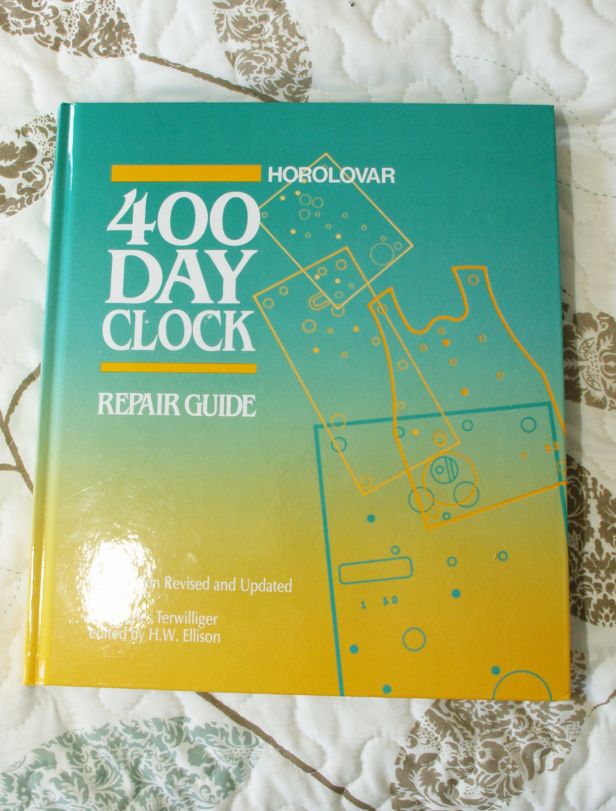
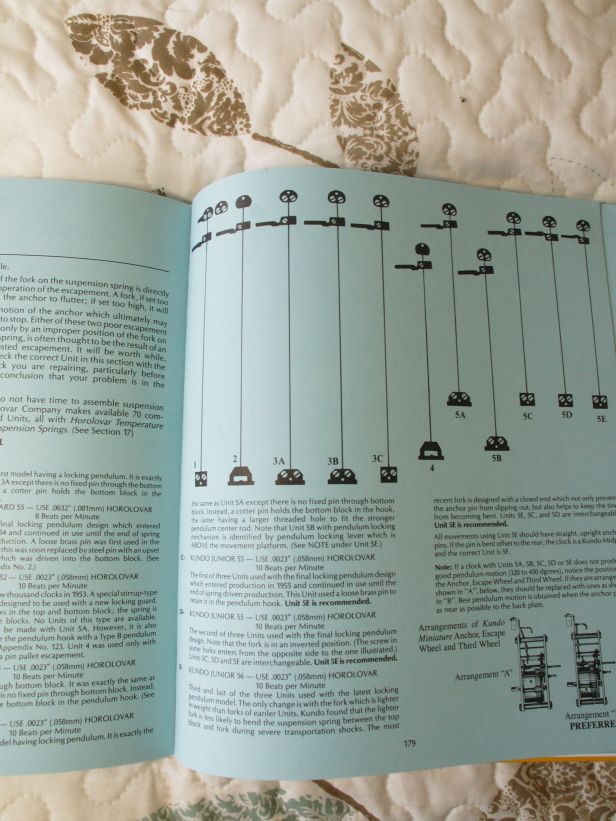
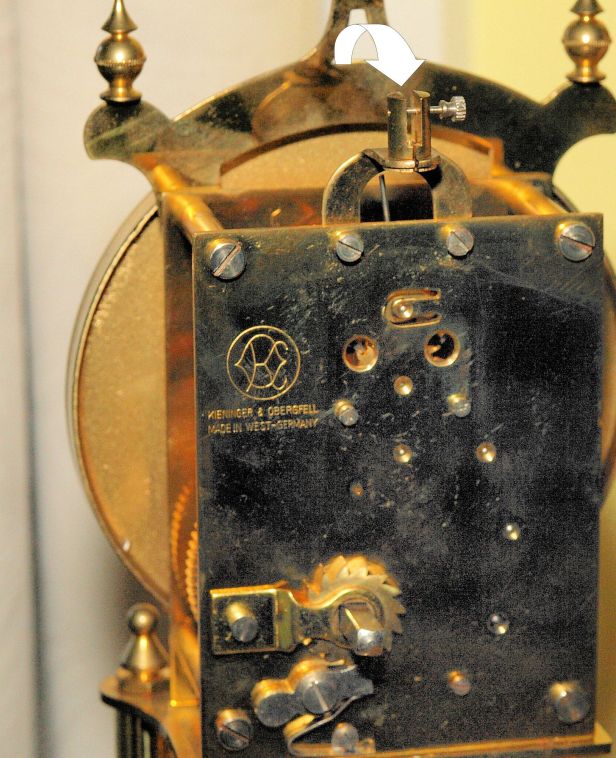
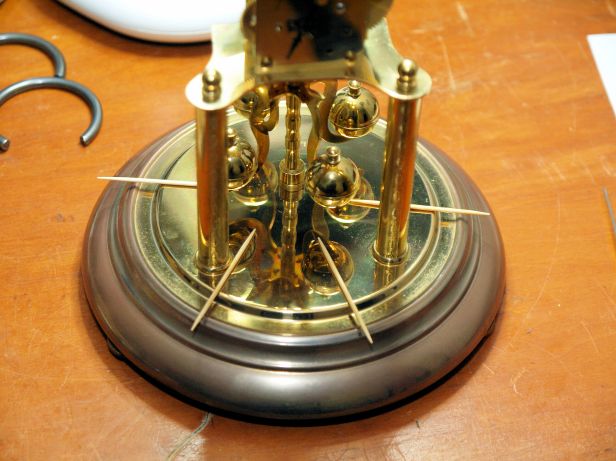
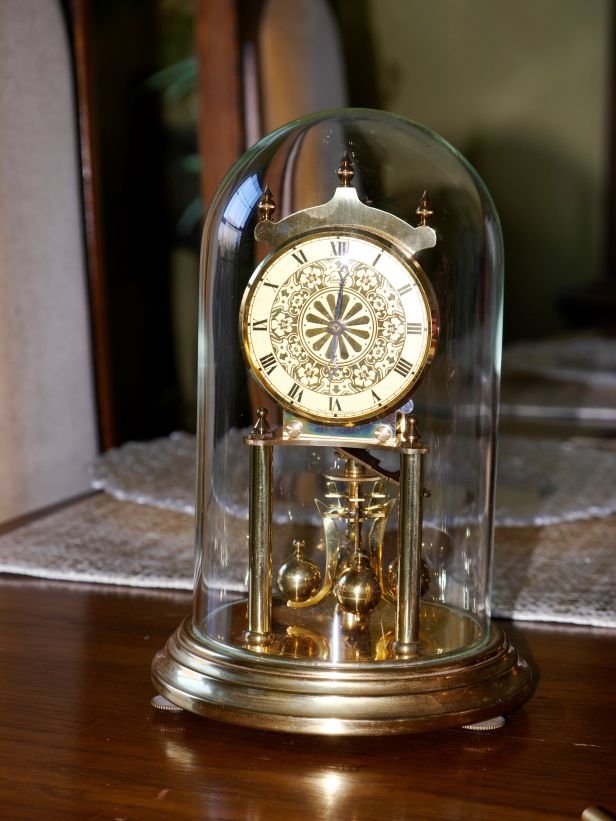

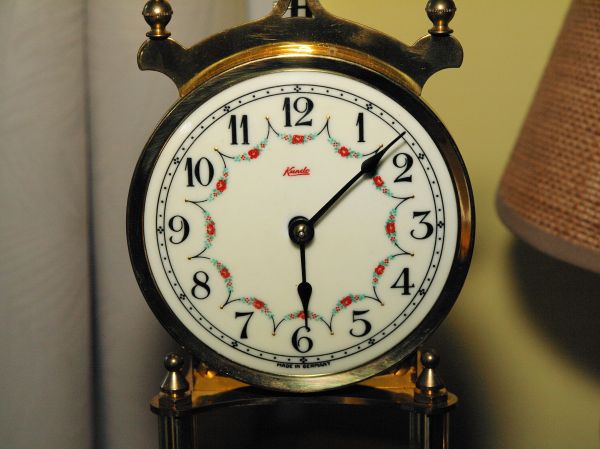


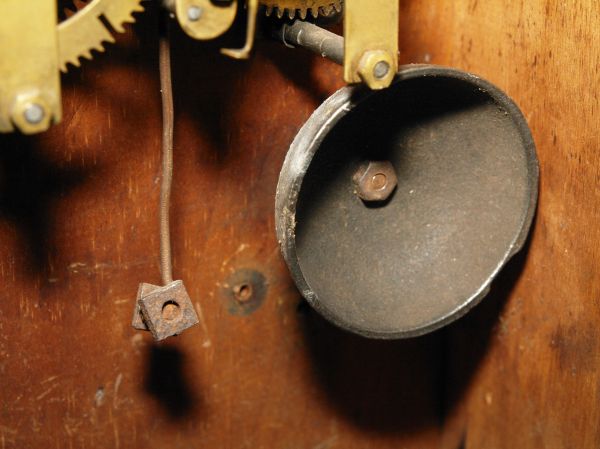

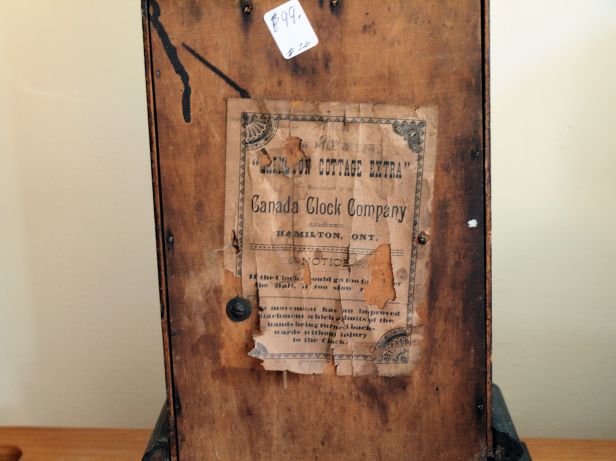
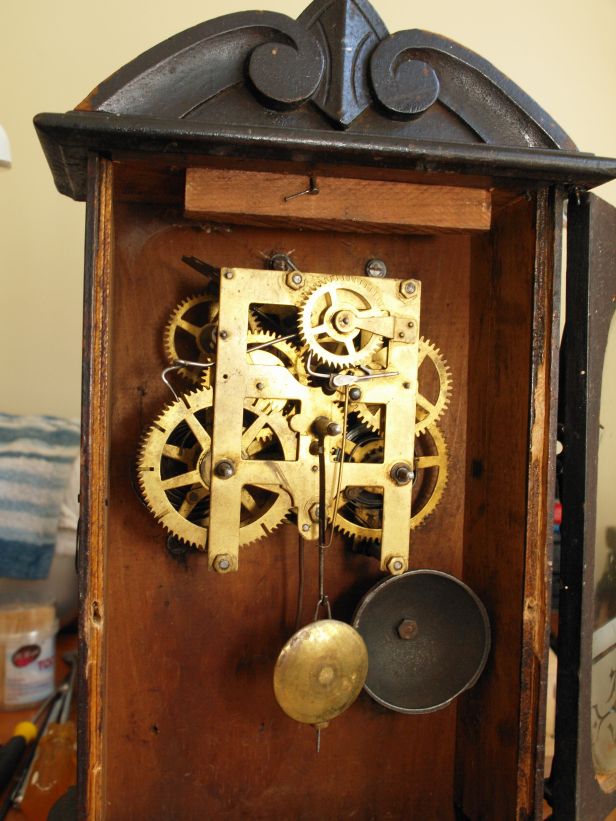
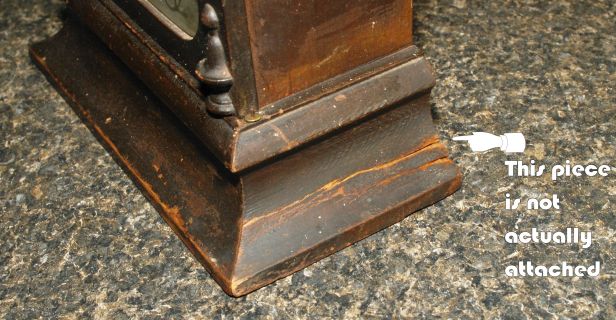
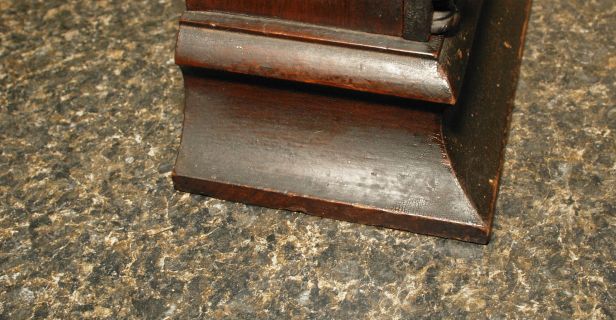
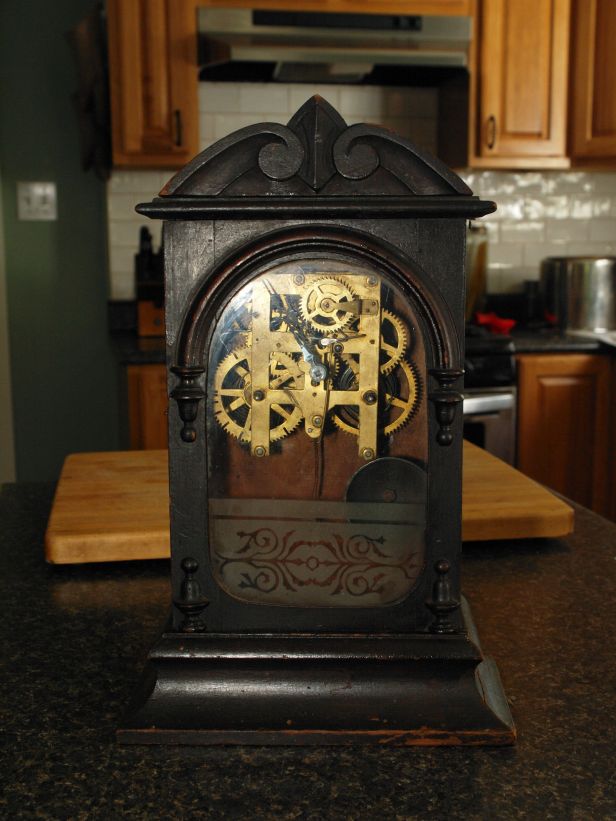
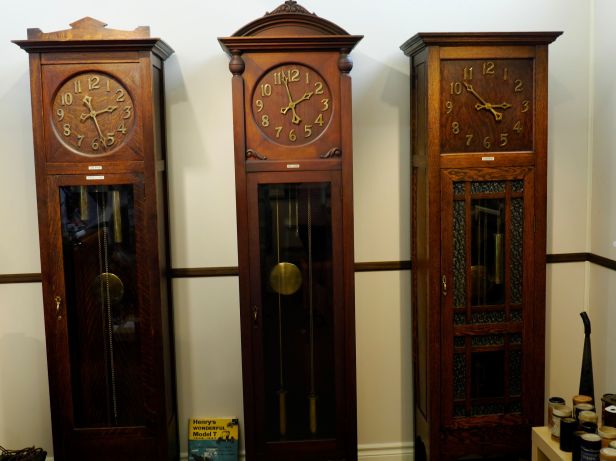
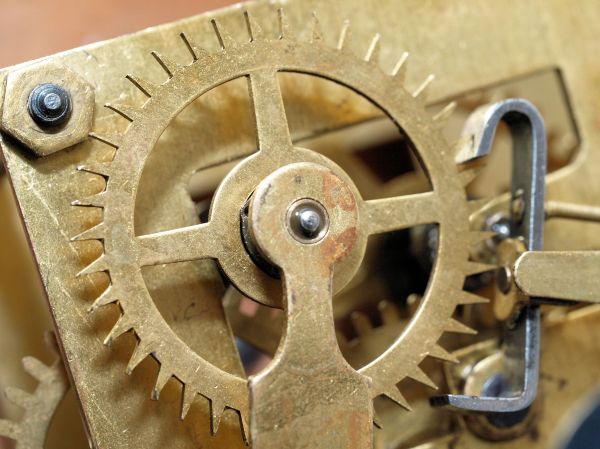


You must be logged in to post a comment.