Trouble Strikes Thrice: The Notion of Bad Luck in Threes

The belief that bad luck happens in threes is a common folk belief that suggests that if you experience one bad event or stroke of bad luck, two more are likely to follow in quick succession. While this adage is not grounded in any scientific or empirical evidence, it has persisted for years.

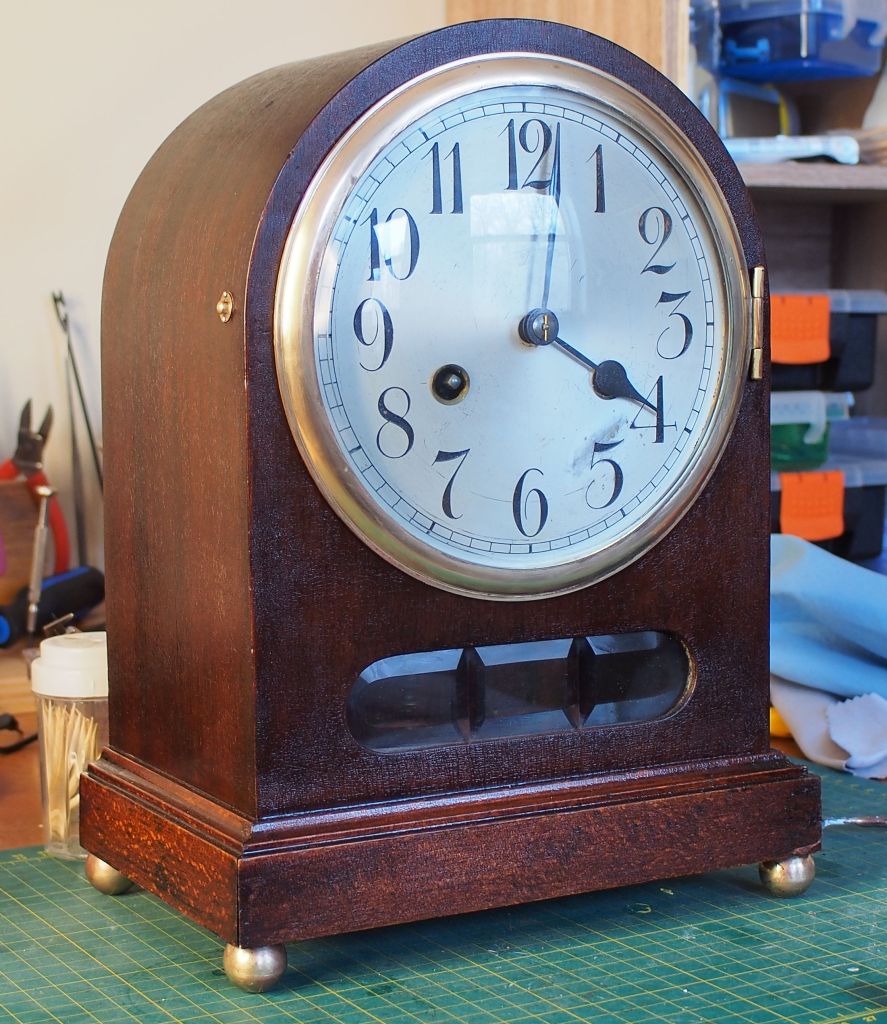
In this blog post, I will recount a series of unfortunate events I’ve experienced with one specific clock, a German-made mahogany-cased Junghans Hansruck time and strike mantel clock from the latter part of 1913.

While my bad luck didn’t unfold rapidly it seems that I was destined to have problems with this clock from the outset.

Junghans Hansruck time and strike mantel clock
Junghans Hansruck time and strike mantel clock when first received

Some time ago, I purchased the clock through an online auction. Emerging as the successful bidder, I arranged for the clock to be shipped to my location. It arrived intact and undamaged.

Setback Number One

After unpacking the clock, I immediately set out to test its functionality. I wound up both the strike side and the time side, ready to set the correct time when the minute hand unexpectedly snapped off. It wasn’t an ideal beginning, to say the least. While the minute hand was repairable, it added another layer of frustration to contend with.

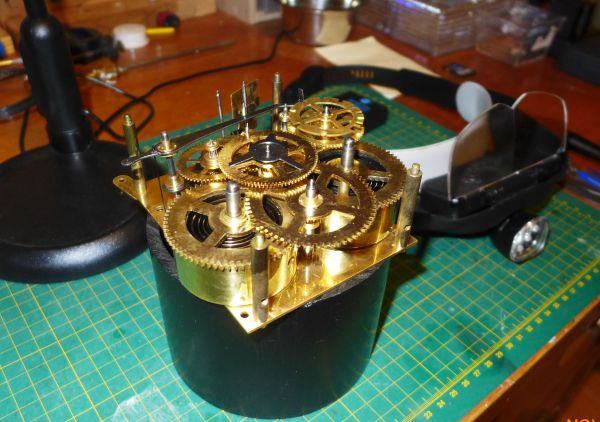
Okay, I can deal with the hand later. Back to the clock. The clock wasn’t working after all, but a good cleaning and addressing any wear issues should get it running again.

Showing the face of a Junghans mantel clock and the repaired minute hand
Soldered minute hand

I managed to solder the hand and put it aside while I addressed the movement.

Setback Number Two

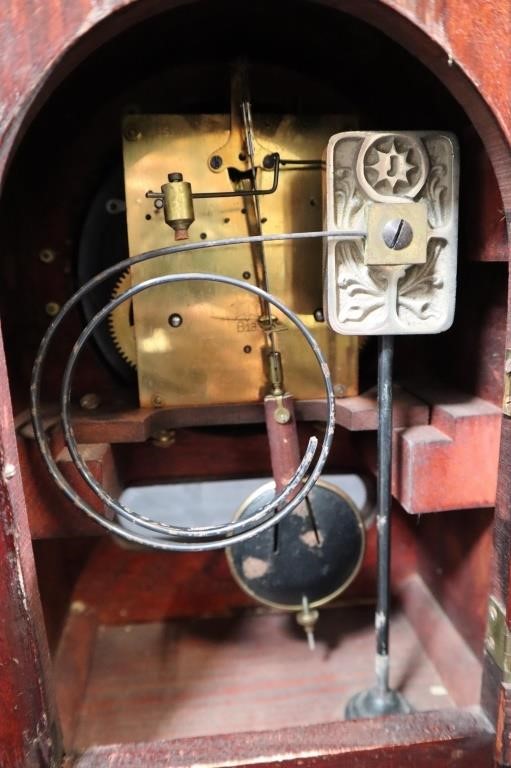
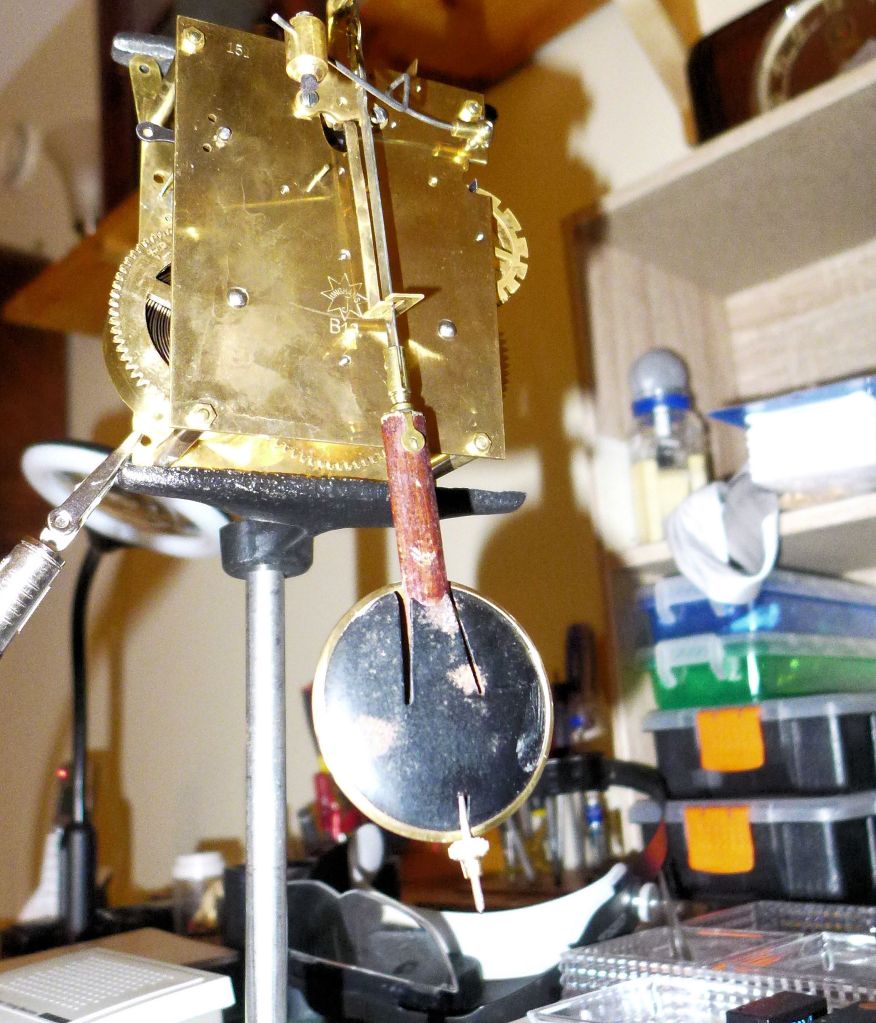
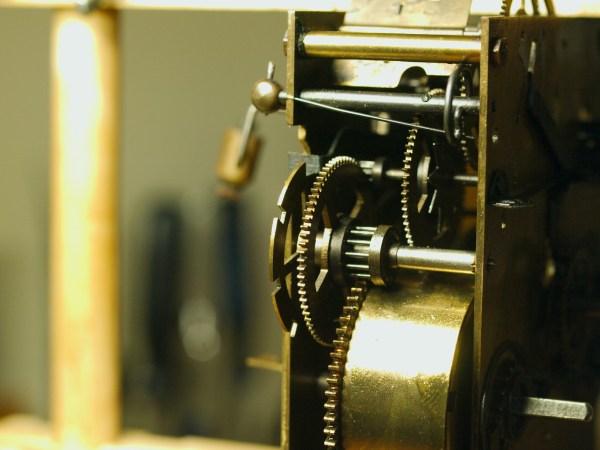
I serviced the movement, reassembled it, and placed it on the test stand. It ran smoothly for a few days on the time side, but the strike side had issues. While investigating the malfunction I identified a small stamped metal part on the movement had bent. In an attempt to straighten it, I inadvertently applied too much force, causing the piece to snap off. I’ll call the part an actuator.

The strike actuator when activated lifts a lever to begin the strike process. The actuator is attached to the front plate with a small machine screw and is free to move.

On the center arbor is a star cam. The 2 points on the star cam rotate every 30 minutes until a star point pushes the strike actuator to begin the strike sequence. A protruding piece of metal, the contact piece for the star point on the actuator, is the part that broke as I was attempting to unbend it.

Soldered piece above the centre cannon on a Junghans Hunruck movement..
Soldered actuator

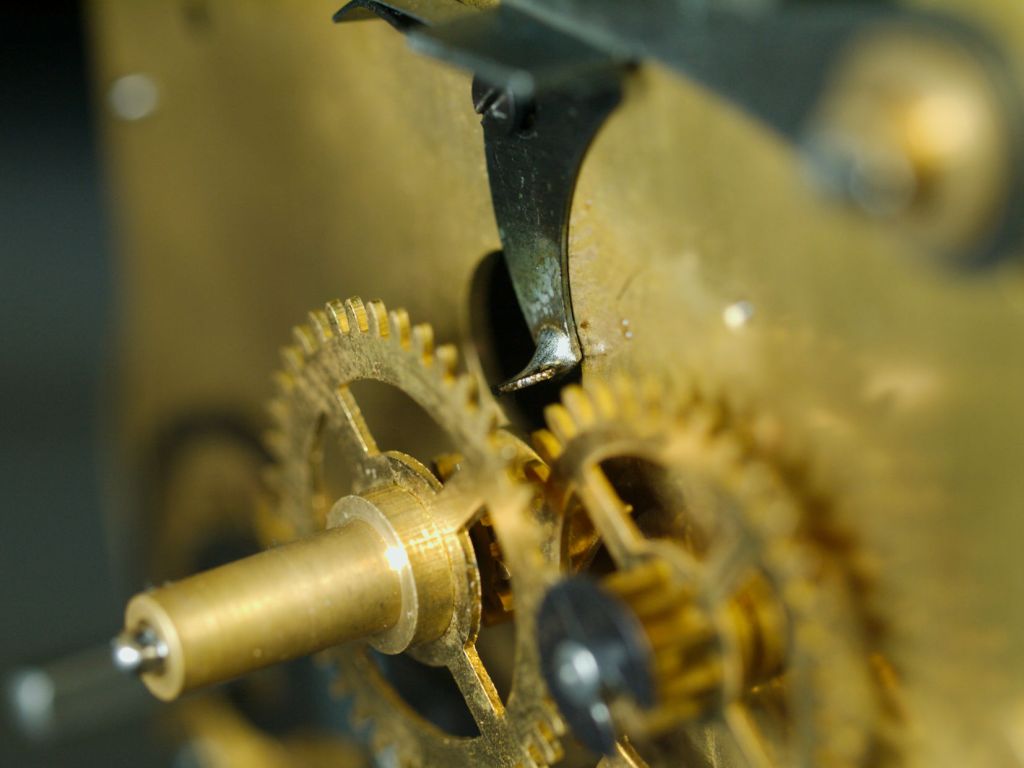
As the actuator does not apply much pressure on the lever above it, soldering should do the trick. Back to more soldering.

The actuator is repaired and the hand has been soldered. Both are functioning like new and the movement is running well on the test stand.

Setback Number Three

Satisfied that everything was working correctly after the testing phase and the movement was keeping good time I then proceeded to mount the movement into its case.

Here’s how I think the third mishap occurred.

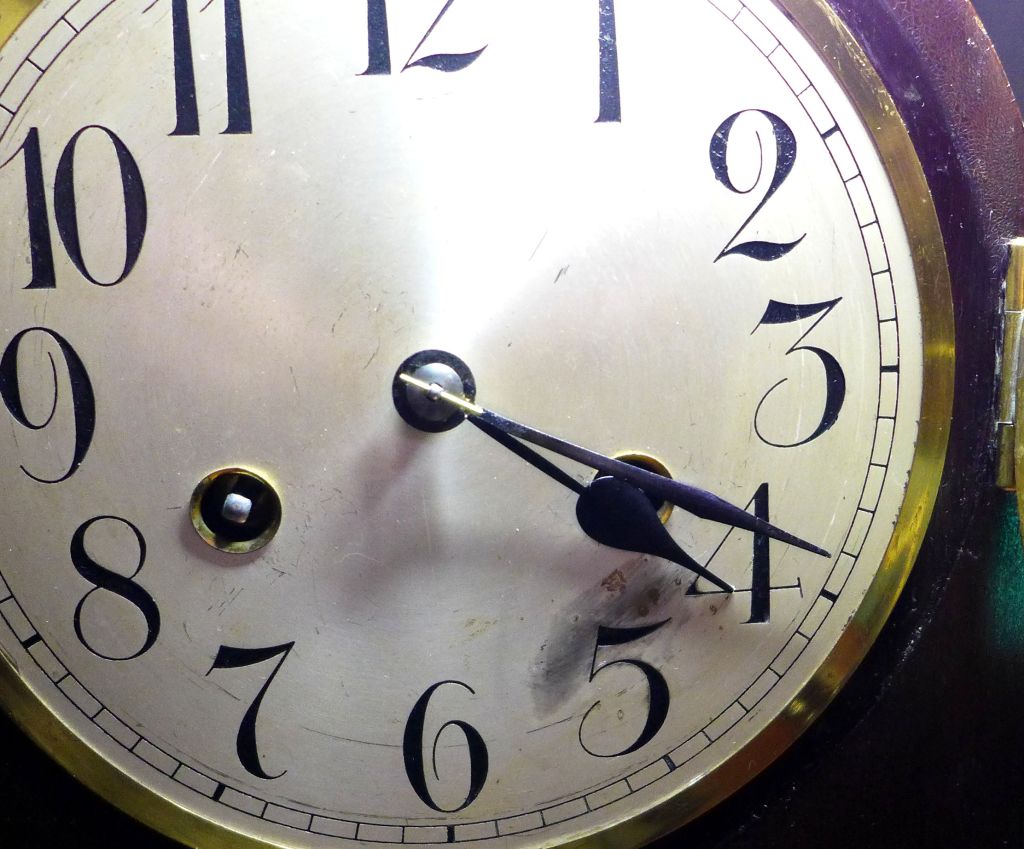
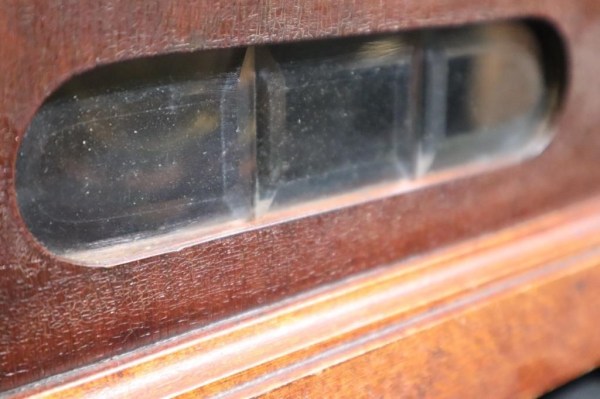
When mounting the movement into its case, I positioned the case glass side down without any padding. My attempts to secure the movement into the case might have inadvertently stressed the dial glass, leading it to break. I didn’t hear the crack, and the second possibility is that it occurred earlier, possibly getting kicked accidentally on the floor next to my desk.

The bottom line is, that the glass is now cracked, necessitating either replacing it or salvaging the dial bezel from another clock. I don’t suppose anyone has a magical resin that will hide the crack.

I thought so!

Cracked dial glass on a Junghans mantel clock
Cracked dial glass

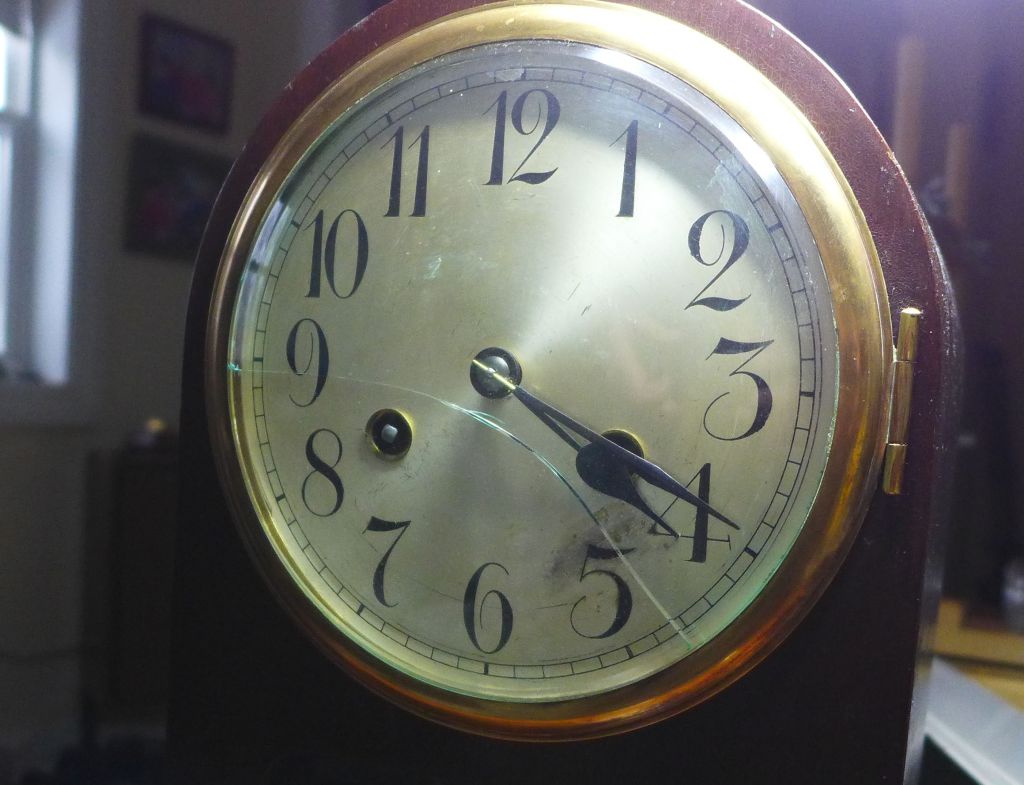
Most errors in clockwork are fixable, but a damaged dial glass is an exception—it cannot be repaired.

Cracked glass aside it is a very nice clock and it runs well.

Are setbacks a good thing?

I don’t often publish my mistakes but in the spirit of transparency and the unpredictable nature of clock restoration, it seems fitting to share this series of setbacks with my audience.

So, does bad luck happen in threes? From a statistical perspective, events occurring in threes are not more likely than any other numerical pattern but it happened.

Setbacks are a natural part of the process and should not deter anyone from passionately pursuing a hobby they love. Not every restoration or service of a clock goes according to plan and it’s normal to face unexpected issues when restoring or servicing clocks that are over 100 years old.

Yes, of course, there are lessons learned. But it just seems very strange that all of this happened to me with this one clock.

Junghans round-top mantel clock – wrapping up servicing

In the past two weeks, my focus has been directed towards the servicing of a Junghans roundtop mantel clock. This particular time and strike mantel clock is the Hunsruck model manufactured in the second half of 1913 (stamped B13 on the rear plate). For first impressions and background information about the clock itself, you can go here. For a description of mainspring servicing, you can find that article here.

Junghans Hunsruck mantel clock C.1913

During this part of the servicing process, my attention will be focused on bushing work, reassembly (with some tips), final testing, and addressing the condition of the case.

Back of movement showing strike block and pendulum

My initial assessment revealed that the movement was generally in good condition. While some previous work had been done on it, limited to a basic cleaning, no substantial repairs were evident. Nevertheless, a conspicuous buildup of dirty oil was observed in most pivot holes, underscoring the need for a good cleaning.

Avoid using a taper pin for this lever (see arrow), as it would result in the lever being excessively tight; opt for a thin wire instead

Upon closer inspection, elongated pivot holes in three locations told me that new bushings were necessary: specifically, the third wheel time side, back plate, and both the front and back plates of the star wheel. The star wheel runs off the count wheel and it is the star points that move the tail that activates the hammer to produce the strike on the half hour.

The pivot holes were carefully cleaned out using toothpicks as the first step in the cleaning process. Subsequently, I examined the pivots on each wheel by running a fingernail across them to detect any ridges or imperfections, and they appeared to be in excellent condition. I also verified the integrity of the pins in each lantern pinion. Upon confirming that I had addressed all that I could at this point, the next phase involved cleaning the components in the ultrasonic cleaner.

Once everything was out of the ultrasonic cleaner all components were thoroughly dried to remove all traces of residual moisture.

Now to address the worn pivot holes.

A centering bit ensures an accurate cut

If you are accustomed to handling traditional time-and-strike American clocks, the small pivots on these German clocks might cause some unease. The diameter of each bushing measures just 2.47mm (Bergeon bushing size), whereas conventional bushings for an American clock are often 3.47mm and larger (again, Bergeon-sized bushings).

In the above photo, I use a centering bit to ensure a precise cut into the plate so that the bushing can be seamlessly inserted.

To ensure a precise fit the newly installed bushings are reamed using a cutting broach, followed by smoothing with a broach and cleaning with a toothpick. After each new bushing is in place, the wheels are test-fitted to ensure they spin freely plus sufficient end shake.

Given the delicate nature of the pivots, handling each one requires careful attention, as a broken pivot and its repair can be a challenging and intricate task on a German clock.

After the bushings are installed the movement is reassembled. Before attaching the back plate, all wheels, and levers are positioned in their respective locations.

Wheels and levers are ready for the rear place

To avoid having to remove the back plate to make further adjustments after assembly addressing four specific items will ease the process;

  • the count lever paddle must be in one of the deep slots of the count wheel,
  • the cam lever must be on the flat section of the cam,
  • the hammer tail must be positioned between two points of the star wheel (otherwise the tail contacts a star point, and the hammer will be left in the raised position preventing further striking)
  • and the pin on the warning wheel must be in the 12 o’clock position to catch the warning lever.

In my experience, the hammer tail contacting one of the star points is the most common of annoyances and calls for parting the plates. It is worth noting that the levers on clock movements of this specific type are not adjustable so, bending a lever to fit is not possible.

Pivot locator

Utmost attention must be paid to moving the pivots carefully into their respective holes as the risk of a broken pivot is very high at this point in the process. A “pivot locator” is an indispensable tool for safely moving pivots into their holes while working on the movement.

The pendulum is placed such that it can be seen through the front glass portal

Prior to mounting on the test stand, the movement is oiled using Keystone pivot oil. As with oiling any clock, the maxim is “less is more”.

The testing phase is one of the most crucial parts of the process, providing a chance to make minor adjustments and regulate the movement. I routinely ensure that the movement goes through at least two or three operational cycles while mounted on the test stand. Once I am satisfied that the movement is running well and needs no further remediation it goes back into its case.

While the movement is being tested I generally address any issues regarding the case. Little needed to be done to this attractive oak-cased roundtop and a general cleaning with Murphy’s soap and an application of paste wax preserved its patina while sprucing up its appearance.

Servicing an antique clock not only respects its history but also keeps its mechanism working for future generations to appreciate.

Junghans round top mantel clock servicing

I first wrote about this clock in April 2023 after having won it at auction. With so many other projects on the go, I can finally allocate time to focus on servicing this captivating German time and strike mantel clock.

Auction photo

The 1915 Junghans catalog identifies the clock as the Hunsruck, named after a mountain range in Germany, and provides its specifications as 28.5 cm in height with a mahogany or oak case construction, a 14-day run time, and a silvered dial. This clock is the mahogany cased model.

Junghans Hunsruck model

The movement is a time-and-strike design that was a hallmark feature of numerous Junghans mantel clocks during that period. I have one other Junghans mantel clock with an identical 151 movement.

Junghans Corner feet finished
Junghans Sydney with the 151 movement

The Junghans trademark is boldly showcased on the gong block and inscribed on the back of the movement. On the back plate, it is stamped B13 which denotes the movement as having been manufactured in the latter part of 1913.

Removing the movement from the case is relatively straightforward. The movement, which rests on a wooden support board is held in place by two rather large 1 1/8 inch wood screws. After taking the movement out of the case, two brass thumbscrews are removed to release the seat board.

Assessment

Upon my initial assessment, it appears that the movement is in decent condition, overall. However, there is a noticeable accumulation of dirty oil in the majority of pivot holes, indicating a thorough cleaning is necessary.

Junghans movement with the back plate removed

Upon closer inspection, elongated pivot holes in three locations tell me that new bushings need to be installed: specifically, on the third wheel time side, back plate, and both the front and back plates of the star wheel. The star wheel runs off the count wheel and it is the star points that activate the hammer for the strike.

I use toothpicks to carefully clean out the pivot holes before immersing the plates in the ultrasonic cleaner as part of my standard practice. With a soft cloth, I clean and inspect the pivots on each wheel using a fingernail across the pivot to check for ridges and imperfections. I then check the integrity of the pins in each of the lantern pinions. Once satisfied that the inspection is complete the next step is cleaning the parts in my ultrasonic cleaner.

I will pause here and resume next week with the continuation of servicing the Junghans type 151 clock movement, including details about the necessary bushing work. Additionally, I will provide insights into the case’s condition. Stay tuned for the conclusion!

Junghans Hunsruck roundtop mantel clock – refreshing the case

Junghans, a renowned manufacturer of high-end wristwatches today, acknowledges their significant role in the clock industry by providing access to their catalogs to anyone interested in researching their clock production since the company’s establishment in the 1880s.

This demonstrates the company’s commitment to preserving the history and legacy of their brand and allowing collectors and enthusiasts to gain valuable insights into the evolution of their clock-making techniques and designs over time.

Auction photo

The 1915 Junghans catalog identifies this clock as the Hunsruck, named after a mountain range in Germany, and provides its specifications as 28.5 cm in height with a mahogany or oak case construction, a 14-day run time, and a silvered dial.

While I haven’t yet had the opportunity to service the clock’s movement, I have focused my attention on refreshing the clock’s case, which is the main topic of this post.

This particular clock was originally offered in both oak and mahogany versions, and the one in my possession is the mahogany variant.

A comment on the finish

Despite my expectations that the finish would be consistent throughout the entire case, I have noticed a noticeable tonal variation between the base and the top, sides, and front of the clock. This observation leads me to suspect that the base may be crafted from a different type of wood than the rest of the clock.

We will have to wait and see if any measures taken will have an impact on the tonal difference between the base and the rest of the clock.

All brass is polished and after one coat of stain is applied

Work begins on the case

I began by giving the case a thorough cleaning using Murphy’s soap. Following the cleaning, I applied a light coat of Mahogany stain from a company called Minwax, being cautious not to leave it on for more than the recommended 10-minute period to ensure the stain penetrated the wood correctly. After 10 minutes, I wiped off any remaining residue and gave it an additional wipe at the four-hour drying point.

After the initial staining, I observed that the base of the clock still had a tonal difference compared to the rest of the case.

Through previous experience, I’ve learned not to overdo the staining process, and often, one coat is more than sufficient. Despite this, I opted to apply a second coat of stain to the base only, intending to stop there, even if the tonal difference was still present. As a result there remained a subtle variation in the finish, perhaps only discernible to me. Nevertheless, I was very satisfied with the performance of the stain as it effectively concealed the scratches and nicks on the case.

For the final stage of the case restoration, my original plan was to use a product called Wipe-On Poly by Minwax but using a modern finish for restoring antique clock cases is not a conventional practice.

After careful consideration, I opted for a less intrusive approach by utilizing a finishing paste wax specifically designed for dark finishes, also made by Minwax (and no, I don’t have shares in the company). Clock cases were typically dusted, waxed, and polished during their time as part of routine housekeeping.

After one coat of finishing paste wax

As always, my goal is not to restore the clock case to its original factory finish but rather to conceal any imperfections caused by wear and tear on the wood surfaces in order to enhance its overall appearance. The light refinishing effectively achieved the desired outcome.

The brass

To clean the dial, side door button, and ball feet, I used a cleaning and polishing product called Brasso. I was pleasantly surprised by the results since I had anticipated that removing years of accumulated dirt and grime would be a significant challenge. However, the Brasso worked remarkably well in restoring the brass clock case features to their former shine. I removed the ball feet by unscrewing them so that I could polish every part of them thoroughly.

The dial

Despite efforts to remove the blemish between the numbers four and five with Murphy’s Soap, which was clearly visible in the auction photo above, it was found to be impossible to eliminate completely. However, it is now slightly less noticeable. I initially assumed that it was dirt, but upon closer inspection, it turned out to be some sort of abrasion.

In sum

Restoring an antique clock case can be a delicate and challenging process that requires patience and attention to detail. By using a combination of cleaning and staining products, as well as conventional finishes it’s possible to bring new life to a piece that may have been neglected or damaged over time.

While it may not always be possible to eliminate every imperfection entirely, taking the time to restore a clock case to a semblance of its former glory can be a rewarding experience for both the restorer and the future owner of the piece. Ultimately, the care and effort put into restoring an antique clock case can help preserve its history and ensure that it remains to be enjoyed for generations to come.

Website Powered by WordPress.com.

Up ↑